OpenAI’s Whisper is a new state-of-the-art (SotA) model in speech-to-text. It is able to almost flawlessly transcribe speech across dozens of languages and even handle poor audio quality or excessive background noise.
The domain of spoken word has always been somewhat out of reach for ML use-cases. Whisper changes that for speech-centric use cases. We will demonstrate the power of Whisper alongside other technologies like transformers and vector search by building a new and improved YouTube search.
Search on YouTube is good but has its limitations, especially when it comes to answering questions. With trillions of hours of content, there should be an answer to almost every question. Yet, if we have a specific question like “what is OpenAI’s CLIP?", instead of a concise answer we get lots of very long videos that we must watch through.
What if all we want is a short 20-second explanation? The current YouTube search has no solution for this. Maybe there’s a good reason to encourage users to watch as much of a video as possible (more ads, anyone?).
Whisper is the solution to this problem and many others involving the spoken word. In this article, we’ll explore the idea behind a better speech-enabled search.
The Idea
We want to get specific timestamps that answer our search queries. YouTube does support time-specific links in videos, so a more precise search with these links should be possible.
To build something like this, we first need to transcribe the audio in our videos to text. YouTube automatically captions every video, and the captions are okay — but OpenAI just open-sourced something called “Whisper”.
Whisper is best described as the GPT-3 or DALL-E 2 of speech-to-text. It’s open source and can transcribe audio in real-time or faster with unparalleled performance. That seems like the most exciting option.
Once we have our transcribed text and the timestamps for each text snippet, we can move on to the question-answering (QA) part. QA is a form of search where given a natural language query like “what is OpenAI’s Whisper?" we can return accurate natural language answers.
We can think of QA as the most intuitive form of searching for information because it is how we ask other people for information. The only difference being we type the question into a search bar rather than verbally communicate it — for now.
How does all of this look?
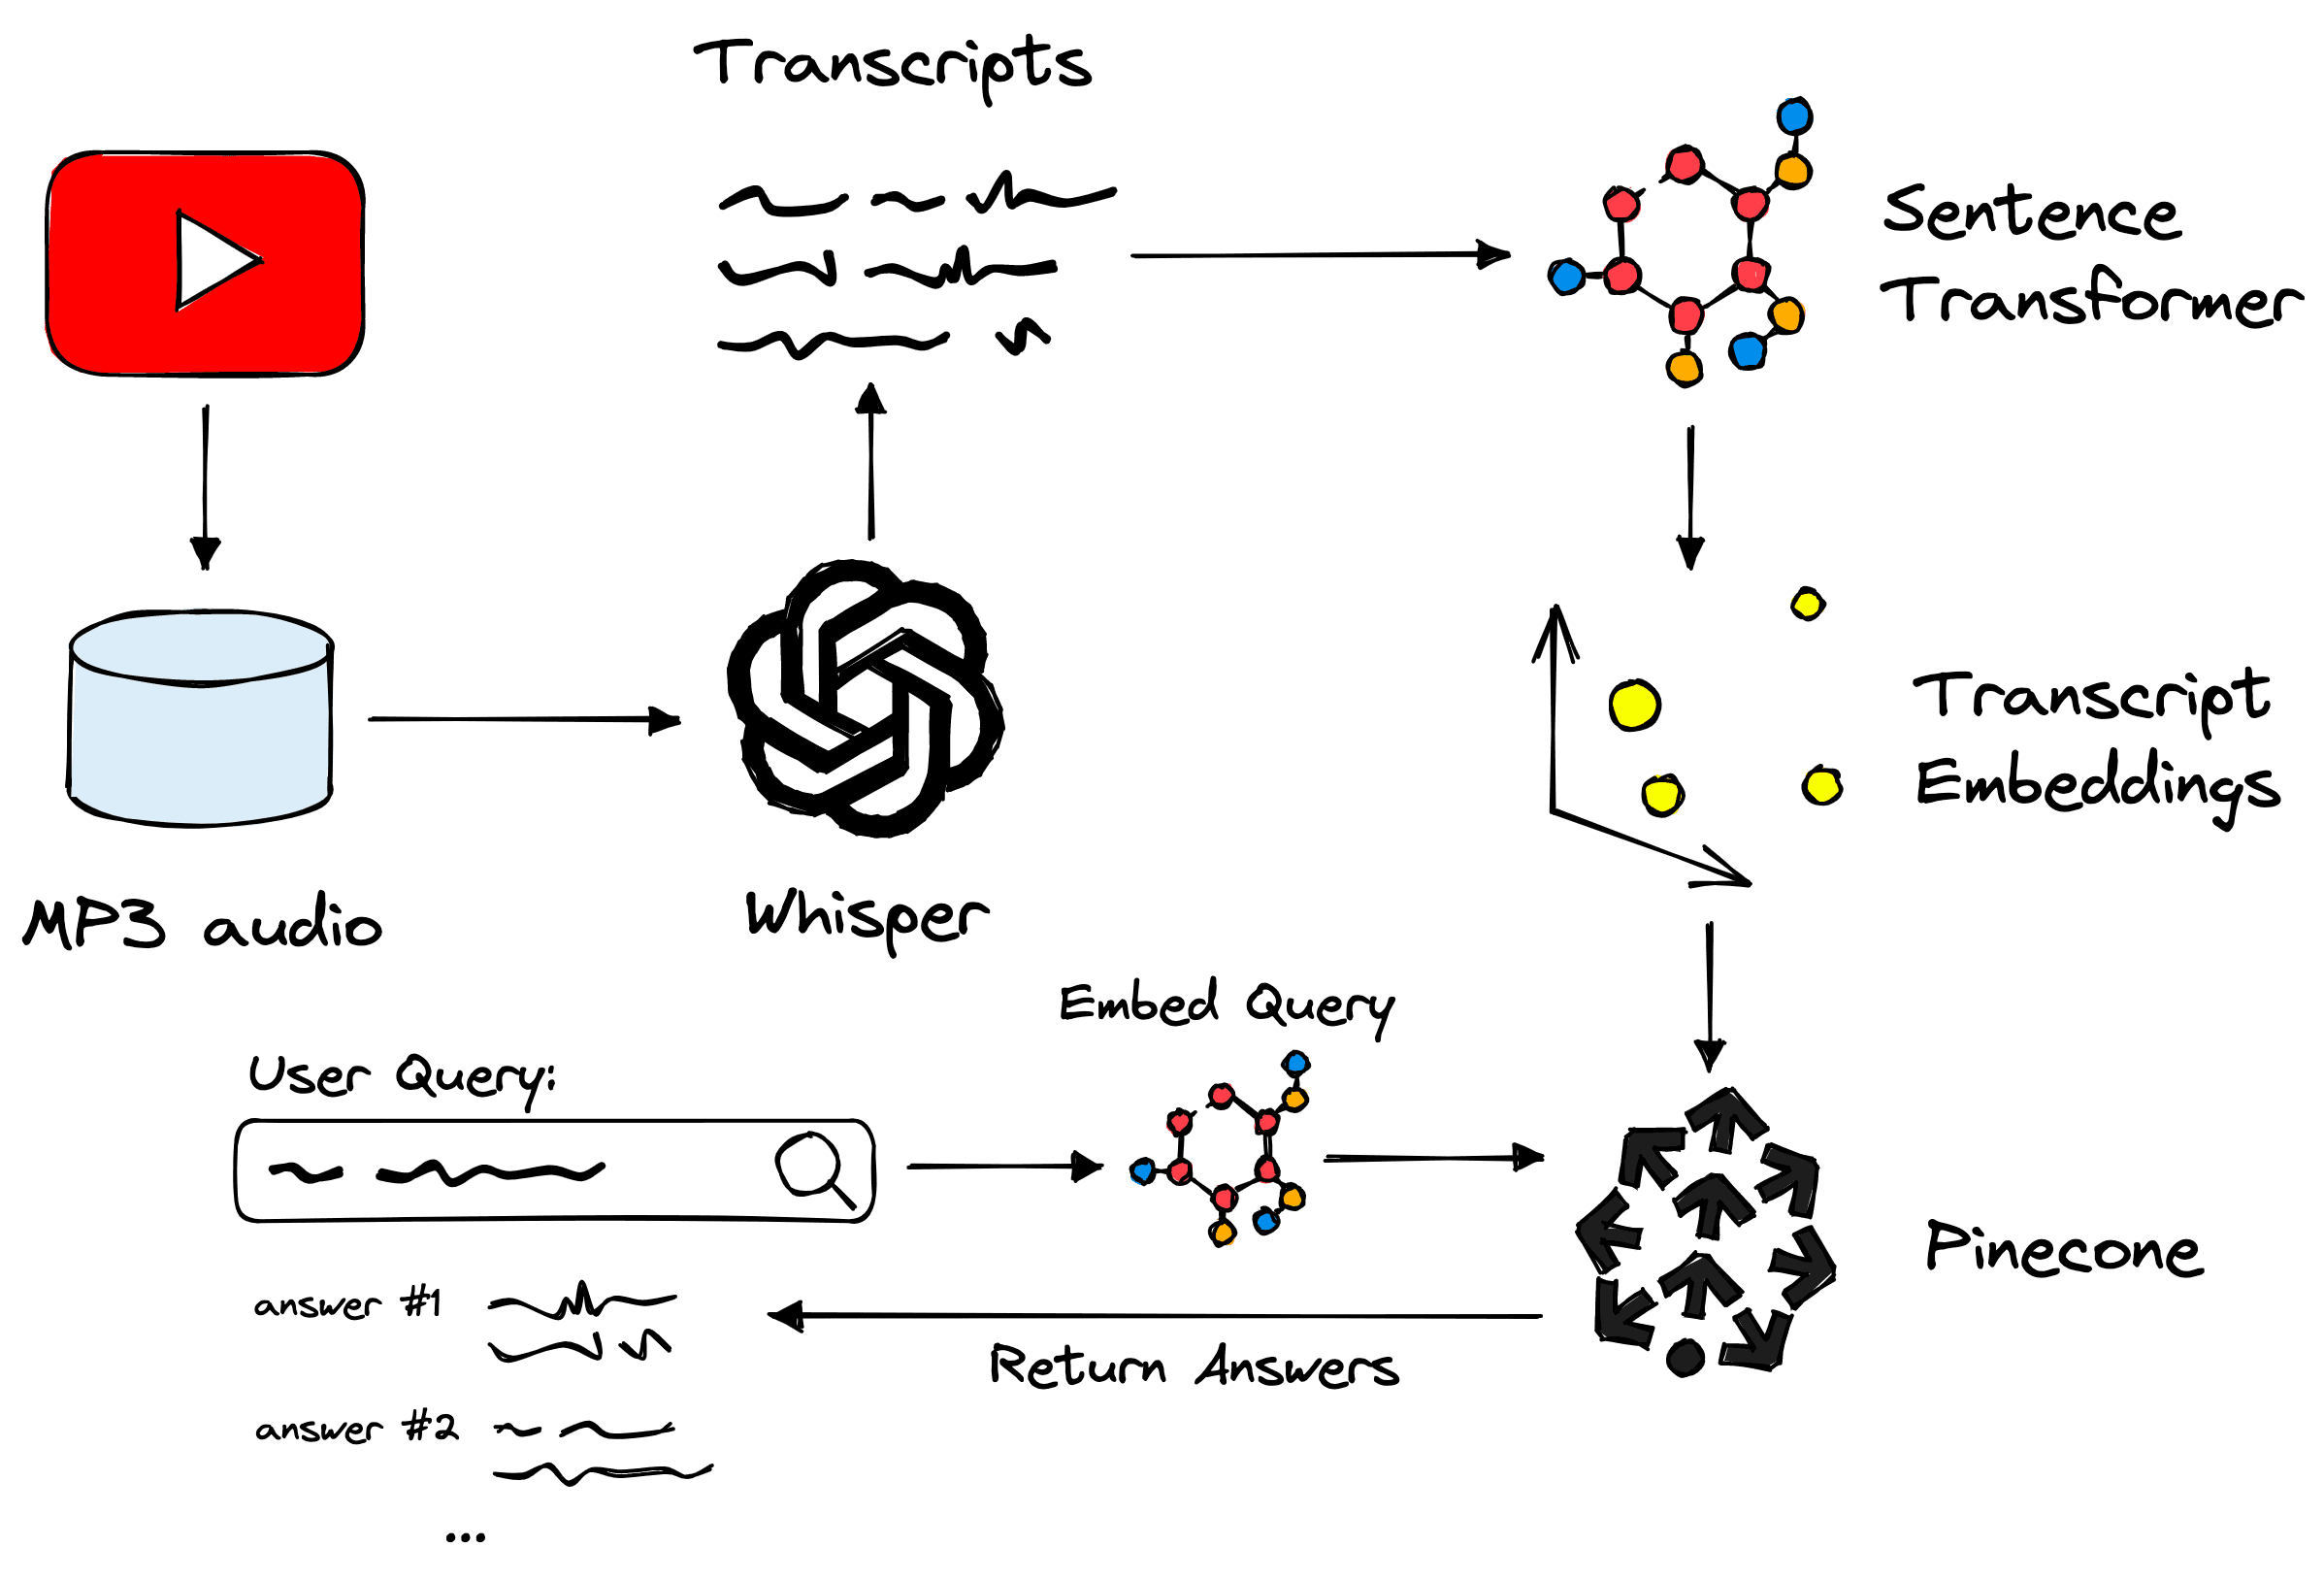
Now let’s color in the details and walk through the steps.
Video Data
The first step is to download our YouTube video data and extract the audio attached to each video. Fortunately, there’s a Python library for exactly that called pytube.
With pytube, we provide a video ID (found in the URL bar or downloadable if you have a channel). I directly downloaded a summary of channel content, including IDs, titles, publication dates, etc., via YouTube. This same data is available via Hugging Face Datasets in a dataset called jamescalam/channel-metadata.
from datasets import load_dataset

meta = load_dataset(
    "jamescalam/channel-metadata",
    split="train",
    revision="9614cf8"
)
metaDataset({
features: ['Video ID', 'Channel ID', 'Title', 'Time Created', 'Time Published', 'Duration', 'Description', 'Category', 'Like Count', 'Dislike Count'],
num_rows: 222
})We’re most interested in the Title and Video ID fields. With the video ID, we can begin downloading the videos and saving the audio files with pytube.
from pytube import YouTube  # !pip install pytube
from pytube.exceptions import RegexMatchError
from tqdm.auto import tqdm  # !pip install tqdm

# where to save
save_path = "./mp3"

for i, row in tqdm(videos_meta):
    # url of video to be downloaded
    url = f"https://youtu.be/{row['Video ID']}"

    # try to create a YouTube vid object
    try:
        yt = YouTube(url)
    except RegexMatchError:
        print(f"RegexMatchError for '{url}'")
        continue

    itag = None
    # we only want audio files
    files = yt.streams.filter(only_audio=True)
    for file in files:
        # from audio files we grab the first audio for mp4 (eg mp3)
        if file.mime_type == 'audio/mp4':
            itag = file.itag
            break
    if itag is None:
        # just incase no MP3 audio is found (shouldn't happen)
        print("NO MP3 AUDIO FOUND")
        continue

    # get the correct mp3 'stream'
    stream = yt.streams.get_by_itag(itag)
    # downloading the audio
    stream.download(
        output_path=save_path,
        filename=f"{row['Video ID']}.mp3"
    )
After this, we should find ~108 audio MP3 files stored in the ./mp3 directory.
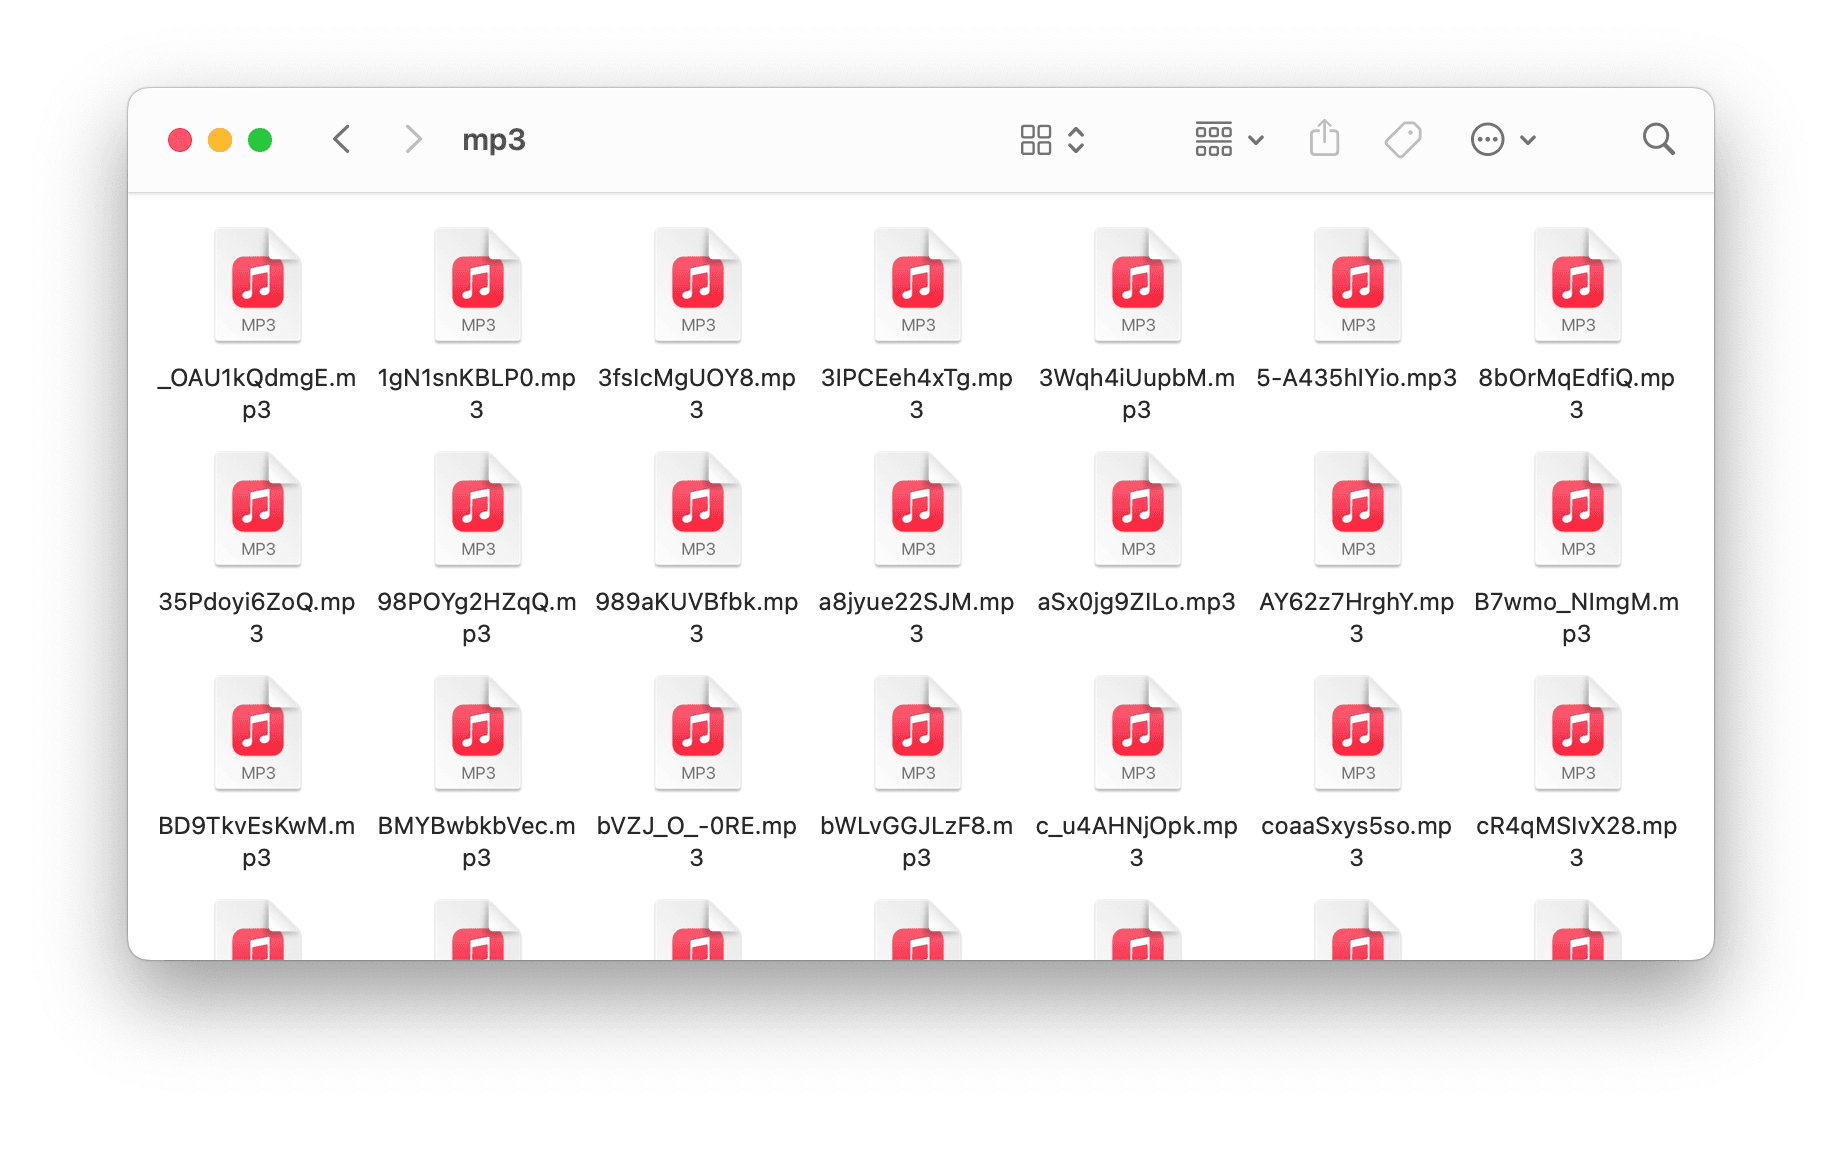
With these, we can move on to transcription with OpenAI’s Whisper.
Speech-to-Text with Whisper
OpenAI’s Whisper speech-to-text-model is completely open source and available via OpenAI’s Whisper library available for pip install via GitHub:
!pip install git+https://github.com/openai/whisper.git
Whisper relies on another software called FFMPEG to convert video and audio files. The installation for this varies by OS [1]; the following cover the primary systems:
# on Ubuntu or Debian sudo apt update && sudo apt install ffmpeg # on Arch Linux sudo pacman -S ffmpeg # on MacOS using Homebrew (https://brew.sh/) brew install ffmpeg # on Windows using Chocolatey (https://chocolatey.org/) choco install ffmpeg # on Windows using Scoop (https://scoop.sh/) scoop install ffmpeg
After installation, we download and initialize the large model, moving it to GPU if CUDA is available.
import whisper
import torch  # install steps: pytorch.org

device = "cuda" if torch.cuda.is_available() else "cpu"

model = whisper.load_model("large").to(device)
Other models are available, and given a smaller GPU (or even CPU) should be considered. We transcribe the audio like so:
from pathlib import Path

# get list of MP3 audio files
paths = [str(x) for x in Path('./mp3').glob('*.mp3')]
print(len(paths))
print(paths[:5])108
['mp3/35Pdoyi6ZoQ.mp3', 'mp3/B7wmo_NImgM.mp3', 'mp3/x1lAcT3xl5M.mp3', 'mp3/r-zQQ16wTCA.mp3', 'mp3/DFtP1THE8fE.mp3']
# we get the IDs like so
paths[0].split('/')[-1][:-4]'35Pdoyi6ZoQ'data = []
for i, path in enumerate(tqdm(paths)):
_id = path.split('/')[-1][:-4]
# transcribe to get speech-to-text data
result = model.transcribe(path)
# add results to data list
data.extend(result['segments'])
break # this is just part of the loop used as example
From this, we have a list of ~27K transcribed audio segments, including text alongside start and end seconds. If you are waiting a long time for this to process, a pre-built version of the dataset is available. Download instructions are in the following section.
The last cell from above is missing the logic required to extract and add the metadata from our videos_dict that we initialized earlier. We add that like so:
data = []

for i, path in enumerate(tqdm(paths)):
    _id = path.split('/')[-1][:-4]
    # transcribe to get speech-to-text data
    result = model.transcribe(path)
    segments = result['segments']
    # get the video metadata...
    video_meta = videos_dict[_id]
    for segment in segments:
        # merge segments data and videos_meta data
        meta = {
            **video_meta,
            **{
                "id": f"{_id}-t{segments[j]['start']}",
                "text": segment["text"].strip(),
                "start": segment['start'],
                "end": segment['end']
            }
        }
        data.append(meta)
After processing all of the segments, they are saved to file as a JSON lines file with:
import json

with open("youtube-transcriptions.jsonl", "w", encoding="utf-8") as fp:
    for line in tqdm(data):
        json.dump(line, fp)
        fp.write('\n')
With that ready, let’s build the QA embeddings and vector search component.
Question-Answering
On Hugging Face Datasets, you can find the data I scraped in a dataset called jamescalam/youtube-transcriptions:
from datasets import load_dataset  # !pip install datasets

data = load_dataset(
    "jamescalam/youtube-transcriptions",
    split="train",
    revision="8dca835"
)
dataDataset({
features: ['title', 'visibility', 'published', 'url', 'id', 'text', 'start', 'end'],
num_rows: 27214
})For now, the dataset only contains videos from my personal channel, but I will add more videos from other ML-focused channels in the future.
The data includes a short chunk of text (the transcribed audio). Each chunk is relatively meaningless:
data[0]{'title': 'Training and Testing an Italian BERT - Transformers From Scratch #4',
'visibility': 'Public',
'published': '2021-07-06 13:00:03 UTC',
'url': 'https://youtu.be/35Pdoyi6ZoQ',
'id': '35Pdoyi6ZoQ-t0.0',
'text': 'Hi, welcome to the video.',
'start': 0.0,
'end': 9.36}data[1]{'title': 'Training and Testing an Italian BERT - Transformers From Scratch #4',
'visibility': 'Public',
'published': '2021-07-06 13:00:03 UTC',
'url': 'https://youtu.be/35Pdoyi6ZoQ',
'id': '35Pdoyi6ZoQ-t3.0',
'text': 'So this is the fourth video in a Transformers',
'start': 3.0,
'end': 11.56}data[2]{'title': 'Training and Testing an Italian BERT - Transformers From Scratch #4',
'visibility': 'Public',
'published': '2021-07-06 13:00:03 UTC',
'url': 'https://youtu.be/35Pdoyi6ZoQ',
'id': '35Pdoyi6ZoQ-t9.36',
'text': 'from Scratch mini series.',
'start': 9.36,
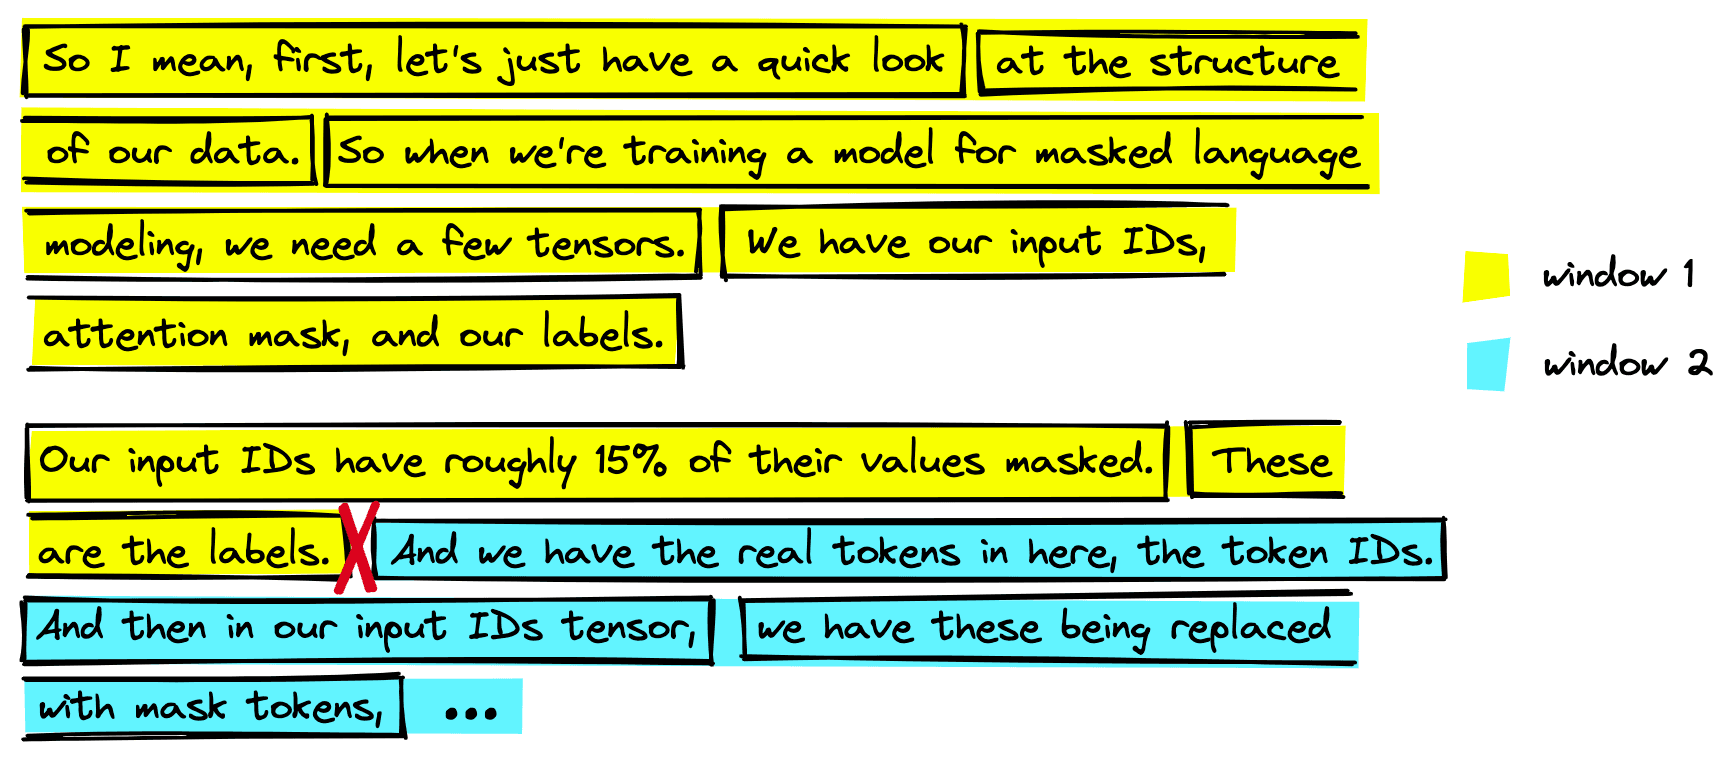
'end': 15.84}Ideally, we want chunks of text 4-6x larger than this to capture enough meaning to be helpful. We do this by simply iterating over the dataset and merging every six segments.
from tqdm.auto import tqdm

new_data = []

window = 6  # number of sentences to combine
stride = 3  # number of sentences to 'stride' over, used to create overlap

for i in tqdm(range(0, len(data), stride)):
    i_end = min(len(data)-1, i+window)
    if data[i]['title'] != data[i_end]['title']:
        # in this case we skip this entry as we have start/end of two videos
        continue
    text = ' '.join(data[i:i_end]['text'])
    new_data.append({
        'start': data[i]['start'],
        'end': data[i_end]['end'],
        'title': data[i]['title'],
        'text': text,
        'id': data[i]['id'],
        'url': data[i]['url'],
        'published': data[i]['published']
})100%|██████████| 9072/9072 [00:07<00:00, 1156.11it/s]
new_data[0]{'start': 0.0,
'end': 25.76,
'title': 'Training and Testing an Italian BERT - Transformers From Scratch #4',
'text': "Hi, welcome to the video. So this is the fourth video in a Transformers from Scratch mini series. So if you haven't been following along, we've essentially covered what you can see on the screen. So we got some data.",
'id': '35Pdoyi6ZoQ-t0.0',
'url': 'https://youtu.be/35Pdoyi6ZoQ',
'published': '2021-07-06 13:00:03 UTC'}new_data[100]{'start': 981.4,
'end': 1009.52,
'title': 'Training and Testing an Italian BERT - Transformers From Scratch #4',
'text': "Now, it has taken a long time. It's a few days later. And I made a few changes during training as well. So this definitely wasn't the cleanest training process, because I was kind of updating parameters as it was going along. So initially, well, first, we've trained",
'id': '35Pdoyi6ZoQ-t981.4',
'url': 'https://youtu.be/35Pdoyi6ZoQ',
'published': '2021-07-06 13:00:03 UTC'}A few things are happening here. First, we’re merging every six segments, as explained before. However, doing this alone will likely cut a lot of meaning between related segments.
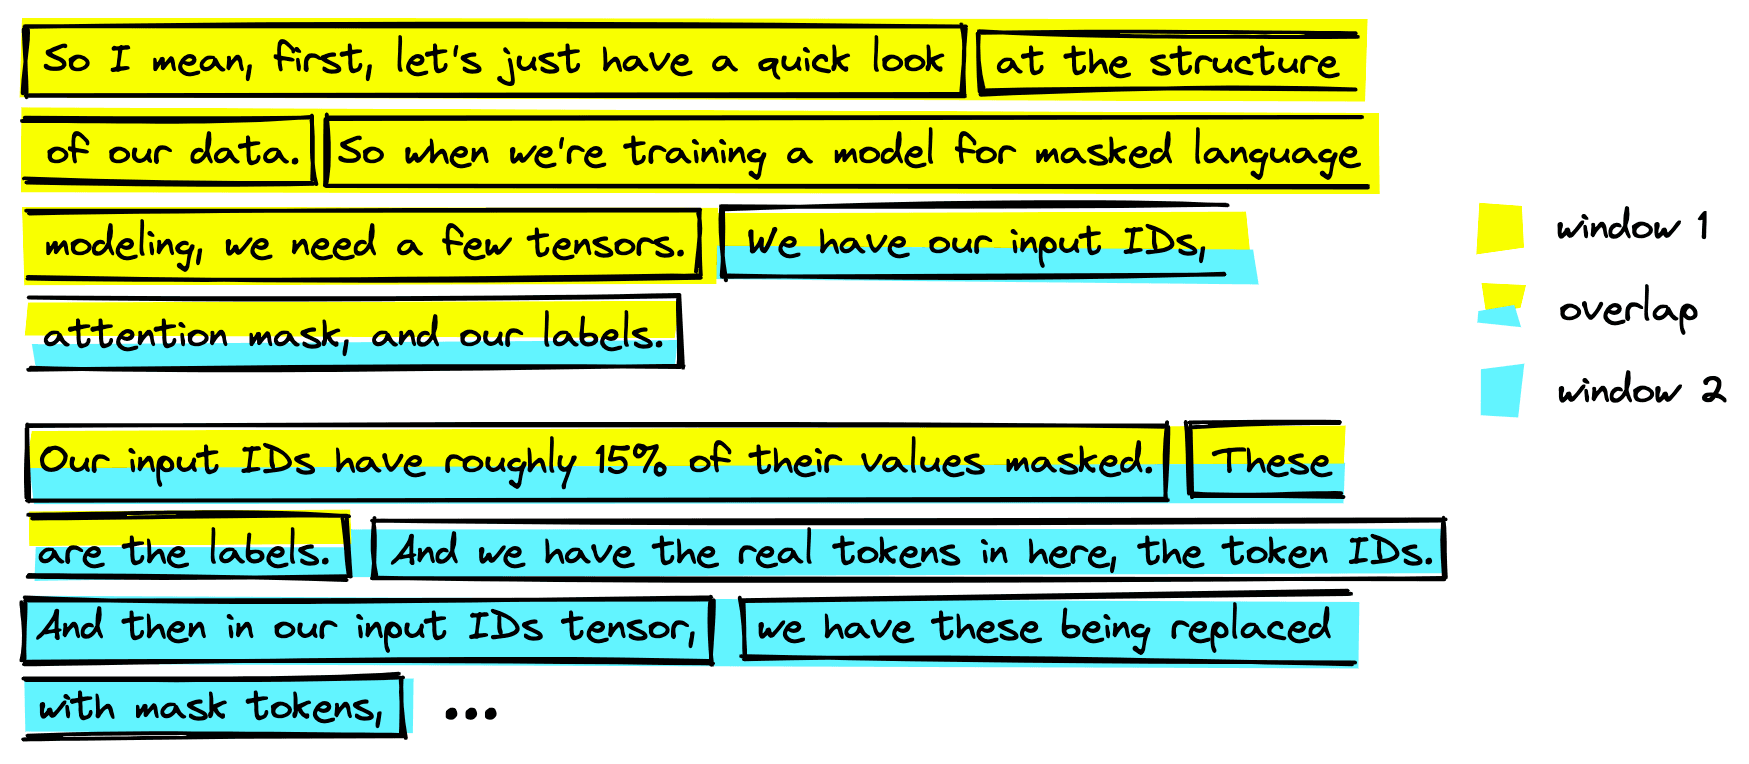
A common technique to avoid cutting related segments is adding some overlap between segments, where stride is used. For each step, we move three segments forward while merging six segments. By doing this, any meaningful segments cut in one step will be included in the next.
With this, we have larger and more meaningful chunks of text. Now we need to encode them with a QA embedding model. Many high-performing, pretrained QA models are available via Hugging Face Transformers and the Sentence Transformers library. We will use one called multi-qa-mpnet-base-dot-v1.
from sentence_transformers import SentenceTransformer

model_id = "multi-qa-mpnet-base-dot-v1"

model = SentenceTransformer(model_id)
modelSentenceTransformer(
(0): Transformer({'max_seq_length': 512, 'do_lower_case': False}) with Transformer model: MPNetModel
(1): Pooling({'word_embedding_dimension': 768, 'pooling_mode_cls_token': True, 'pooling_mode_mean_tokens': False, 'pooling_mode_max_tokens': False, 'pooling_mode_mean_sqrt_len_tokens': False})
)Using this model, we can encode a passage of text to a meaningful 768-dimensional vector with model.encode("<some text>"). Encoding all of our segments at once or storing them locally would require too much compute or memory — so we first initialize the vector database where they will be stored:
dim = model.get_sentence_embedding_dimension()import pinecone # !pip install pinecone-client
index_id = "youtube-search"
pinecone.init(
api_key="YOUR_API_KEY", # app.pinecone.io
environment="YOUR_ENV" # find next to API key
)
if index_id not in pinecone.list_indexes():
pinecone.create_index(
index_id,
dim,
metric="dotproduct"
)
index = pinecone.Index(index_id)
index.describe_index_stats(){'dimension': 768,
'index_fullness': 0.0,
'namespaces': {},
'total_vector_count': 0}We should see that the index (vector database) is currently empty with a total_vector_count of 0. Now we can begin encoding our segments and inserting the embeddings (and metadata) into our index.
# we encode and insert in batches of 64
batch_size = 64

# loop through in batches of 64
for i in tqdm(range(0, len(new_data), batch_size)):
    # find end position of batch (for when we hit end of data)
    i_end = min(len(new_data)-1, i+batch_size)
    # extract the metadata like text, start/end positions, etc
    batch_meta = [{
        "text": new_data[x]["text"],
        "start": new_data[x]["start"],
        "end": new_data[x]["end"],
        "url": new_data[x]["url"],
        "title": new_data[x]["title"]
    } for x in range(i, i_end)]
    # extract only text to be encoded by embedding model
    batch_text = [
        row['text'] for row in new_data[i:i_end]
    ]
    # create the embedding vectors
    batch_embeds = model.encode(batch_text).tolist()
    # extract IDs to be attached to each embedding and metadata
    batch_ids = [
        row['id'] for row in new_data[i:i_end]
    ]
    # 'upsert' (insert) IDs, embeddings, and metadata to index
    to_upsert = list(zip(
        batch_ids, batch_embeds, batch_meta
    ))
    index.upsert(to_upsert)
100%|██████████| 210/210 [00:56<00:00, 3.72it/s]
# check everything has been added
index.describe_index_stats(){'dimension': 768,
'index_fullness': 0.0,
'namespaces': {'': {'vector_count': 13392}},
'total_vector_count': 13392}That is everything we needed to prepare our data and add everything to the vector database. All that is left is querying and returning results.
Making Queries
Queries are straightforward to make; we:
- Encode the query using the same embedding model we used to encode the segments.
- Pass to query to our index.
We do that with the following:
query = "what is OpenAI's CLIP?"

xq = model.encode(query).tolist()

index.query(xq, top_k=5, include_metadata=True){'matches': [
{'id': 'coaaSxys5so-t129.0',
'metadata': {
'end': 157.0,
'start': 129.0,
'text': "Let's ask another question. So this one's "
"not even really a question. I'm just going "
'to say OpenAI Clip. And what I want to do '
'is just say okay can you summarize what '
'OpenAI Clip is.',
'title': 'How to build next-level Q&A with OpenAI',
'url': 'https://youtu.be/coaaSxys5so'},
'score': 33.6478119,
'values': []},
{'id': 'coaaSxys5so-t147.0',
'metadata': {
'end': 183.0,
'start': 147.0,
'text': "So we'll come down here. Let's see what it "
'returns. Cool so OpenAI Clip is a '
'contrastive language image pre-training '
'model that uses pairs of images and text '
'and returns a matrix of cosine similarity '
"between text and each image. Okay that's "
'cool. So written in PyTorch uses bcelas.',
'title': 'How to build next-level Q&A with OpenAI',
'url': 'https://youtu.be/coaaSxys5so'},
'score': 31.5986061,
'values': []},
{'id': 'bVZJ_O_-t2085.44',
'metadata': {
'end': 2131.7599999999998,
'start': 2085.44,
'text': "OpenAI clip VIT so it's the vision "
'transformer this VIT you see here refers '
'to the the vision transformer which clip '
'is using or is based on at least the '
'vision aspect and we want to write base '
"patch 32. So I mean we'll go into more "
'detail but the patch part of that is '
'referring to the way that the model almost '
'tokenizes your images it splits an image',
'title': 'Intro to Dense Vectors for NLP and Vision',
'url': 'https://youtu.be/bVZJ_O_-0RE'},
'score': 31.4537525,
'values': []},
{'id': '989aKUVBfbk-t35.0',
'metadata': {
'end': 88.5,
'start': 35.0,
'text': 'During pre-training OpenAI trained the '
'model on pairs of images and text and it '
'trained them to both output embedding '
'vectors that are as close as possible to '
'each other. So the text transformer was '
'trained to output a single embedding 512 '
'dimensional embedding that was as close as '
"possible to the vision transformer's image "
'embedding for the image text pair. So what '
'that means is that clip is able to take '
'both images and text and embed them both '
'into a similar vector space. And with that '
'we can do a lot of things.',
'title': 'Fast intro to multi-modal ML with '
"OpenAI's CLIP",
'url': 'https://youtu.be/989aKUVBfbk'},
'score': 31.4496136,
'values': []},
{'id': '989aKUVBfbk-t98.0',
'metadata': {
'end': 119.0,
'start': 98.0,
'text': 'OpenAI released a GitHub repository OpenAI '
"clip here. This contains clip but we're "
'not going to use this implementation. '
"We're actually going to use this "
'implementation of clip. So this is on '
'Hugging Face.',
'title': 'Fast intro to multi-modal ML with '
"OpenAI's CLIP",
'url': 'https://youtu.be/989aKUVBfbk'},
'score': 29.3169785,
'values': []}],
'namespace': ''}These results are relevant to the question; three, in particular, are from a similar location in the same video. We might want to improve the search interface to be more user-friendly than a Jupyter Notebook.
One of the easiest ways to get a web-based search UI up and running is with Hugging Face Spaces and Streamlit (or Gradio if preferred).
We won’t go through the code here, but if you’re familiar with Streamlit, you can build a search app quite easily within a few hours. Or you can use our example and do it in 5-10 minutes.
You can test the app here. When querying again for "what is OpenAI's clip?" we can see that multiple results from a single video are merged. With this, we can jump to each segment by clicking on the part of the text that is most interesting to us.
Try a few more queries like:
What is the best unsupervised method to train a sentence transformer? What is vector search? How can I train a sentence transformer with little-to-no data?
We can build incredible speech-enabled search apps very quickly using Whisper alongside Hugging Face, sentence transformers, and Pinecone’s vector database.
Whisper has unlocked a entire modality — the spoken word — and it’s only a matter of time before we see a significant increase in speech-enabled search and other speech-centric use cases.
Both machine learning and vector search have seen exponential growth in the past years. These technologies already seem like sci-fi. Yet, despite the incredible performance of everything we used here, it’s only a matter of time before all of this gets even better.
Resources
[1] OpenAI Whisper Repo (2022), GitHub
Was this article helpful?