Making Stable Diffusion Faster with Intelligent Caching
wwCreative industries are changing. A new wave of “AI art” tools like DALL-E 2, Imagen, and Midjourney seemed to pop up from nowhere. In a few short months, they have reshaped the way art is made.
The first of these tools, OpenAI’s DALL-E 2, was announced in April 2022. It became the first widespread use of “diffusion” models. Since then, diffusion has exploded, reaching far beyond the tech and even creative industries, into common knowledge among people without any ties to either industry.
Yet, there is a problem. Diffusion models take a lot of compute to generate images.
The iterative diffusion process means end users generating images on CPU can expect to wait tens of minutes to produce a single image.
Despite the high compute requirements, innovation in the space has blossomed. Several other tools have since been released — one of the most exciting being stable diffusion.
Stable diffusion didn’t bring any fundamental changes to the technology itself. It is exciting because it was the first high-performance diffusion model that was open sourced.
The release of stable diffusion alongside the slightly earlier release of Hugging Face Diffusers in July 2022 [1] triggered an explosion in new use cases.
Getting high-quality diffusion into the hands of open-source communities quickly produced “stable diffusion dreams” that create trippy videos as the model traverses between different prompts [2]. Diffusion has been applied to 3D objects [3] and even to create video and help animators create masterpieces in record time [4].
It’s safe to say that diffusers are here to stay. Yet, since diffusion requires many generations and plenty of prompt tweaking to produce good results — stable diffusion is simply out of reach for most people unless we find a way to make it more efficient.
Fortunately, there is something we can do to make diffusion more efficient and accessible as demoed above. Whether using the latest GPUs or entry-level CPUs. In this article, we discover how to make stable diffusion more efficient through collaboration and caching with a vector database.
Collaborative Diffusion
Hugging Face Spaces has been flush with stable diffusion apps ever since stable diffusion was released. There are thousands of people using these apps daily. Yet, stable diffusion requires a massive amount of compute, a problem for both the host’s costs and the user’s patience. Yet, there is no clear solution.
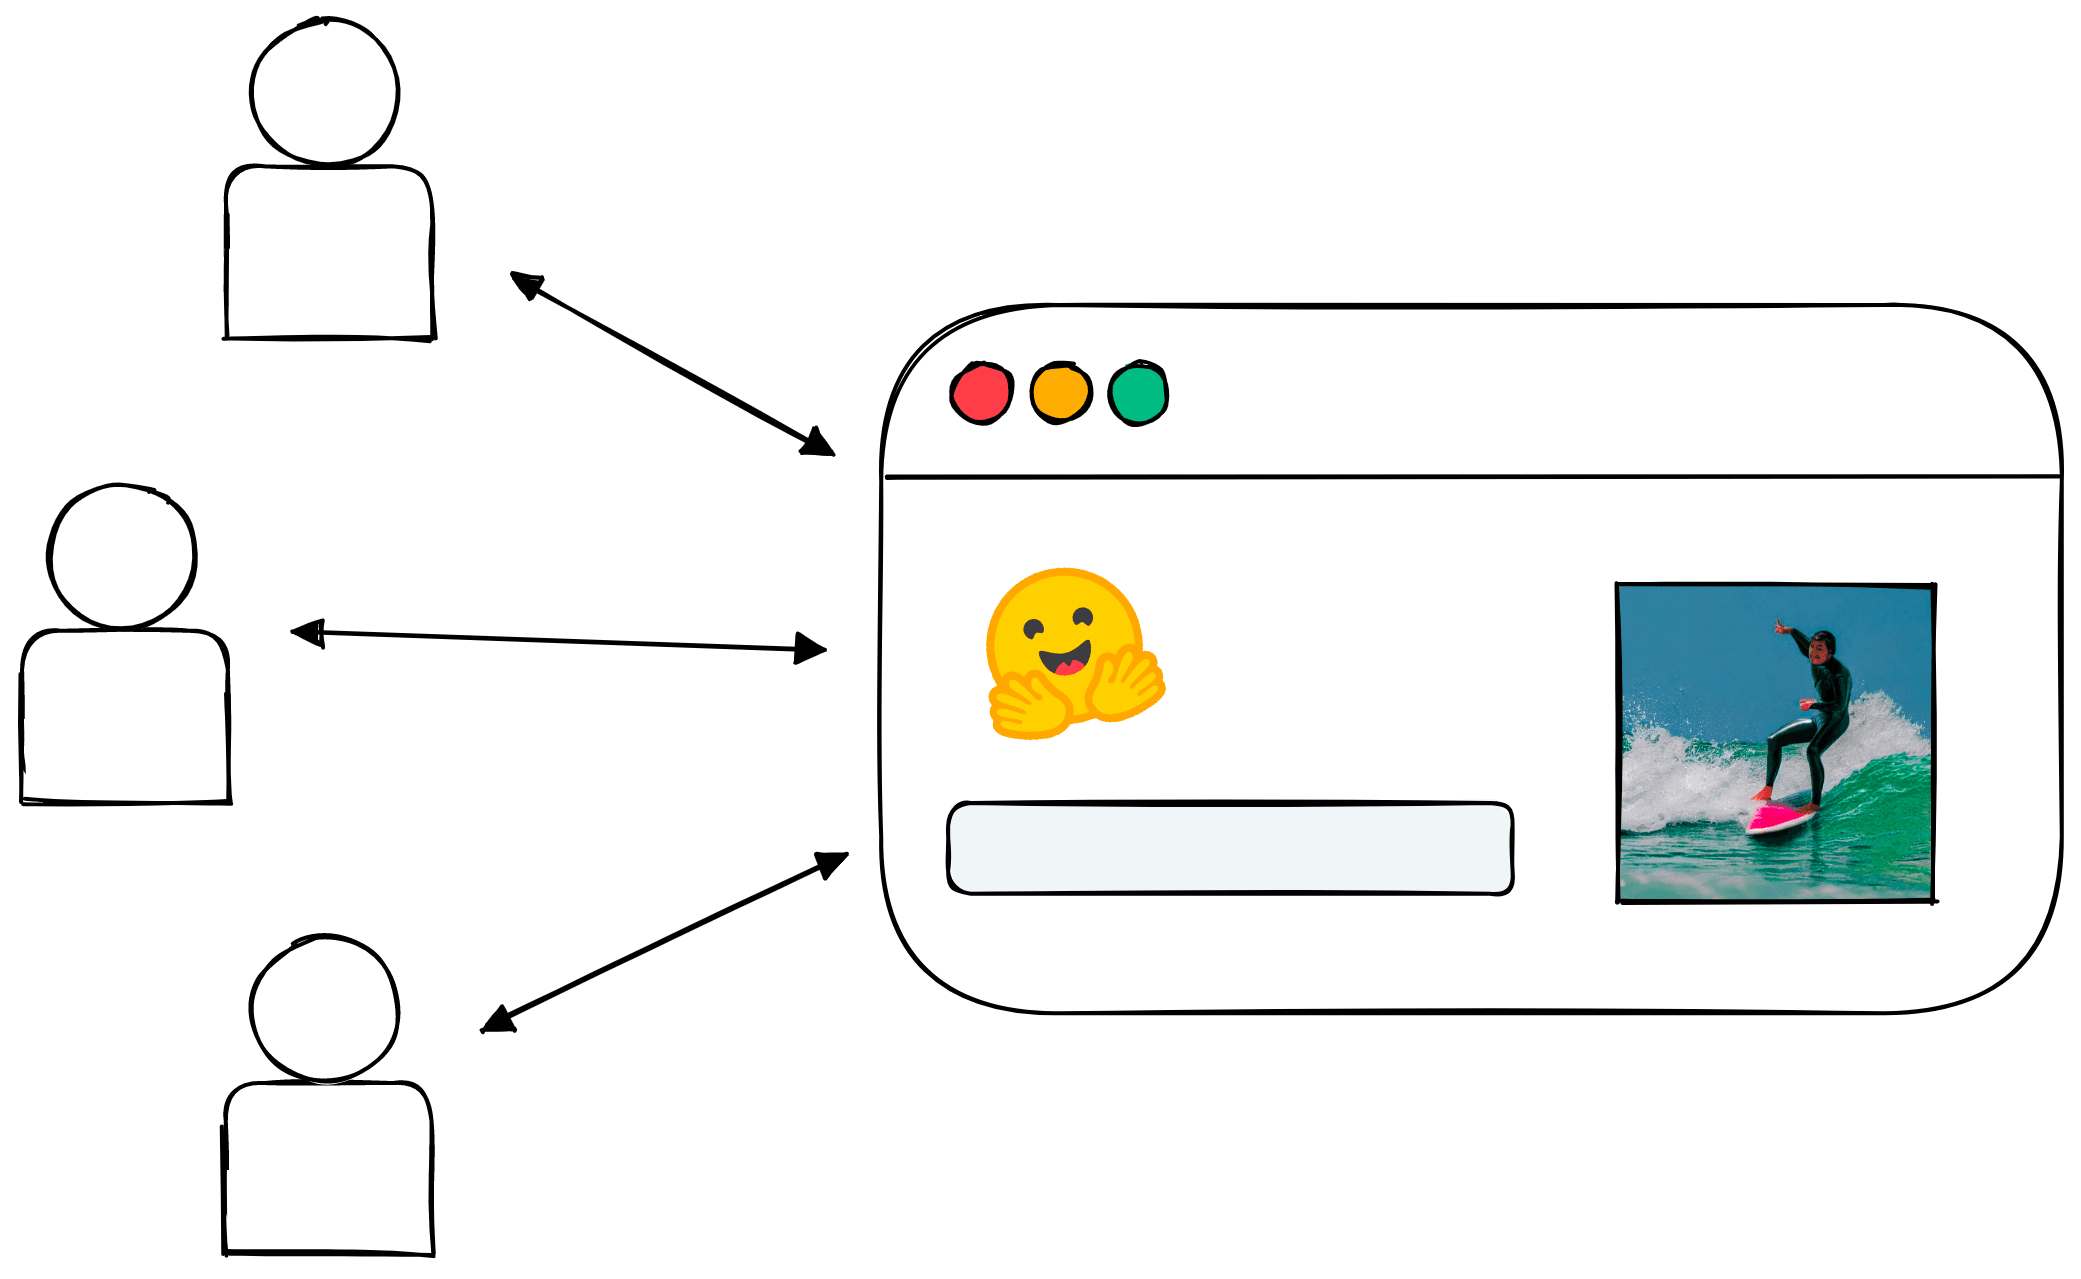
Serving so many users adds a lot of pressure to the service, but we can use this to our advantage.
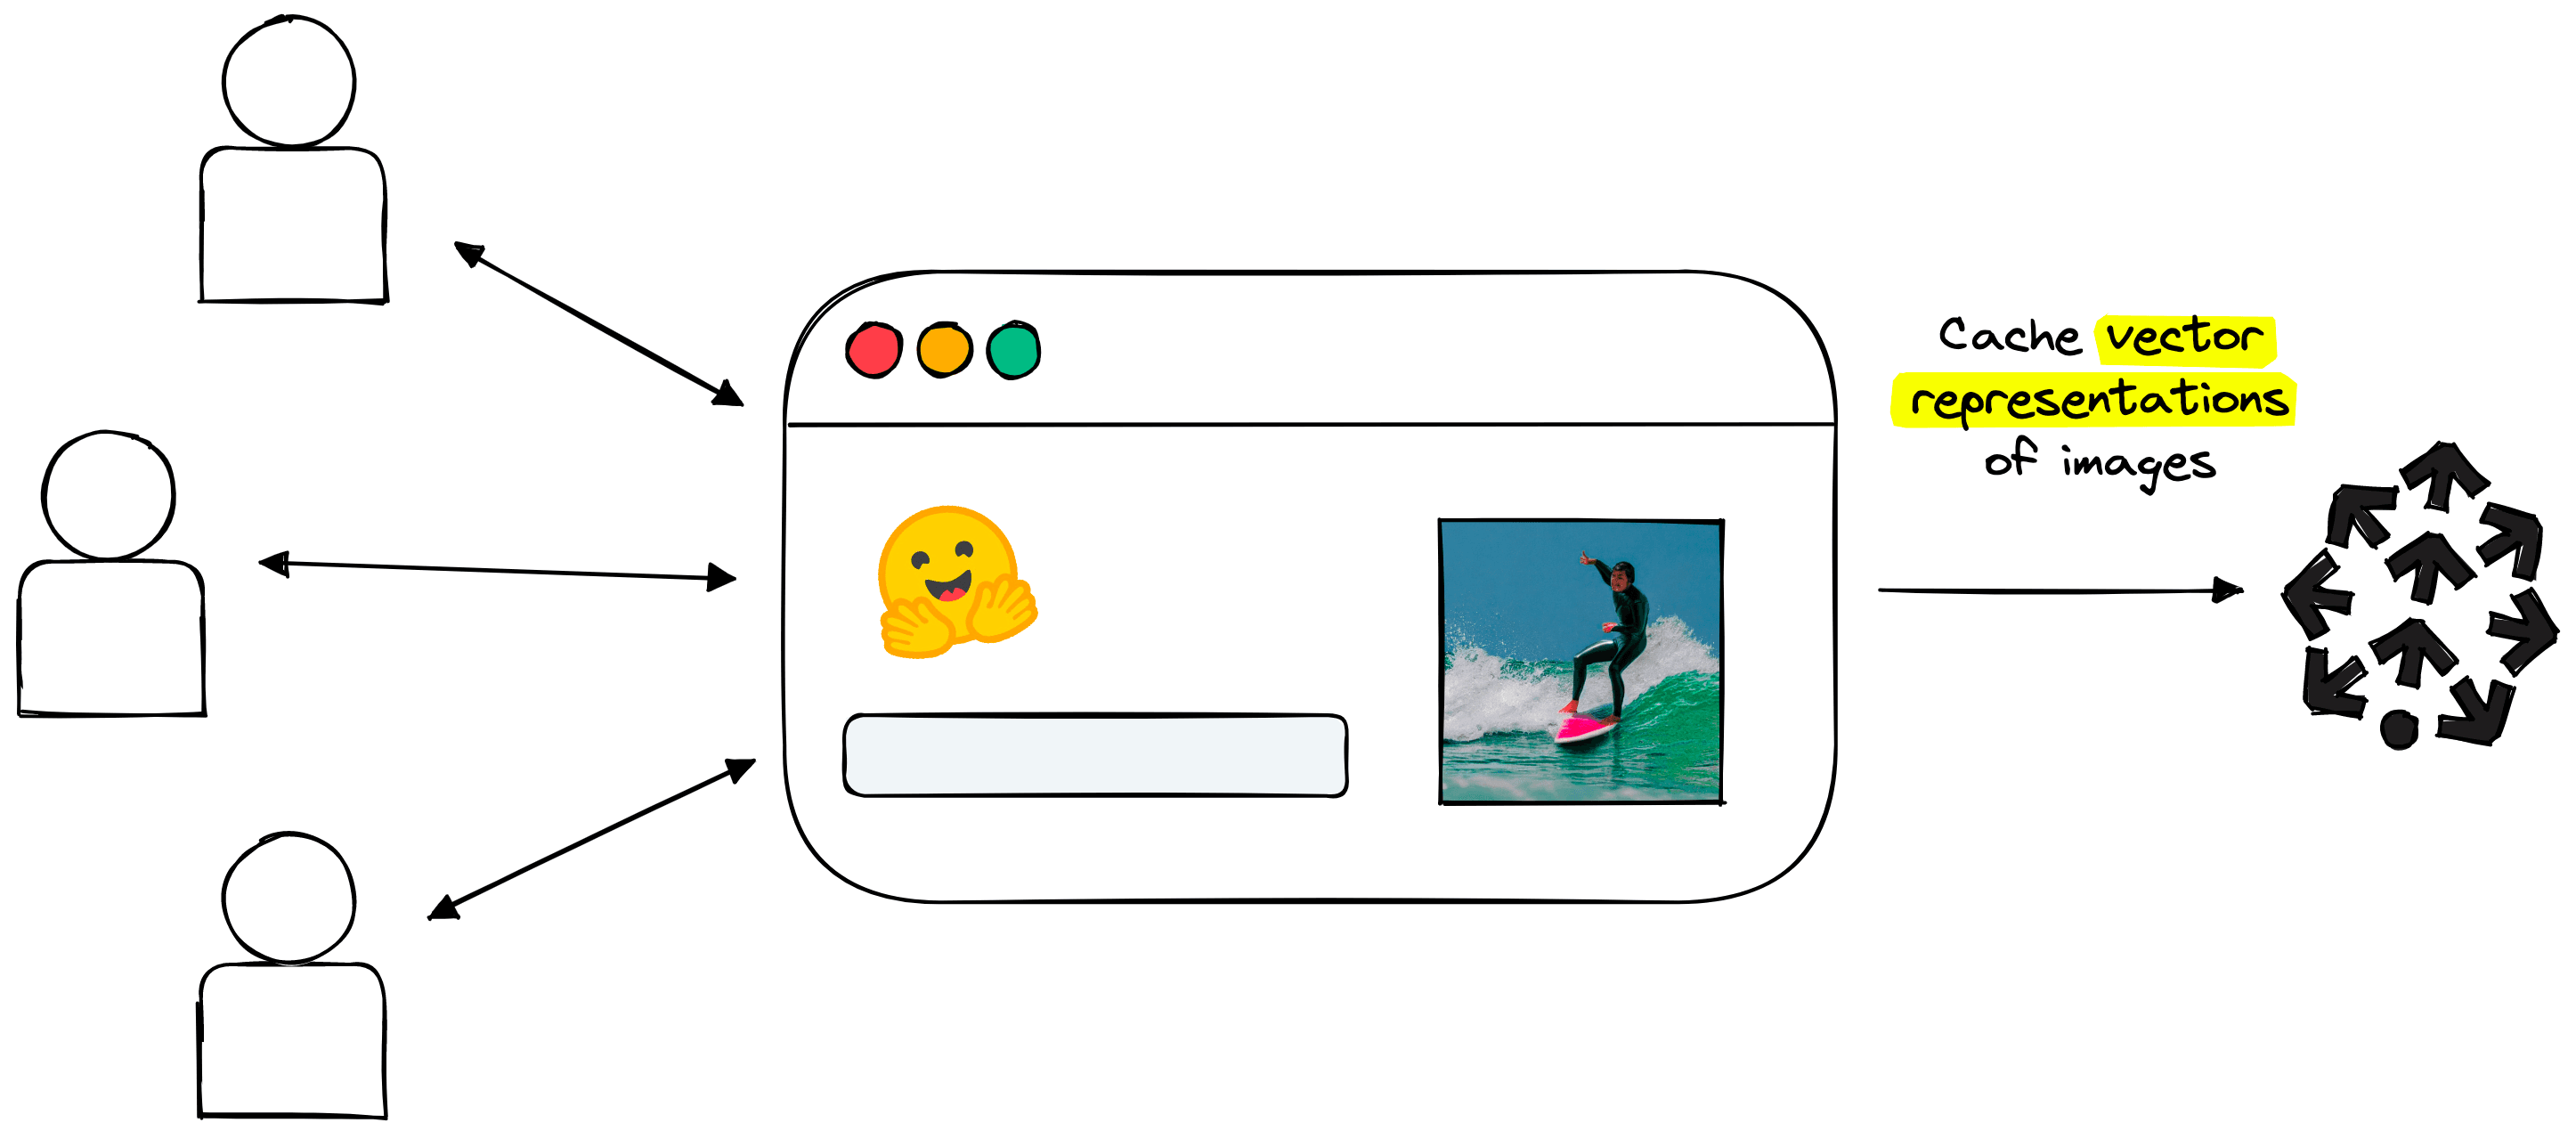
Rather than users competing for service resources, we help users collaborate. We can find a way to cache the generations of every user in a way that similar generations are ”grouped”. In that case, we can serve relevant past generations to current users and bypass the compute-heavy diffusion process.
As more generations are cached, fewer generations are required, speeding up retrieval time for current users and freeing up service compute.
Deciding Between Retrieval or Generation?
We can’t only retrieve past generations; that would miss the value of generating new images with diffusion. However, if a user looks for something highly similar to a previously cached generation, why not return those cached generations?
The only problem is identifying what ”similar” actually means.
Ideally, we should enable a backend search through past images based on their visual meaning and their semantic similarity to the user’s text prompt.
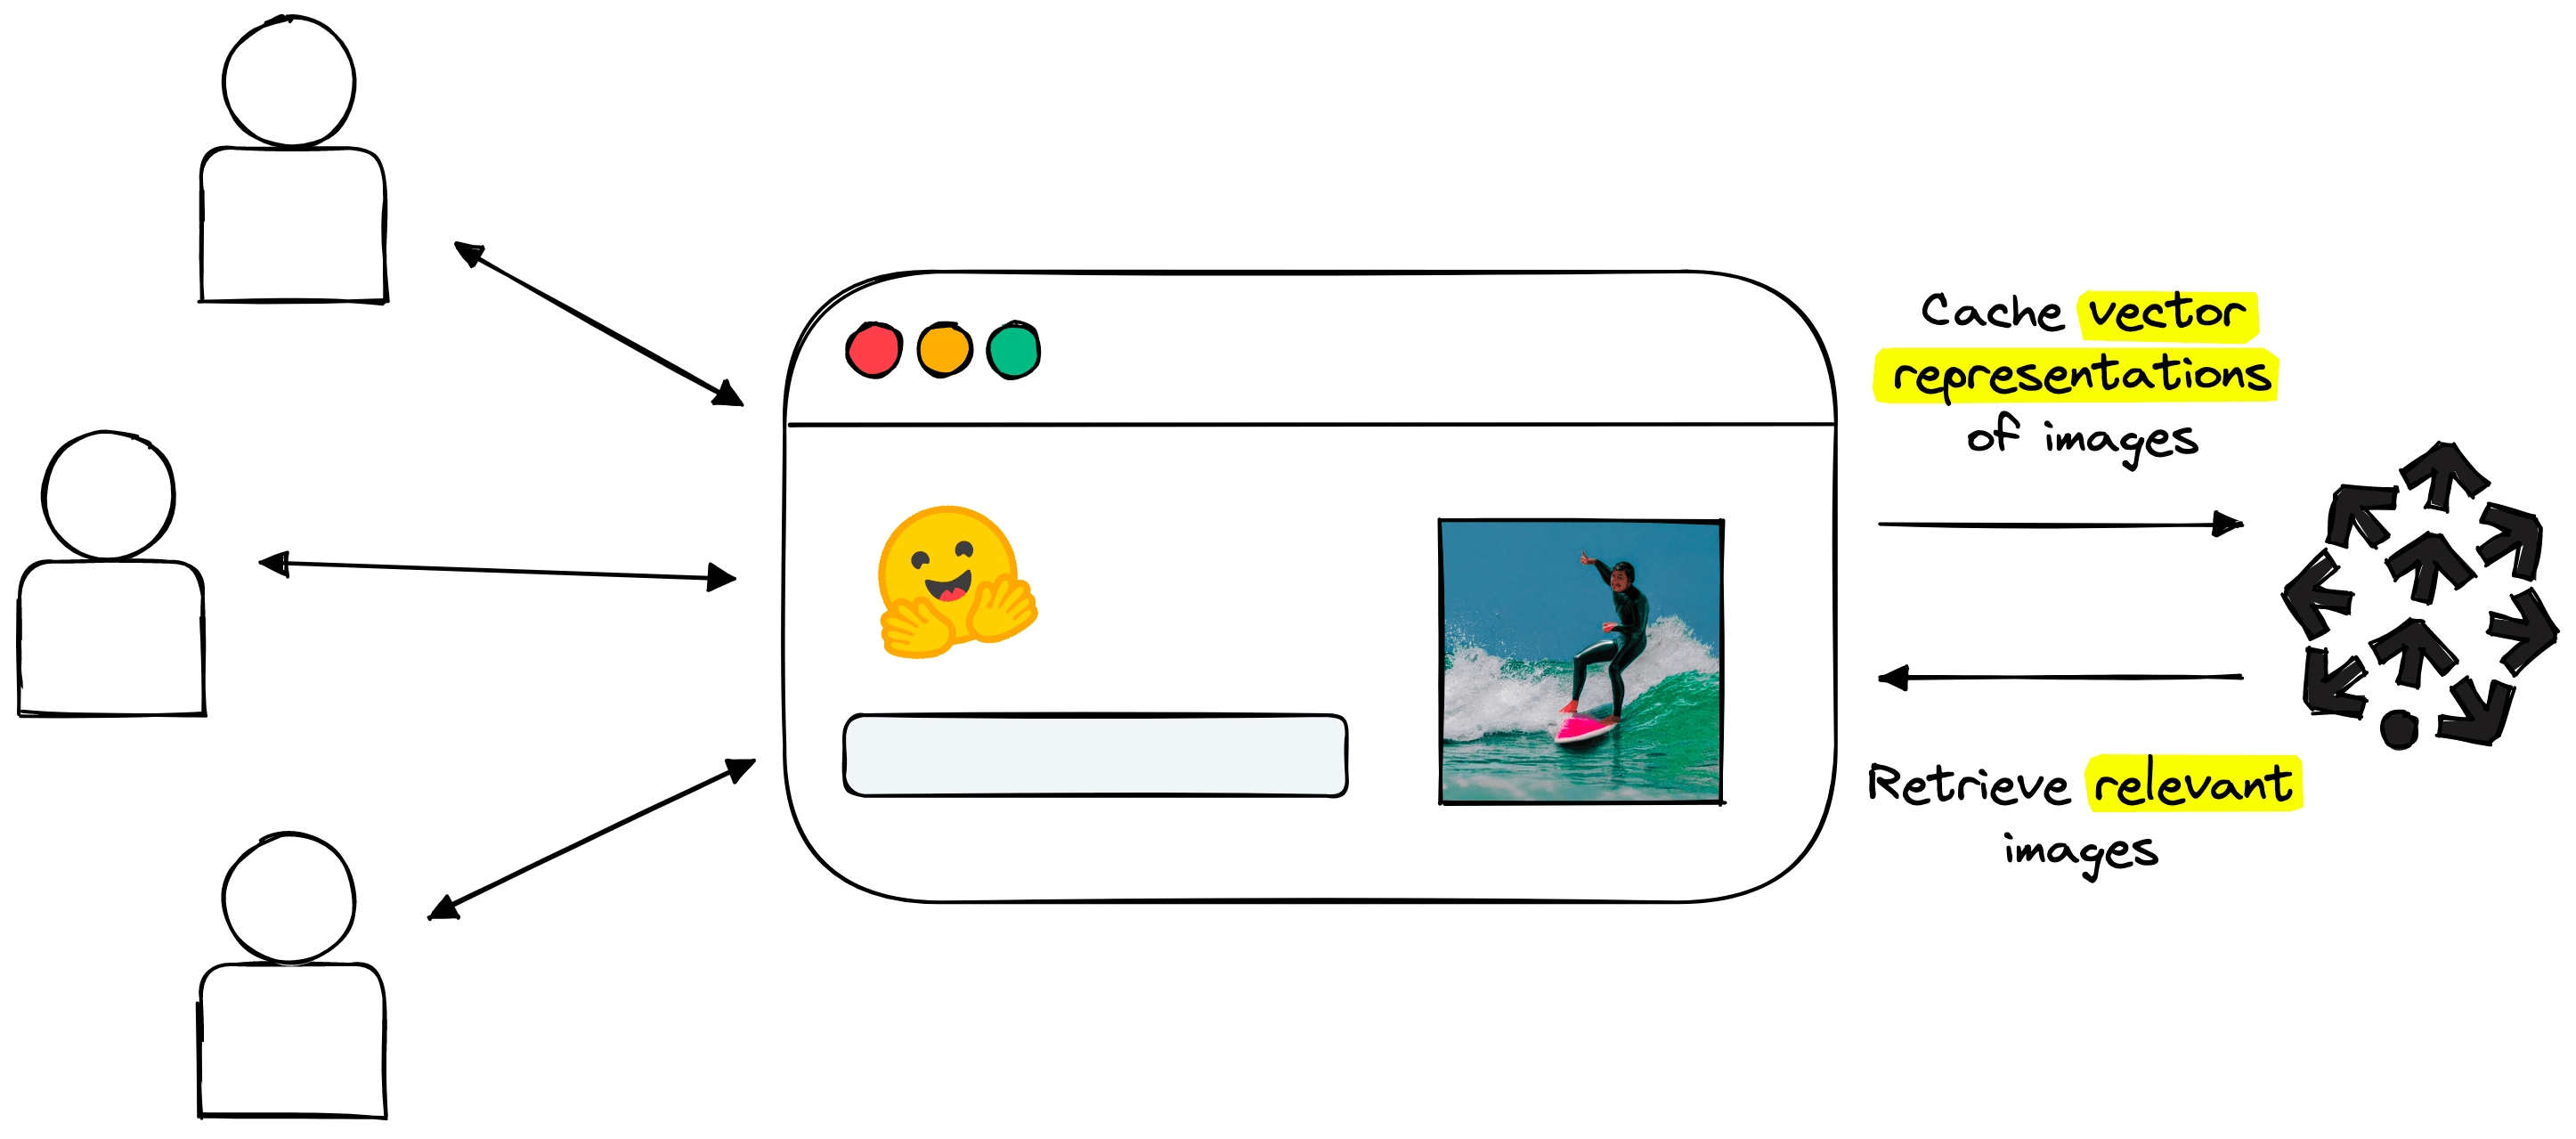
We will handle this through what we call the dream cacher component. It consists of two steps:
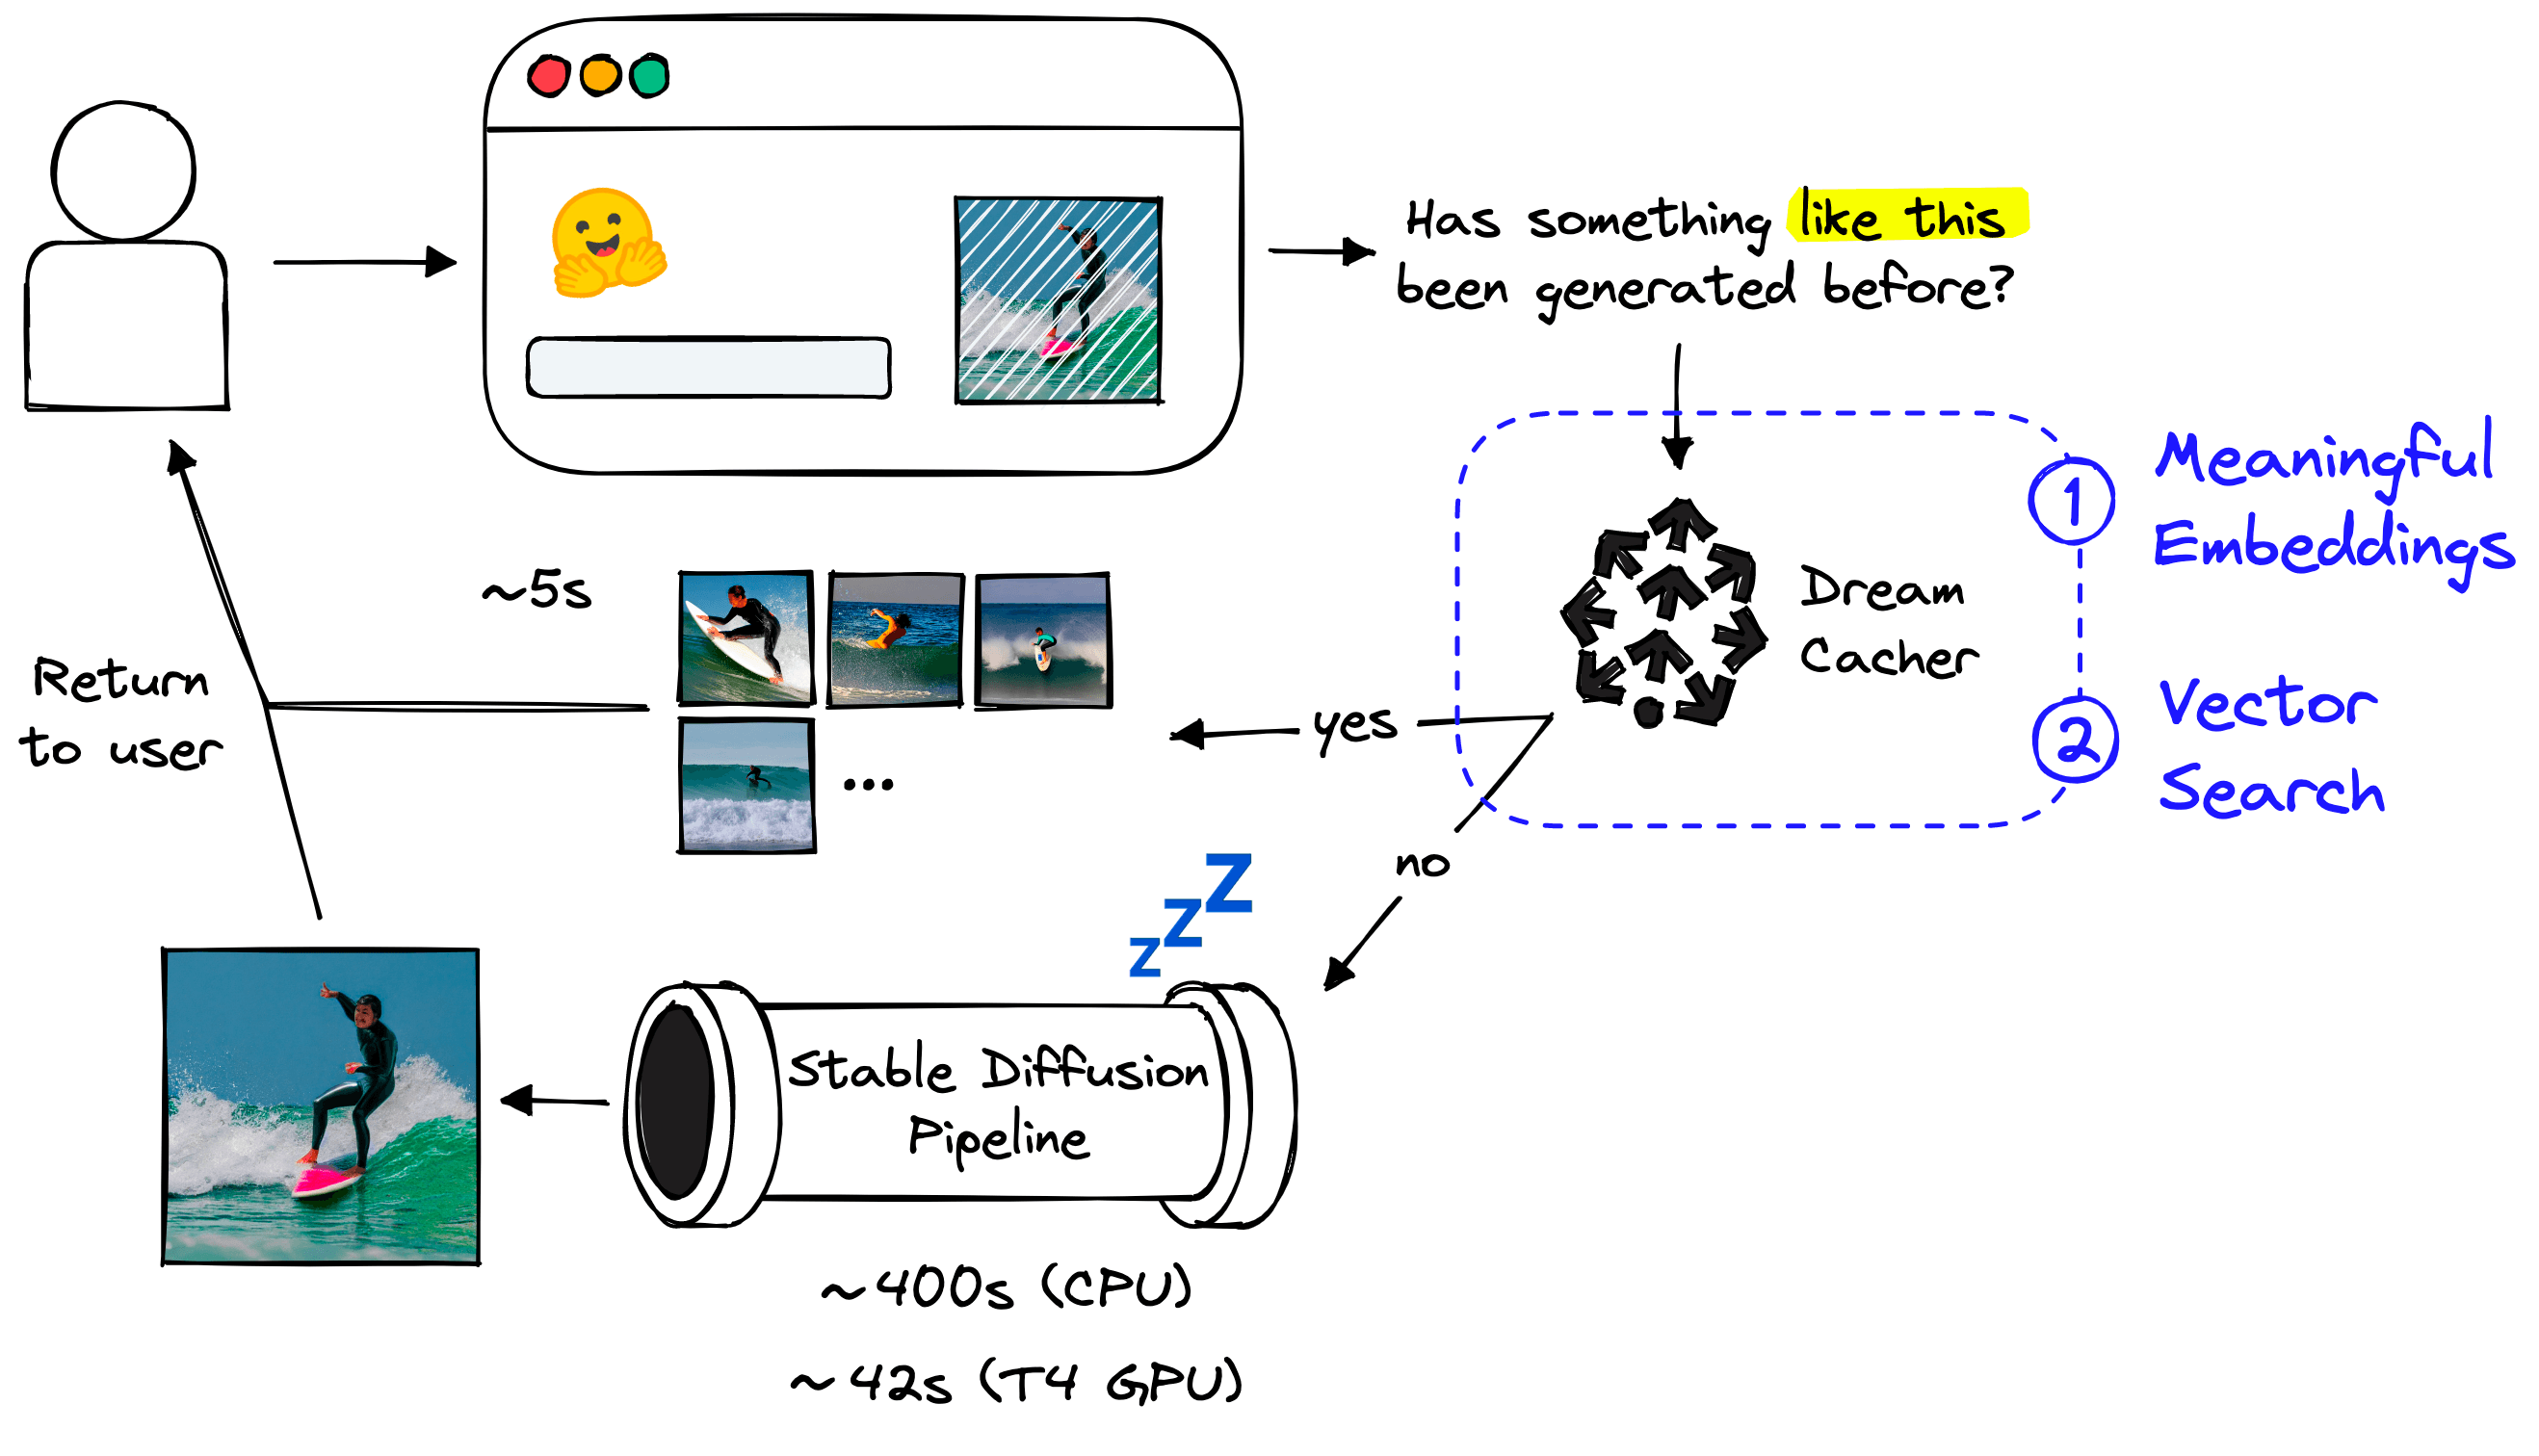
- Embedding the user’s text prompt to a meaningful dense vector.
- Vector search through past prompt vectors and their respective images.
Let’s start with step 1 of creating meaningful embeddings.
Meaningful Embeddings
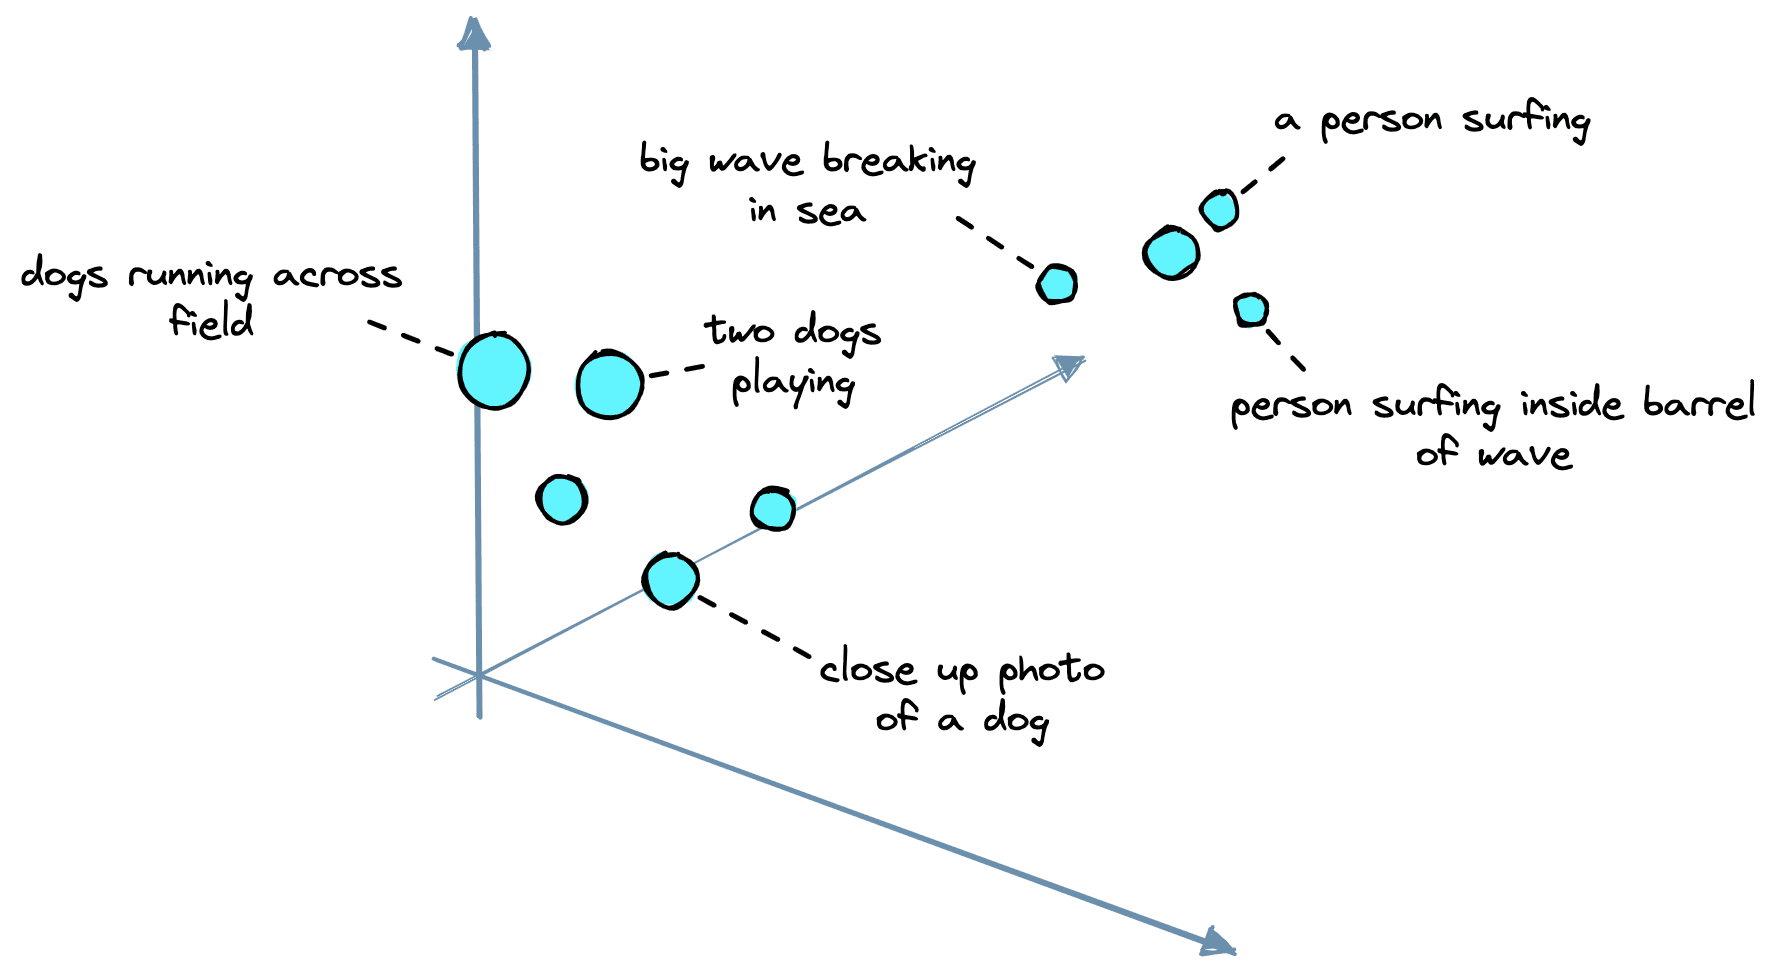
Our embeddings must represent the “semantic meaning” behind past prompts in vector space. This means prompts with similar meanings should be placed close to one another, whereas dissimilar prompts should be separated.
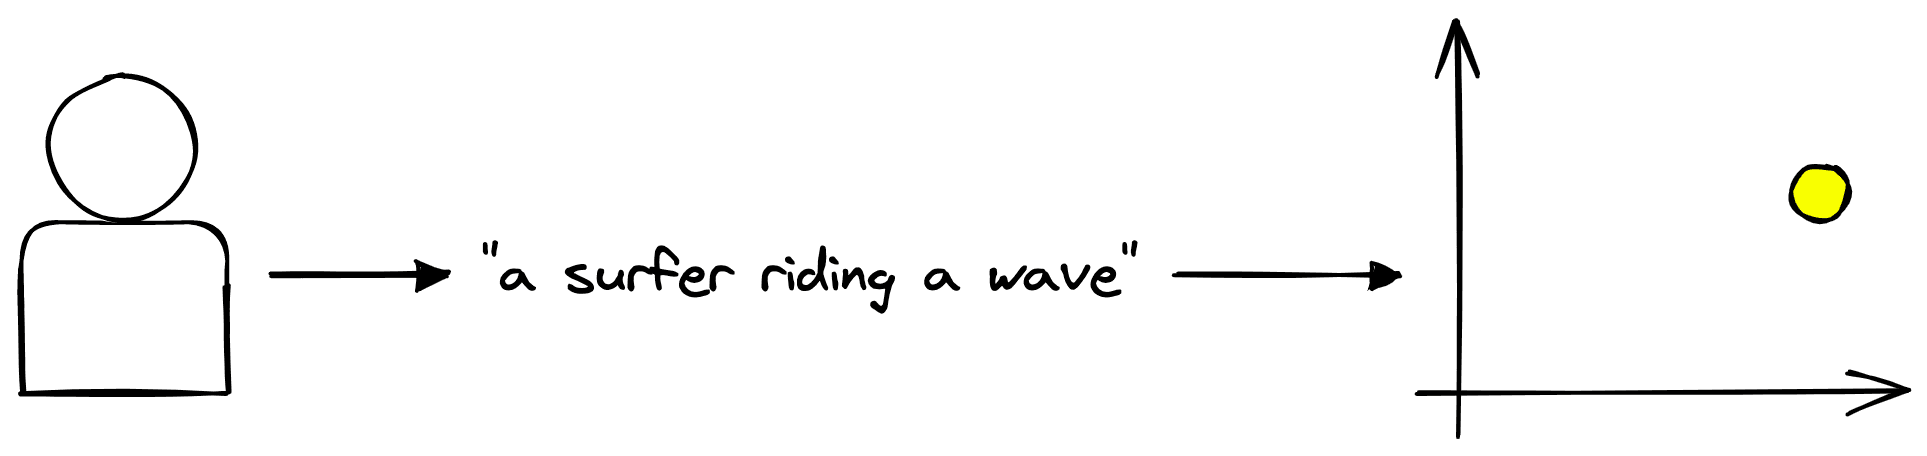
The typical approach for embedding text prompts uses a sentence transformer (or another encoder) model. These models all take text as input and output vector representations of that text.
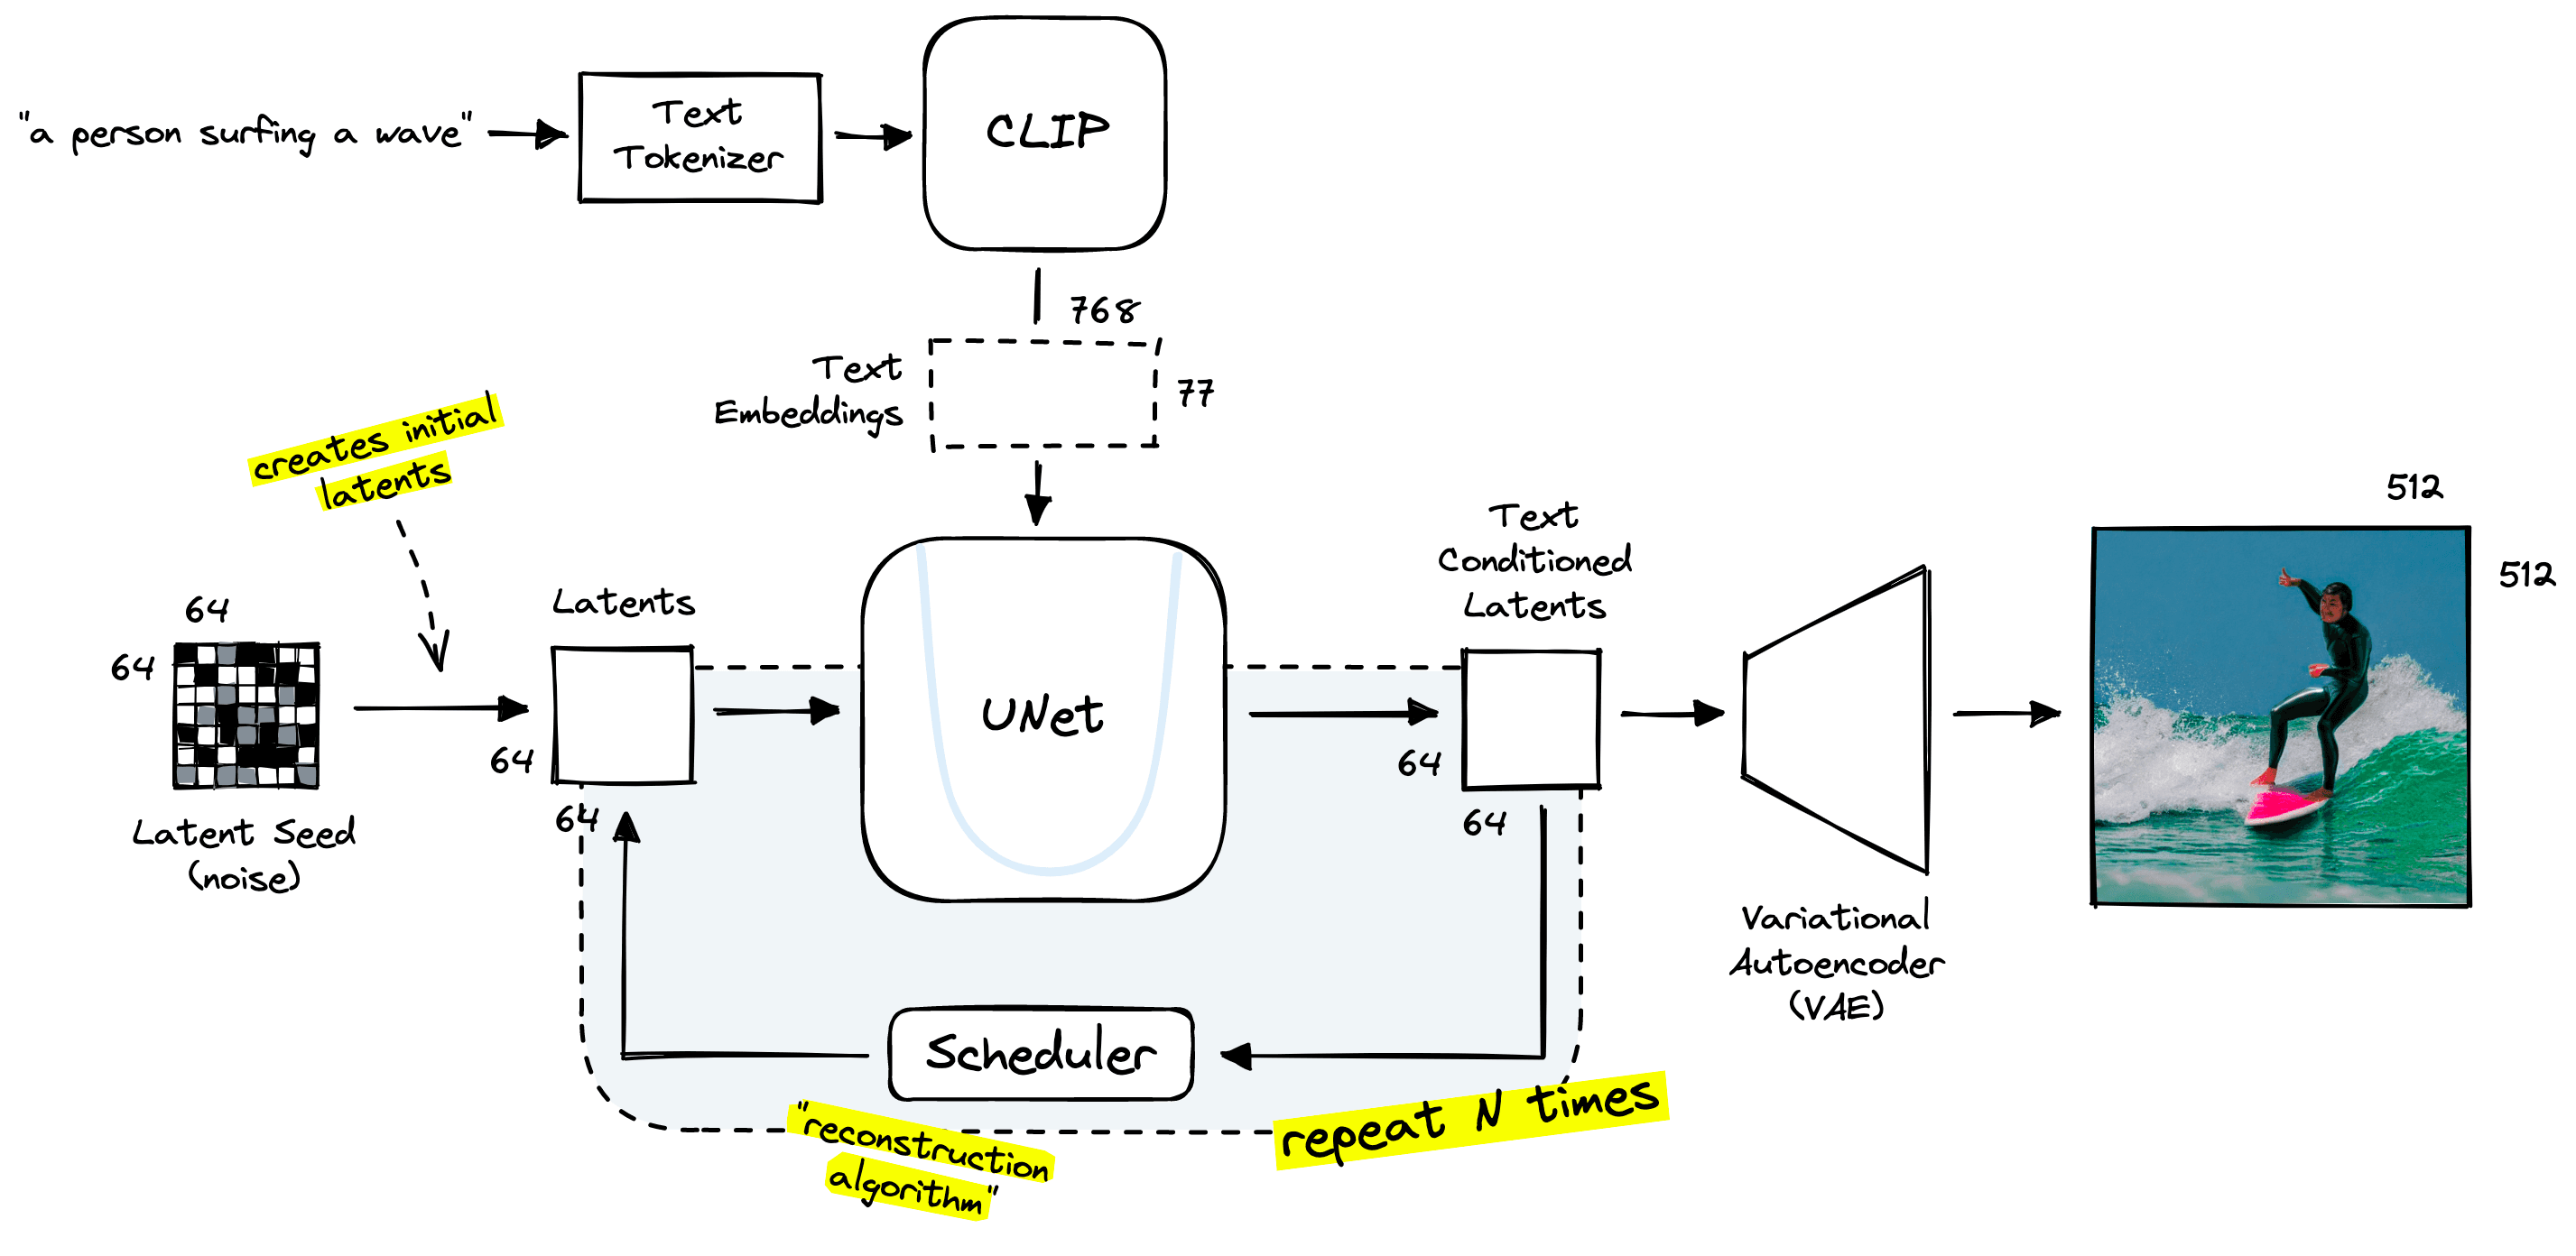
Now we need to find suitable vector embeddings produced within the stable diffusion pipeline. Stable diffusion uses an encoder model named CLIP. OpenAI’s CLIP is a multi-modal model that places both images and text in a similar vector space.
CLIP is not a sentence transformer, but it’s pretty close. However, there is a slight misalignment. Stable diffusion does not use single CLIP embeddings — it uses a large tensor containing 77 of these embeddings, which cannot be used in a vector search.
We can go ahead and initialize the stable diffusion pipeline from Hugging Face Diffusers like so:
# !pip install torch transformers diffusers
import torch
from diffusers import StableDiffusionPipeline

# set the hardware device
device = 'cuda' if torch.cuda.is_available() else 'cpu'

# init all of the pipeline models and move them to a given GPU
pipe = StableDiffusionPipeline.from_pretrained(
   "CompVis/stable-diffusion-v1-4",
   use_auth_token="<<ACCESS_TOKEN>>"
)
pipe.to(device)
The StableDiffusionPipeline requires a Hugging Face user access token. They can be found in user settings. Follow this guide on Hugging Face access tokens if you need help.
From here, we can use the first two components of the pipeline, the tokenizer and the text_encoder, to create the CLIP text embeddings.
We can see the token-level CLIP embeddings with shape 77x768. Having 77 of these embeddings is problematic as we need a single vector vector search to work.
Thanks to CLIP’s contrastive pretraining, we can produce a meaningful 768-d vector by “mean pooling” the 77 768-d vectors.
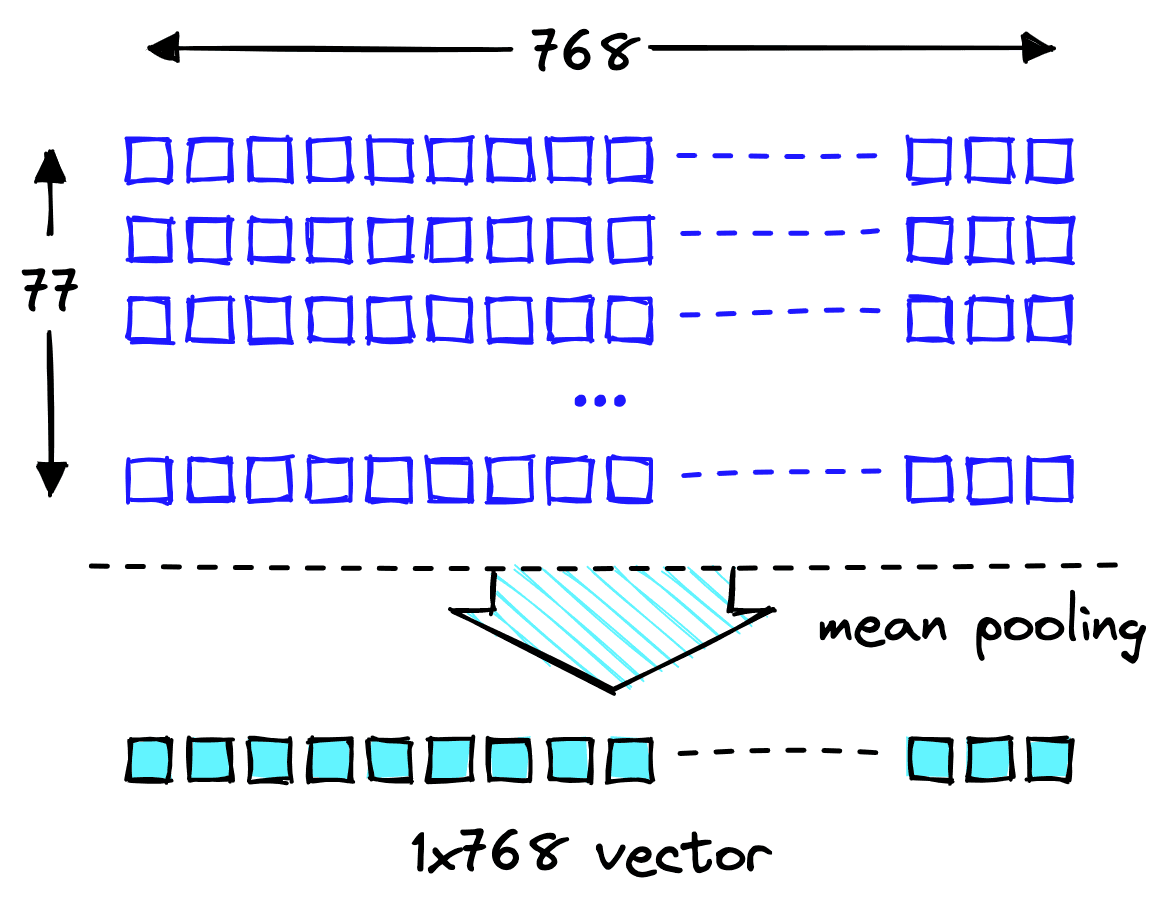
When we apply mean pooling to our 2D text embeddings tensor, we average the values across each dimension, outputting a single 1D text embedding vector.
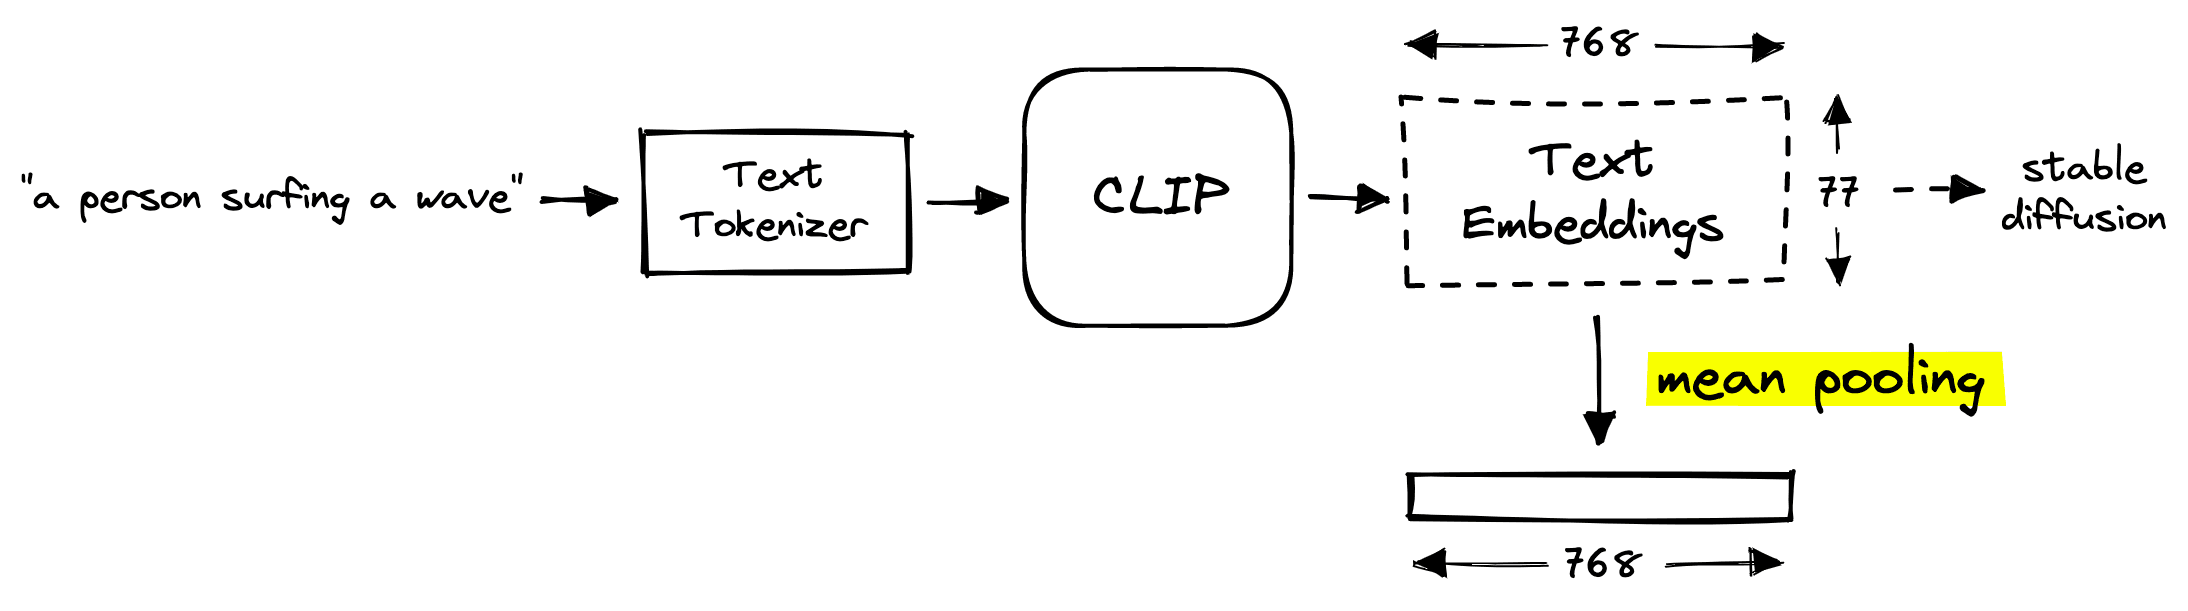
Fortunately, CLIP generates a mean pooled version of these text embeddings by default, so we don’t need to perform this operation ourselves.
These pooled “prompt vectors” are created before the long diffusion process begins, so they can be built quickly.
We now have meaningful prompt vectors, but how do we use them? For this, we need a vector database.
Vector Database
A “vector database” is a vector storage and retrieval service that we can use to efficiently search through millions or even billions of vectors.
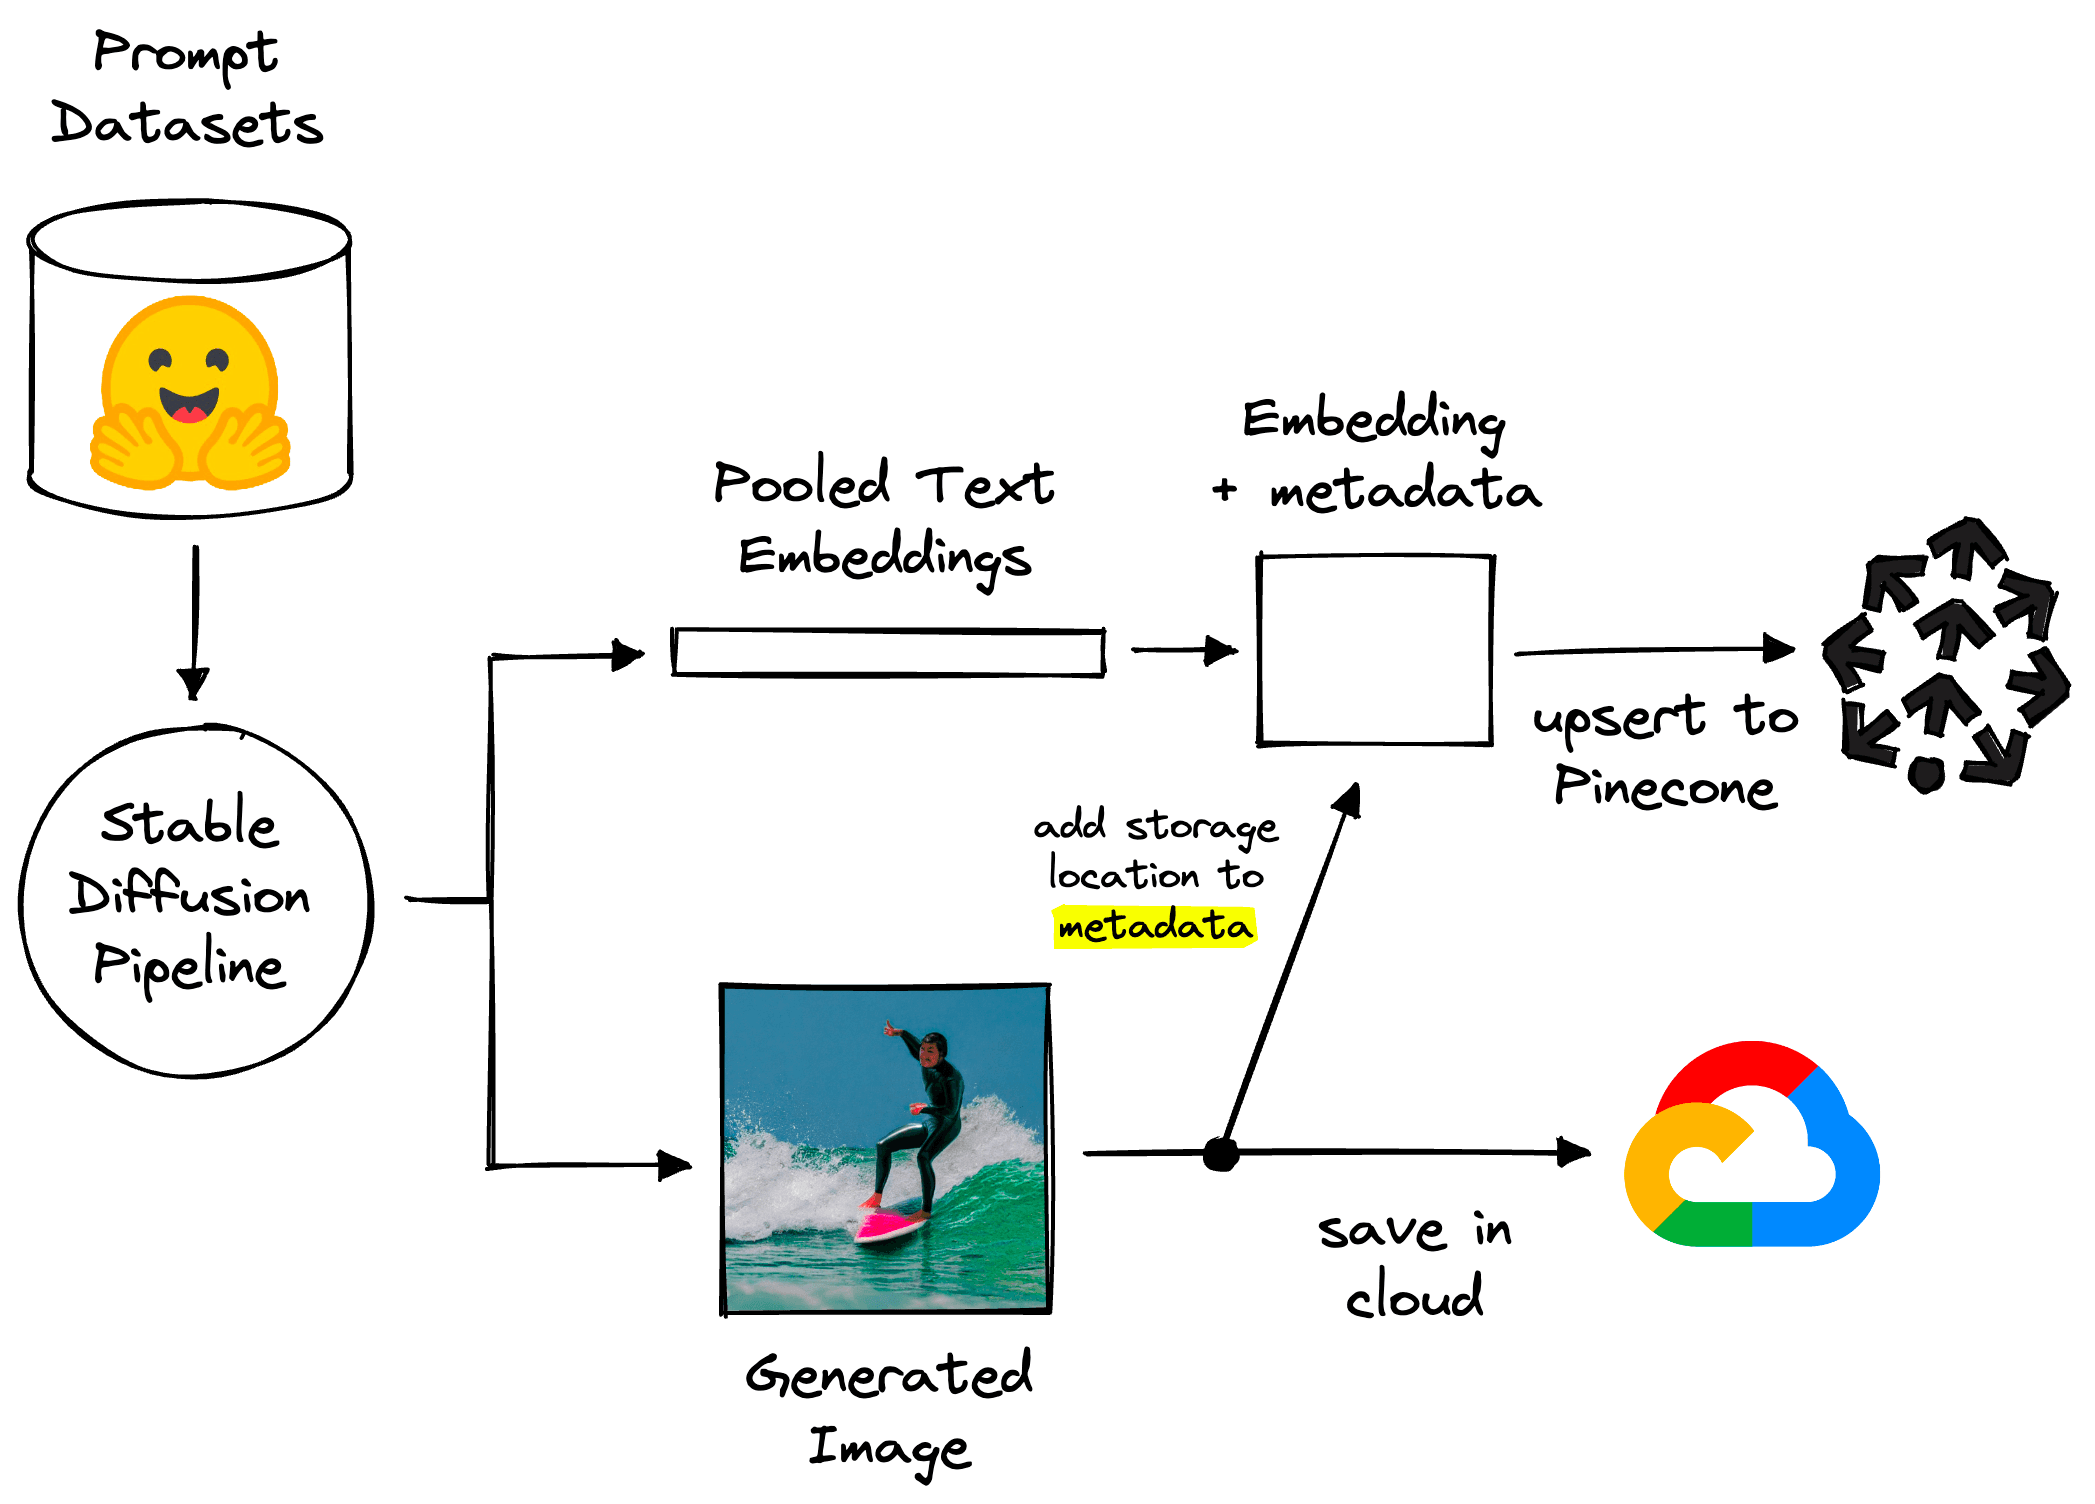
After generating the prompt vectors, we insert them into our vector database. From there, they can be retrieved by querying with new prompt vectors.
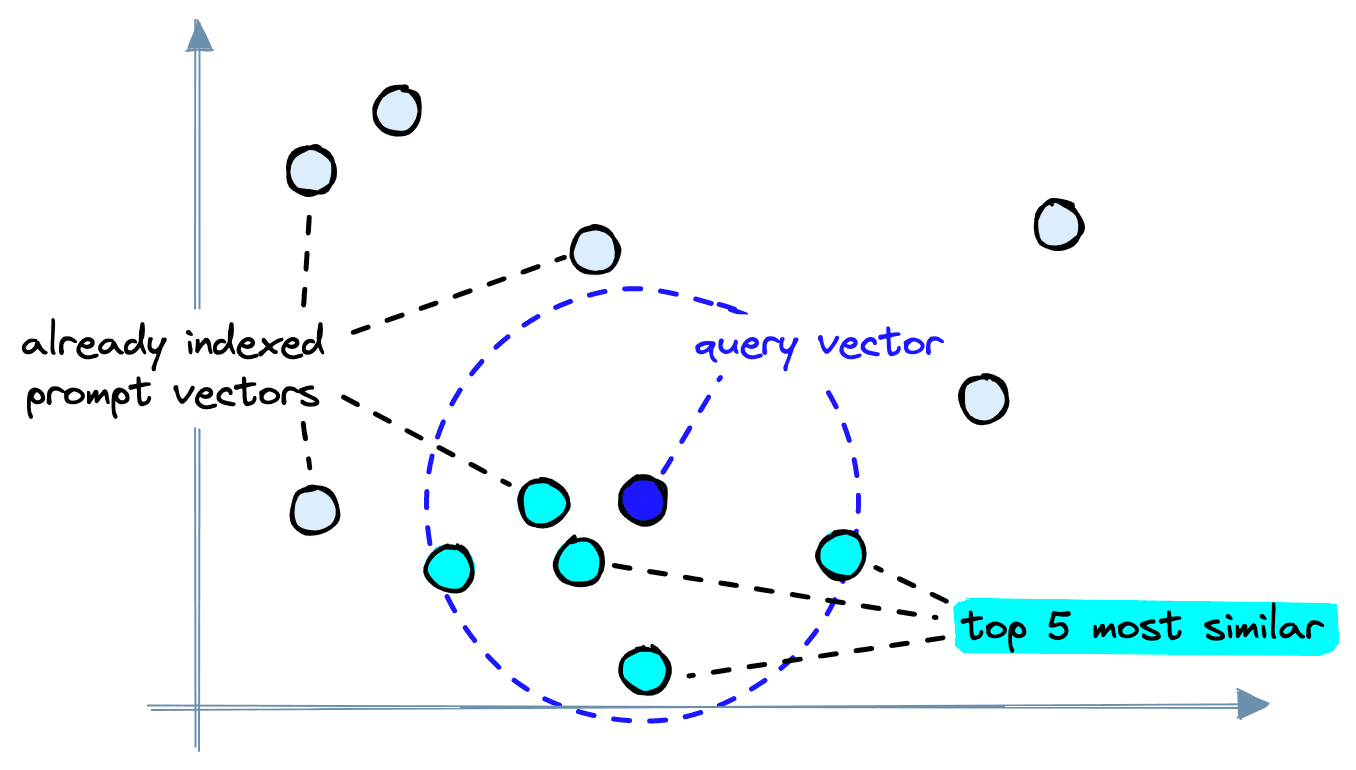
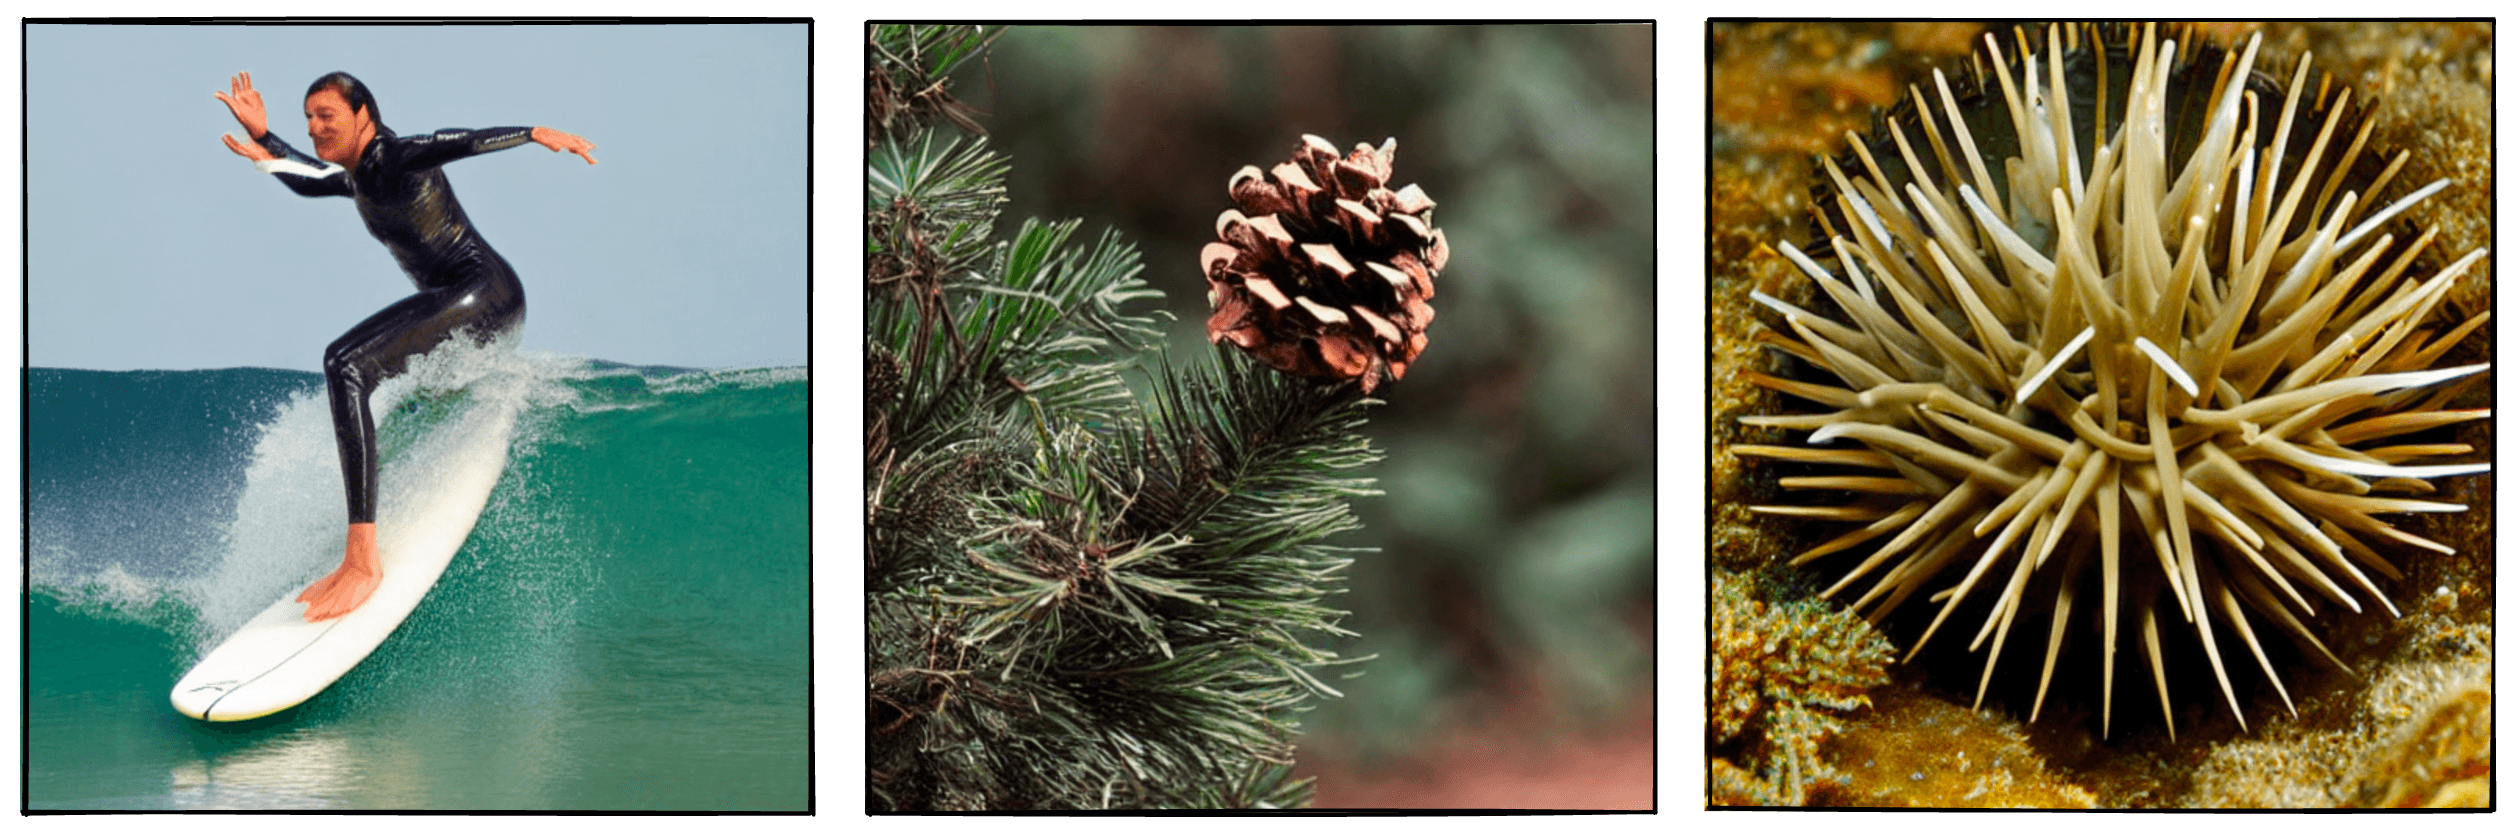
Given the prompt "A person surfing", we build a prompt vector, search within the vector database for similar items, and find several images that already fit this description:
For this to work, we need to add a second storage location for our images, like GCP’s Cloud Storage. Here, we simply save the image using the unique ID assigned to it (we will cover this later) and then retrieve it using this same ID.
Prompt Recommendation?
An optional metadata field we can include is the plaintext prompt used to generate the vector. This isn’t necessary for direct image retrieval, but it enables a second feature, prompt recommendations.
These recommendations are helpful for users struggling with prompt ideas and encourage interesting movement across the vector space.
Upserting Vectors and Storing Images
To implement our search component, we will use Pinecone’s vector database. To do this, we initialize our connection (using a free API key) and create a vector index (a single instance within the vector database).
We haven’t added any vectors yet, so 'total_vector_count' should be 0. We need a unique ID, the prompt_embeds vector, and related metadata to create our first record. These will be upserted in the format:
"abcd-abcd-abcd-abcd",  # unique ID
[0.01, 0.64, 0.27, ...],  # 784-d vector
{
 "prompt": "A person surfing"
}  # metadata dictionary
The ID can be created using the uuid module like so:
import uuid

_id = str(uuid.uuid4())  # creates format "xxxx-xxxx-xxxx-xxxx"
The prompt_embeds must be reformated into a flat list to satisfy Pinecone client requirements:
vec = prompt_embeds.cpu().tolist()[0]Then we use the original prompt text to create the metadata dictionary:
meta = {
   "prompt": prompt
}
Now we upsert everything with index.upsert:
index.upsert(
    [(_id, vec, meta)]
)
# we should see a single record has been added
index.describe_index_stats(){'dimension': 768,
'index_fullness': 0.0,
'namespaces': {'': {'vector_count': 1}},
'total_vector_count': 1}That is our vector and prompt metadata indexed. Now we need to generate the image using the StableDiffusionPipeline and store it somewhere to be retrieved later. We will use GCP’s Cloud Storage.
If you’re not familiar with GCP’s Cloud Storage and Python’s Cloud Storage API, they are explained in the GCP Cloud Storage docs.
We generate the image like so:
With the image stored as a PIL object, we save it to file and upload it to a GCP Cloud Storage bucket using:
# !pip install google-cloud-storage
from google.cloud import storage

# set credentials
os.environ['GOOGLE_APPLICATION_CREDENTIALS'] = 'cloud-storage.json'
# connect to bucket (we named it 'hf-diffusion-images')
storage_client = storage.Client()
bucket = storage_client.get_bucket('hf-diffusion-images')
# create object blob
blob = bucket.blob(f'images/{_id}.png')
# save image to file
im.save(f'{_id}.png', format='png')
# upload to blob
blob.upload_from_filename(f'{_id}.png')
That covers most of our logic with embeddings, vector search, and the image storage component. The next step is applying this at scale.
Stable Diffusion Pipeline
We could build a frontend and let users begin generating images right away. Yet, with just "A person surfing" currently indexed, the benefits of retrieval when possible are unlikely to be used.
For now, we need far more records indexed to increase the probability of a user entering a prompt similar to those already indexed.
To get started with this, we build an index using existing prompt datasets found on Hugging Face Datasets, like the bartman081523/stable-diffusion-discord-prompts dataset.
This dataset alone contains nearly 4M prompts. Many of these can be nonsensical or low-quality — this is particularly noticeable among short prompts. So, to improve quality, we filter for longer prompts.
Doing this, we are still left with a huge 3.56M prompts. More than enough to populate our index.
Generating Records at Scale
Our code for building the index requires the prompt vectors and the generated images. As before, we use the StableDiffusionPipeline:
Because we already know what prompts to use, we perform this and successive steps in batches. Allowing us to process many prompts in parallel and speeding up the process.
After generating the images, we must give each record a unique ID. This ID is used for storage in both Pinecone and Cloud Storage — as we did for the single "a person surfing" example earlier.
We upload the image files to Cloud Storage:
for _id, im in zip(ids, out.images):
       im.save(f"tmp.png")
   # connect to target blob in cloud storage
   blob = bucket.blob(f"{_id}.png")
   # upload
   blob.upload_from_filename(f"{_id}.png")
Then insert the vectors and respective metadata in Pinecone:
# tokenize prompts
text_inputs = pipe.tokenizer(
       prompts, padding=True, truncation=True,
       return_tensors='pt'
)
# get embeddings
text_embeds = pipe.text_encoder(**text_inputs)
# mean pool
text_embeds = text_embeds.pooler_output.cpu().tolist()
# create metadata
metadata = [{'prompt': prompt} for prompt in prompts]
# add to pinecone
index.upsert(zip(ids, text_embeds, metadata))
We repeat this over tens of thousands, millions, or more records. After this, new prompt vectors are reasonably likely to collide with existing vectors in the vector space.
All that remains is a way for users to enter prompts.
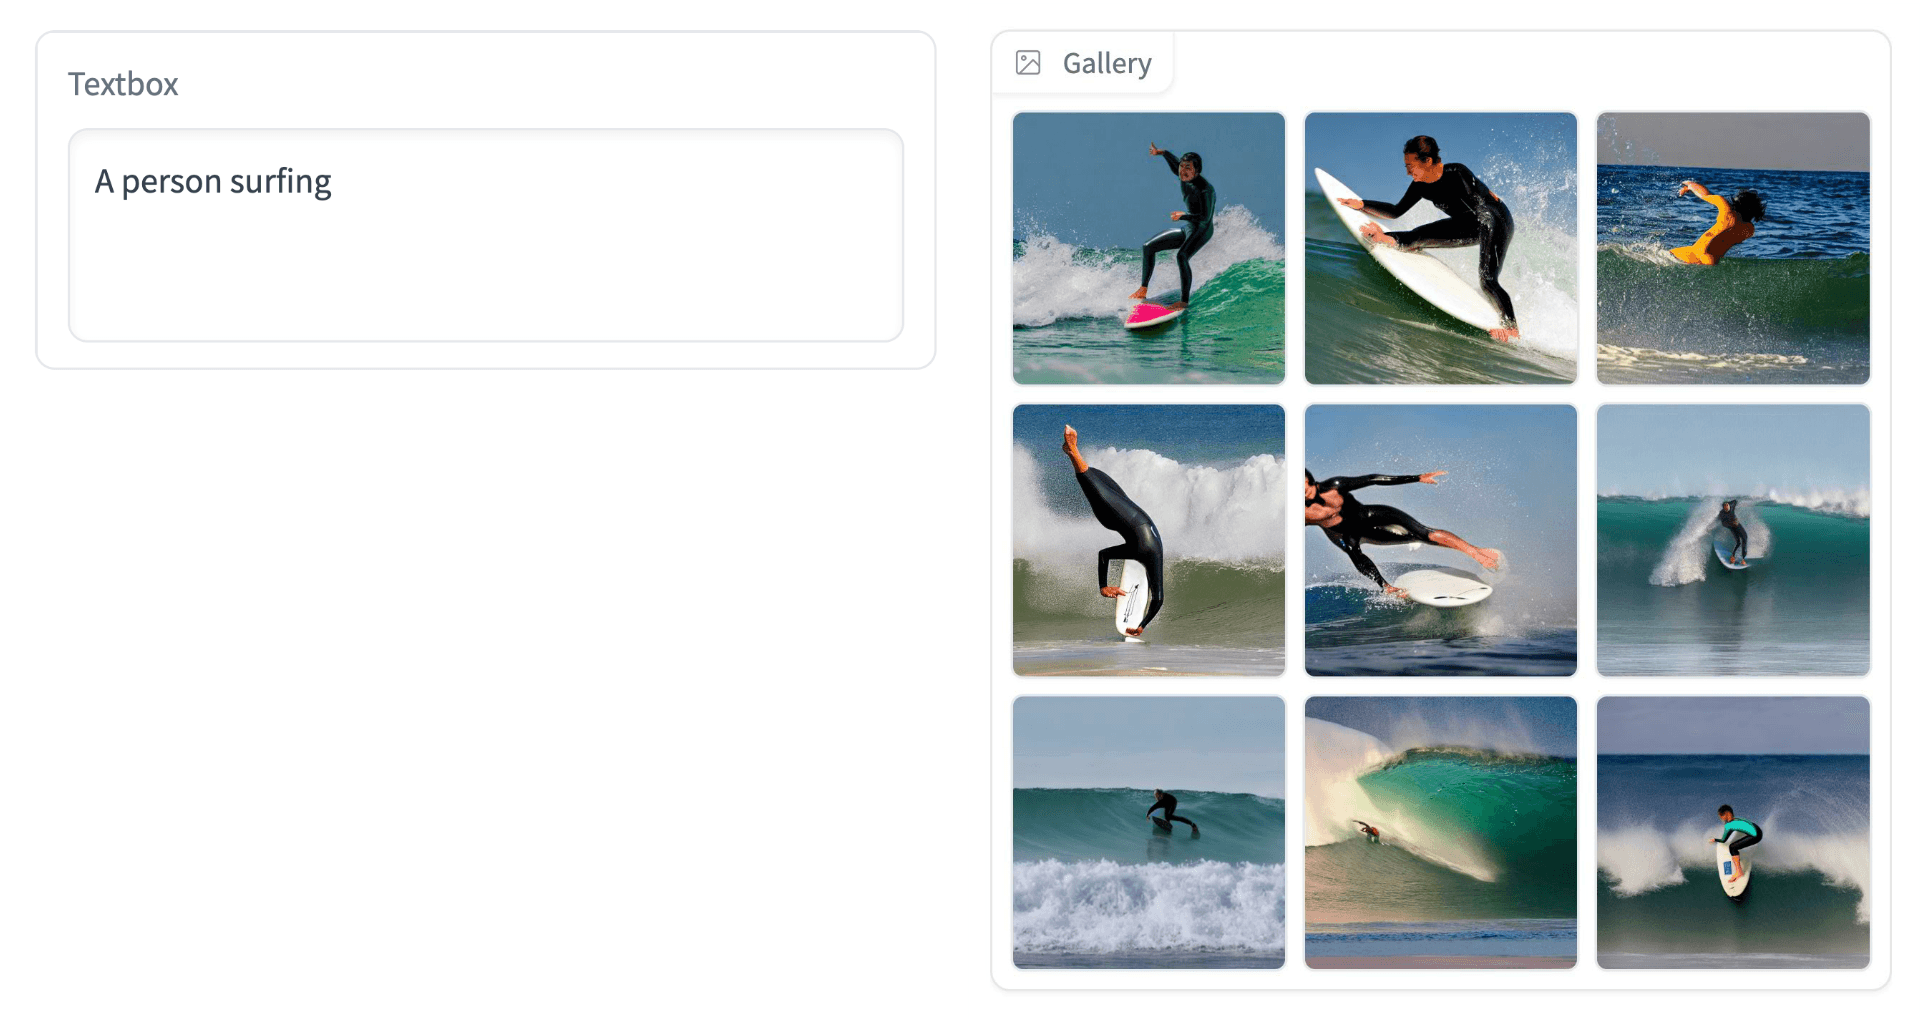
Dream Cacher App
The app is built using Gradio blocks and is relatively simple, consisting of four components:
gr.TextInputgr.Buttongr.Dataframegr.Gallery
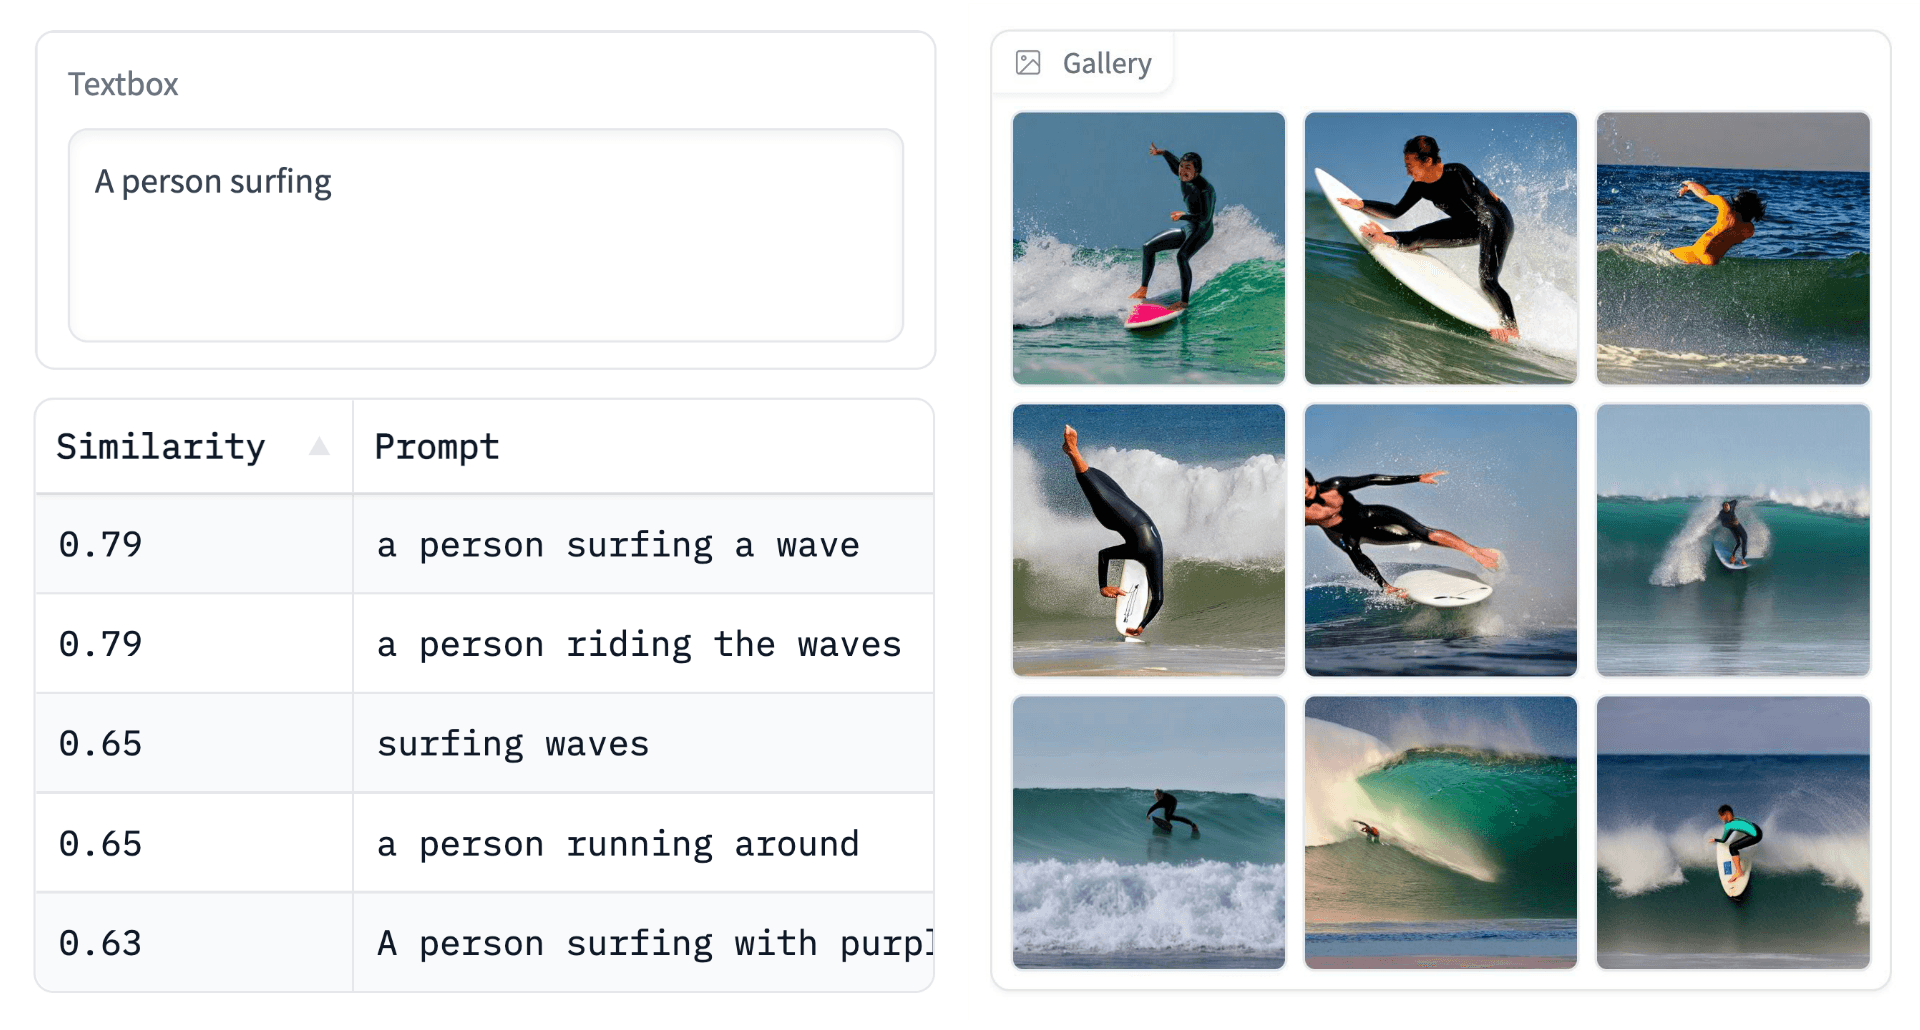
From these, we have two key features. The prompt recommendation is triggered every time the gr.TextInput value changes and is displayed in gr.Dataframe. The image search/diffusion is triggered by the search gr.Button and displayed in gr.Gallery.
Because both images and prompts are attached as metadata to vectors, the prompt recommendation and image retrieval are pulling records from the same Pinecone index. They differ because the image retrieval process also downloads the stored images from GCP’s Cloud Storage.
from PIL import Image

# retrieve most similar records
xc = index.query(
   embeds, top_k=9, include_metadata=True
)
# get IDs
ids = [match['id'] for match in xc['matches']]
images = []
# begin retrieving images and append to 'images' list
for _id in ids:
   blob = bucket.blob(f'/images/{_id}.png').download_as_string()
   # convert to 'in-memory file'
   blob_byes = io.BytesIO(blob)
   # open image as PIL object
   im = Image.open(blob_bytes)
   images.append(im)
These images are then passed as a list of PIL objects to Gradio’s gr.Gallery component.
We have everything needed and can deploy the app using Hugging Face Spaces.
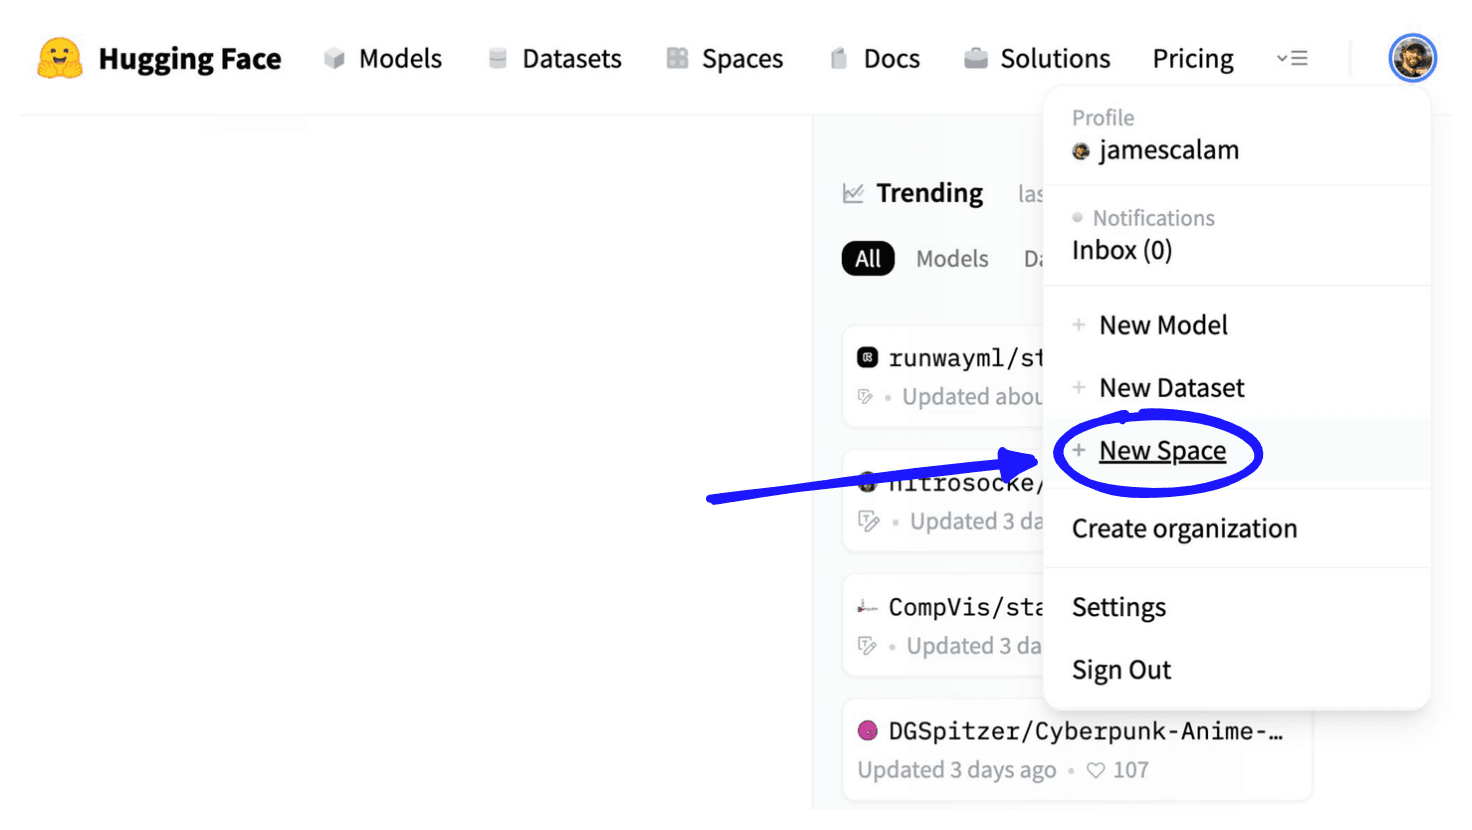
To do so, we sign up for an account at huggingface.co > click Spaces > enter space details and use “Gradio” as the Space SDK.
From here we add our Gradio app code to an app.py file:
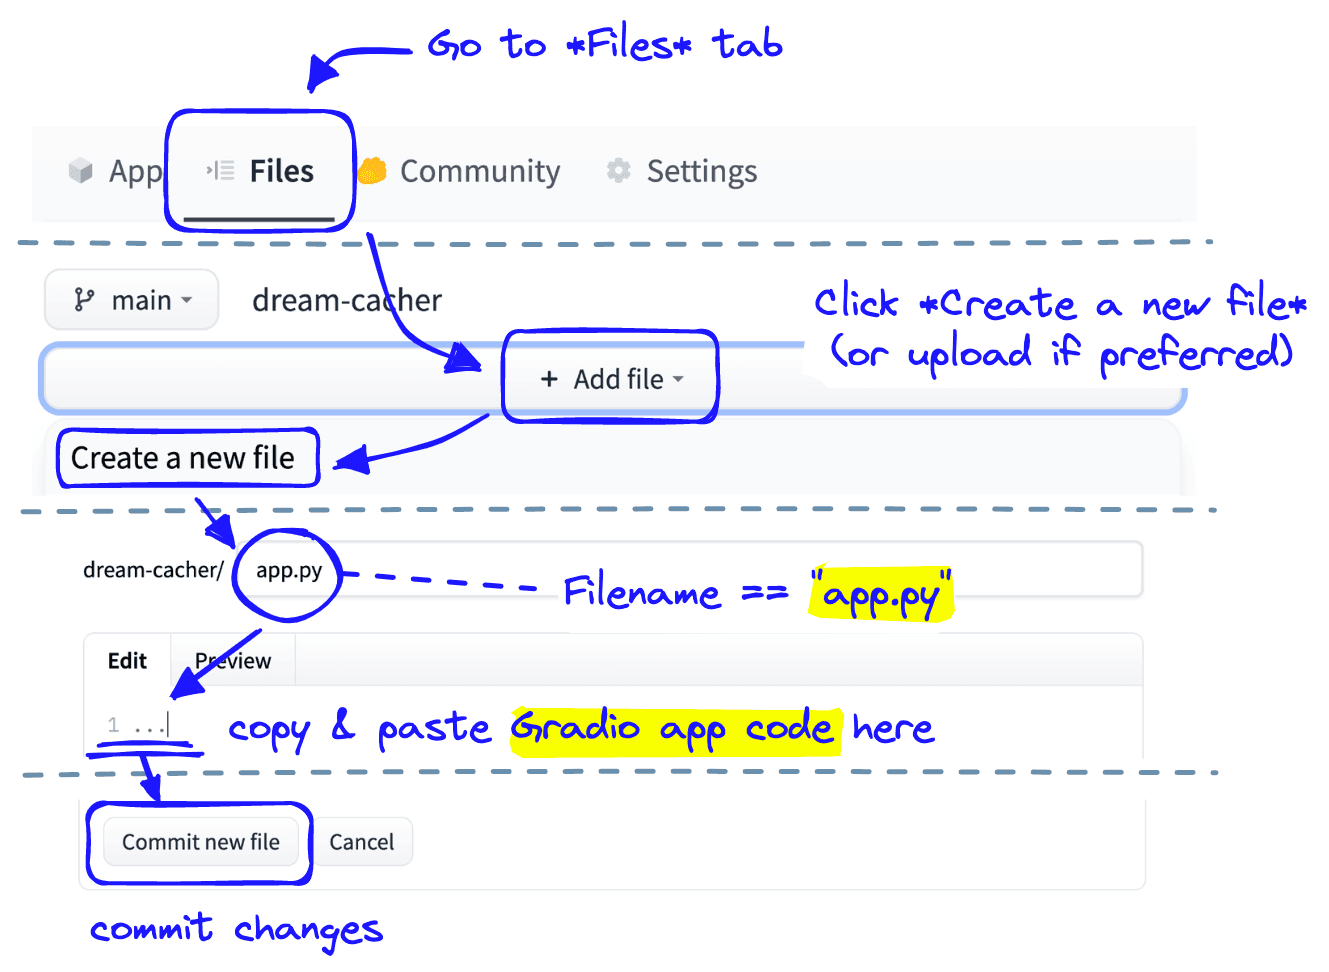
We repeat the Create a new file process for a requirements.txt file and specify the modules that must be installed:
diffusers transformers --extra-index-url https://download.pytorch.org/whl/cu113 torch google-cloud-storage pinecone-client
Our app must communicate with our private Pinecone index and private Cloud Storage. To add API keys or secret tokens to Hugging Face Spaces, we open the Settings tab and add Repo secrets.
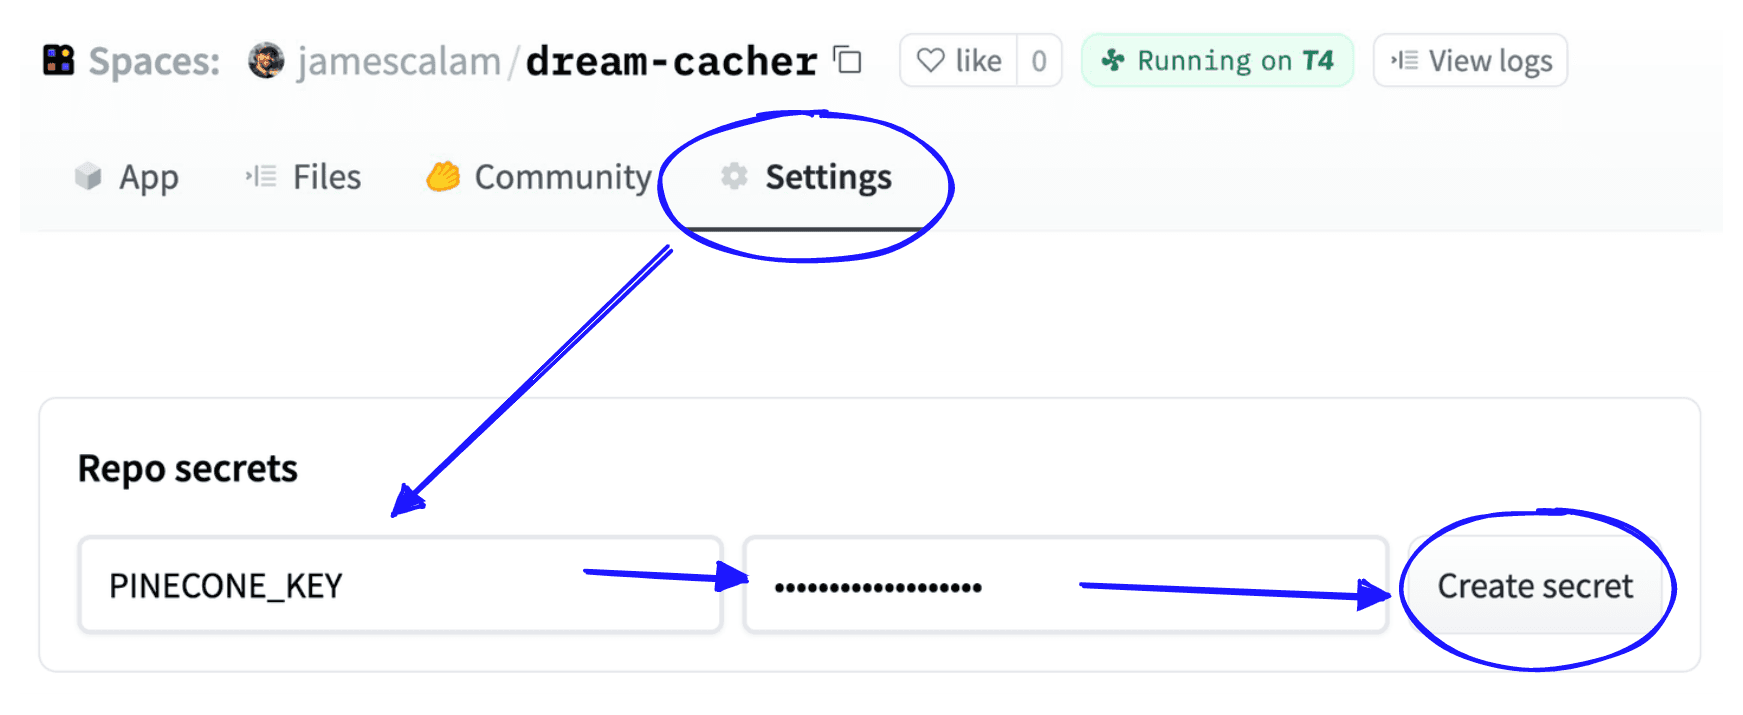
These are stored as environment variables in our app deployment, accessible via Python with os.environ["<SECRET_NAME>"].
Because Cloud Storage requires a local JSON file with connection details and auth codes, we cannot enter this information directly inside Repo secrets. Instead, we encrypt the file with the cryptography module:
import json
from cryptography.fernet import Fernet

# load secrets JSON file
with open('cloud-storage-secrets.json', 'r', encoding='utf-8') as fp:
   api = json.load(fp)
# convert secrets JSON to string
keys_str = json.dumps(api, indent=4)

# initialize key to be used for encryption/decryption
key = Fernet.generate_key()
fernet = Fernet(key)

# create encrypted secrets JSON
encrypted = fernet.encrypt(keys_str.encode())
# save to file
with open('cloud-storage.encrypted', 'wb') as fp:
   fp.write(encrypted)
We save the encrypted secrets to file and upload them again to our Hugging Face space. To allow our app.py script to decrypt the file, we must add the key value to our Repo secrets under DECRYPTION_KEY.
From there, we decrypt the file during deployment and initialize our Cloud Storage connection like so:
from cryptography.fernet import Fernet
from google.cloud import storage

# decrypt Storage Cloud credentials
fernet = Fernet(os.environ['DECRYPTION_KEY'])

with open('cloud-storage.encrypted', 'rb') as fp:
   encrypted = fp.read()
   creds = json.loads(fernet.decrypt(encrypted).decode())
# then save creds to file
with open('cloud-storage.json', 'w', encoding='utf-8') as fp:
   fp.write(json.dumps(creds, indent=4))
# connect to Cloud Storage
os.environ['GOOGLE_APPLICATION_CREDENTIALS'] = 'cloud-storage.json'
storage_client = storage.Client()
bucket = storage_client.get_bucket('hf-diffusion-images')
From there, everything is fully prepared, and we simply wait for Hugging Face to build and deploy our app…

With that, our app is ready-to-go and accessible to the world.
That’s it for this walkthrough to building a diffusion generation and retriever app, or dream cacher the latest NLP and vector search technology.
References
[1] L. Debut, Diffusers 0.1.2 Release Notes (2022), Hugging Face Diffusers Repo
[2] A. Karpathy, Stable Diffusion dreams of steam punk neural networks (2022), YouTube
[3] B. Poole, et al., DreamFusion: Text-to-3D using 2D Diffusion (2022), ArXiV
[4] Corridor Crew, Recreating Spiderverse with AI (2022), YouTube
Was this article helpful?