Deploying Open Source LLMs for RAG with SageMaker
We are developing the future with Large Language Models (LLMs). Companies worldwide are moving fast to integrate LLMs into existing products and even creating entirely new products using LLMs.
Despite the seemingly unstoppable adoption of LLMs across industries, they're just one component of a broader technology ecosystem that is powering the new AI wave. An LLM alone is not all that useful.
Would you use Google if it was 10x slower and only allowed you to search through data from September 2021 or earlier? A slow, outdated Google would not be as compelling as the Google we use today.
LLMs alone are like our slow, outdated Google. With the correct hardware, some of the latest LLMs, like Meta's Llama 2, will either not run or take minutes to generate a paragraph of text. With a knowledge base, GPT 4 (v0316) can tell us about the world pre-September 2021.
These limitations are significant. Yet, we can overcome these issues by augmenting our LLM with the right components. In this article, we'll explore how to deploy open-access LLMs using AWS Sagemaker and keep our LLMs up to date with relevant information using the Pinecone vector database.
Many conversational AI use cases require LLMs like Llama 2, Flan T5, and Bloom to respond to user queries. These models rely on parametric knowledge to answer questions.
Parametric knowledge is powerful but limited. The model learns this knowledge during training and encodes it into the model parameters. We must retrain the LLM to update this knowledge — which takes a lot of time and money.
Fortunately, we can also use source knowledge to inform our LLMs. Source knowledge refers to information fed into the LLM via an input prompt.
Retrieval Augmented Generation (RAG) is a popular approach to providing our LLMs with relevant source knowledge. Using RAG, we retrieve relevant information from an external data source and feed that information into the LLM.
Deploying LLMs in SageMaker
Pinecone will handle the retrieval component of RAG for us, but we still need two more critical components: somewhere to run our LLM inference and somewhere to run our embedding model.
SageMaker provides inference hardware, easily deployable images for LLMs like Llama 2, and integrations with popular model providers like Hugging Face.
SageMaker provides the ideal environment for developing RAG-enabled LLM pipelines. First, create a SageMaker domain and open a Jupyter Studio notebook. We first install prerequisite libraries:
!pip install -qU \
  sagemaker \
  pinecone-client==2.2.1 \
  ipywidgets==7.0.0
Deploying an LLM
There are two approaches to deploying an LLM that we will discuss here. The first is via the HuggingFaceModel object. We use this when deploying LLMs (and embedding models) directly from the Hugging Face model hub.
For example, we could create a deployable config for the google/flan-t5-xl or meta-llama/Llama-2-7b models like so:
import sagemaker
from sagemaker.huggingface import (
    HuggingFaceModel,
    get_huggingface_llm_image_uri
)

role = sagemaker.get_execution_role()

hub_config = {
    'HF_MODEL_ID':'meta-llama/Llama-2-7b', # model_id from hf.co/models
    'HF_TASK':'text-generation' # NLP task you want to use for predictions
}

# retrieve the llm image uri
llm_image = get_huggingface_llm_image_uri(
    "huggingface",
    version="0.8.2"
)

my_model = HuggingFaceModel(
    env=hub_config,
    role=role, # iam role with permissions to create an Endpoint
    image_uri=llm_image
)
When deploying models directly from Hugging Face like this, we must initialize the configuration my_model with:
- An
envconfig tells us which model we want to use and for what task. - Our SageMaker execution
rolegives us permissions to deploy our model. - An
image_uriis an image config specifically for deploying LLMs from Hugging Face.
Alternatively, SageMaker has a set of models directly compatible with a simpler JumpStartModel object. Many popular LLMs like Llama 2 are supported by this, which we initialize like so:
from sagemaker.jumpstart.model import JumpStartModel

my_model = JumpStartModel(
    model_id="meta-textgeneration-llama-2-7b-f"
)
For both versions of my_model, we can go ahead and deploy them like so:
llm = huggingface_model.deploy(
    initial_instance_count=1,
    instance_type="ml.g5.4xlarge",
    endpoint_name="llama-2-demo"
)
Querying the LLM
With our initialized LLM endpoint, we can begin querying it. The format of our queries may vary (particularly between conversational and non-conversational LLMs), but the process is generally the same. For the Hugging Face model, we do the following:
(See this notebook to see an example with the Llama 2 conversational LLM)
The generated answer we're receiving here doesn't make much sense — it is a hallucination.
Adding Context
Llama 2 attempts to answer our question based solely on internal parametric knowledge. Clearly, the model parameters do not store knowledge of which instances we can with managed spot training in SageMaker.
To answer this question correctly, we must use source knowledge. That is, we give additional information to the LLM via the prompt. Let's add that information directly as additional context for the model.
We now see the correct answer to our question; that was easy! However, a user is unlikely to insert contexts into their prompts — in that case, they would already know the answer to their question.
Rather than manually inserting a single context, we need to automatically identify relevant information from a more extensive database of information. For that, we need RAG.
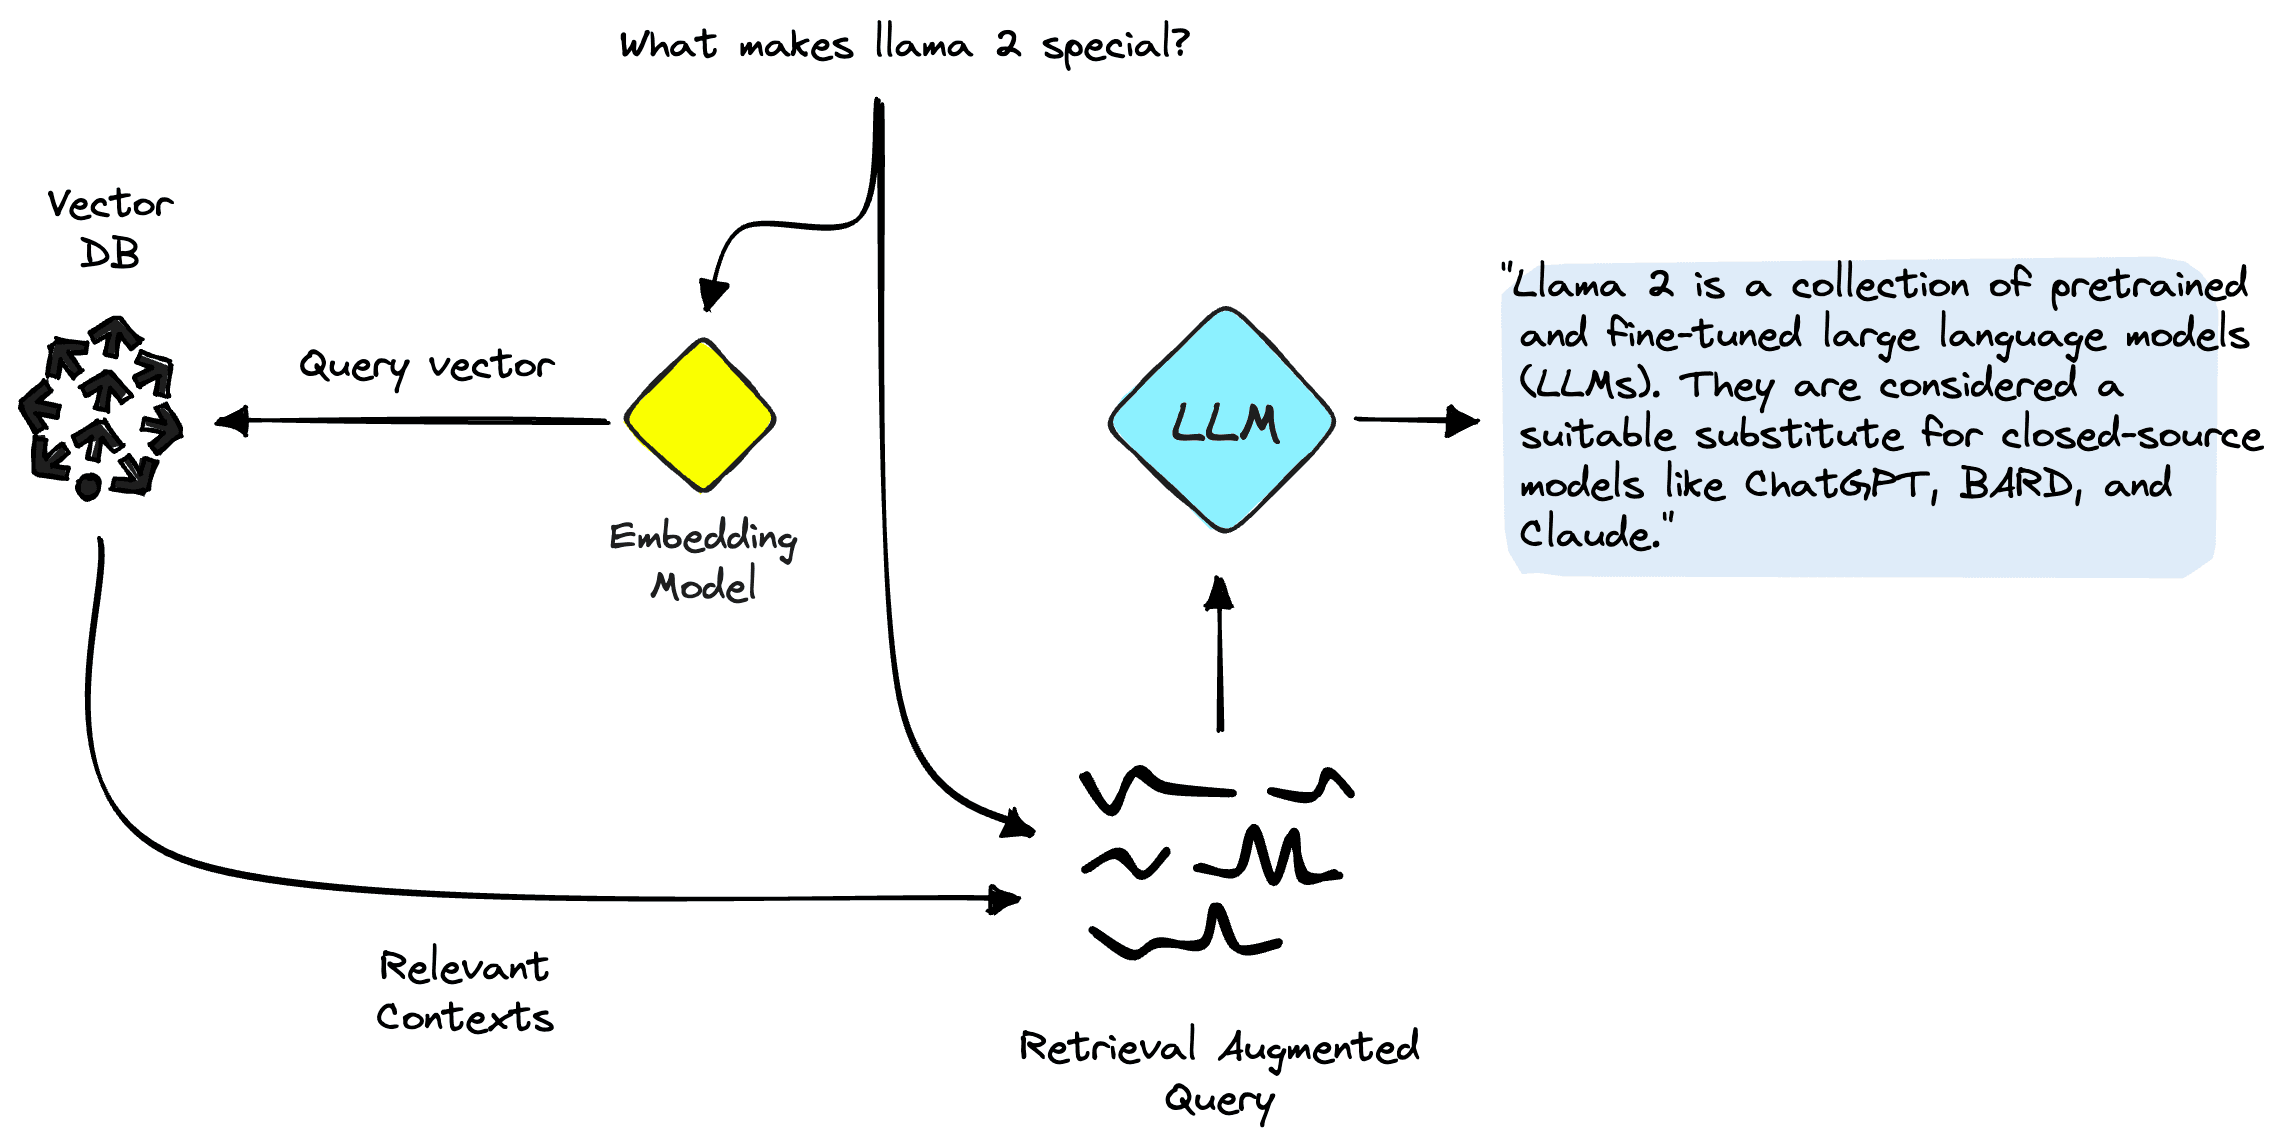
Retrieval Augmented Generation
With RAG, we will encode our database of information into a vector space where the proximity between vectors represents their relevance / semantic similarity to one another. Using this vector space as a "knowledge base", we can take a new user query, encode it into the same vector space, and retrieve the most relevant records previously indexed.
After retrieving these relevant records, we take a few of them and insert them into our LLM prompt as additional context — giving our LLM highly relevant source knowledge.
We can break these components down into two steps:
- Indexing is where we populate our vector index with information from our dataset.
- Retrieval happens at query time and is where we retrieve relevant information from the vector index.
Both steps require an embedding model to translate our human-readable plain text into semantic vector space. We will use the highly efficient MiniLM sentence transformer from Hugging Face. This model is not an LLM and therefore is not initialized in the same way as our Llama 2 model.
hub_config = {
    'HF_MODEL_ID': 'sentence-transformers/all-MiniLM-L6-v2', # model_id from hf.co/models
    'HF_TASK': 'feature-extraction'
}

huggingface_model = HuggingFaceModel(
    env=hub_config,
    role=role,
    transformers_version="4.6", # transformers version used
    pytorch_version="1.7", # pytorch version used
    py_version="py36", # python version of the DLC
)
In the hub_config, we specify the model ID as before, but for the task, we use 'feature-extraction' because we are generating vector embeddings — not text like our LLM. Following this, we initialize the model config with HuggingFaceModel as before, but this time without the LLM image and with some version parameters.
encoder = huggingface_model.deploy(
    initial_instance_count=1,
    instance_type="ml.t2.large",
    endpoint_name="minilm-demo"
)
We deploy the model again with deploy, using the smaller (CPU only) instance of ml.t2.large. The reason for this is that the MiniLM model is tiny, so it does not require a lot of memory. MiniLM also doesn't need a GPU because it can quickly create embeddings even on a CPU. If preferred, we could run the model faster on GPU.
To create our embeddings, we use the predict method and pass a list of contexts to encode via the 'inputs' key like so:
out = encoder.predict({
    "inputs": ["some text here", "some more text goes here too"]
})
We passed two input contexts here, returning two context vector embeddings:
The embedding dimensionality of the MiniLM model is 384. That means each vector embedding MiniLM outputs should have a dimensionality of 384. However, if we take a look at the length of our embeddings, we will see something strange:
We see two lists containing eight items each; what is happening?
MiniLM first processes text in a tokenization step. This tokenization transforms our human-readable plain text into a list of model-readable token IDs. These token IDs each represent a word or sub-word from our input text, like this:
In the output features of the model, we get the token-level embeddings. If we look at one of these embeddings, we'll find the expected dimensionality of 384:
Perfect! Now we need to transform these token-level embeddings into document-level embeddings. To do this, we take the mean values across each vector dimension.
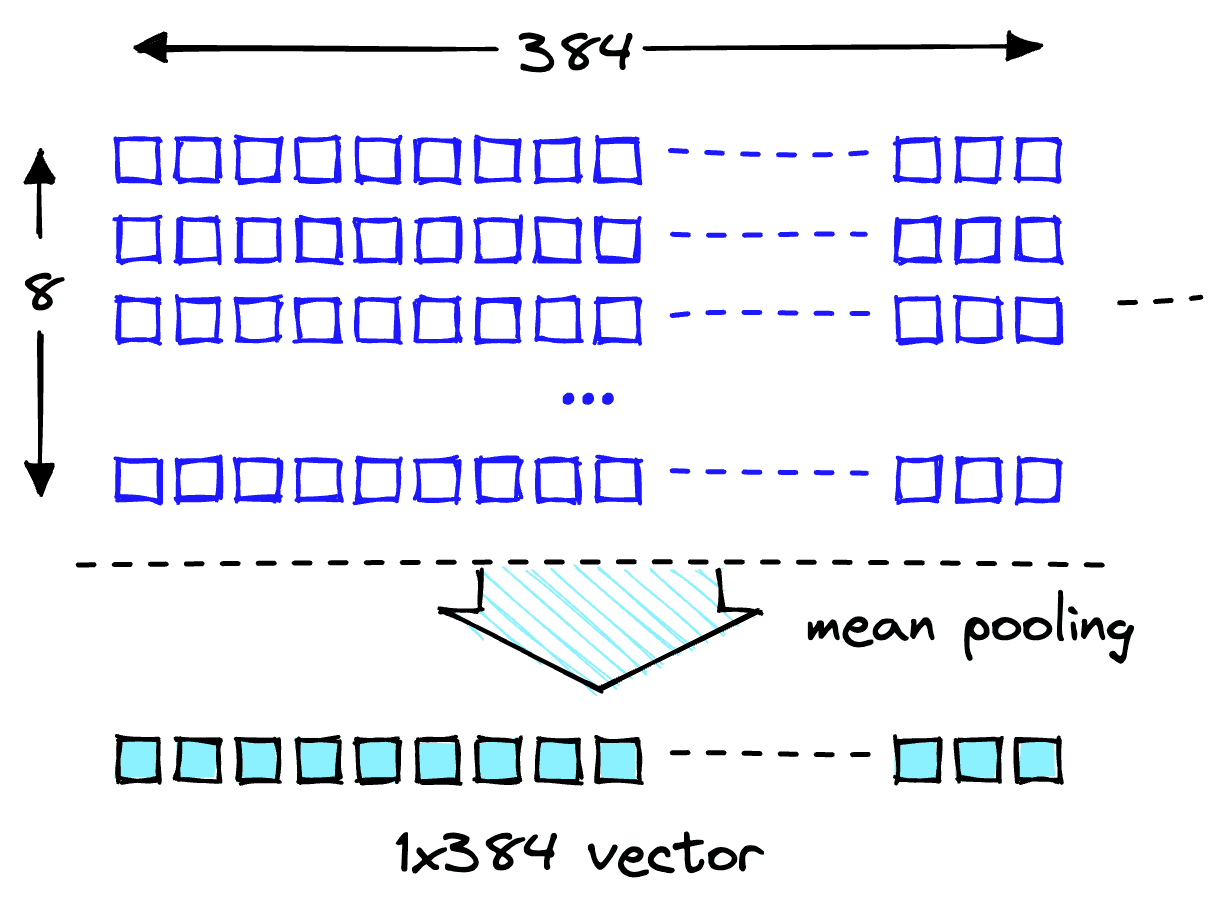
Now we have two 384-dimensional vector embeddings, one for each input text. To make our lives easier, we will wrap the encoding process into a single function:
from typing import List

def embed_docs(docs: List[str]) -> List[List[float]]:
    out = encoder.predict({'inputs': docs})
    embeddings = np.mean(np.array(out), axis=1)
    return embeddings.tolist()
Downloading the Dataset
We download the Amazon SageMaker FAQs as our knowledge base. The data contains both question and answer columns.
When performing our search, we're looking for answers, so we can drop the Question column.
Our dataset and the embedding pipeline are ready. Now all we need is somewhere to store those embeddings.
Indexing
We'll be using the Pinecone vector database to store our vector embeddings and search through them efficiently at scale. To create a database, we need a free API key.
With that, we have connected to our Pinecone vector database. We must create a single vector index (similar to a table in traditional DBs). We will name the index retrieval-augmentation-aws. We must align the index dimension and metric parameters with those required by our embedding model (MiniLM in this case).
We are ready to begin inserting our data — to do this, we run the following:
With that, we populated our index and can begin querying it. Let's try again with our earlier question.
Looks great; we're returning relevant contexts to help us answer our question.
Augmenting the Prompt
We can use the retrieved contexts to augment our prompt. To do this, we should decide on a maximum amount of context to feed into our LLM. We will use 1000 characters. With this limit set, we can iteratively add each returned context to our prompt until we exceed the content length.
Now to feed the context_str into our LLM prompt:
This answer looks excellent! The logic works, so let's wrap it up into a single function to keep things clean.
def rag_query(question: str) -> str:
    # create query vec
    query_vec = embed_docs(question)[0]
    # query pinecone
    res = index.query(query_vec, top_k=5, include_metadata=True)
    # get contexts
    contexts = [match.metadata['text'] for match in res.matches]
    # build the multiple contexts string
    context_str = construct_context(contexts=contexts)
    # create our retrieval augmented prompt
    text_input = prompt_template.replace(
        "{context}", context_str
    ).replace(
        "{question}", question
    )
    # make prediction
    out = llm.predict({"inputs": text_input})
    return out[0]["generated_text"]
We can now ask questions like so:
Let's ask questions about things that are out of context and not contained within the dataset. We will find that thanks to our prompt specifying to use the context provided, the model will not hallucinate and instead honestly tell us that it does not know the answer.
That's it for our introduction to RAG with open-access LLMs on SageMaker. We've seen how to deploy SageMaker's Jumpstart models with Llama 2, Hugging Face LLMs, and even embedding models with MiniLM.
We implemented a complete end-to-end RAG pipeline using our open-access models and a Pinecone vector index. Using this, we minimize hallucinations, keep our LLM knowledge up to date, and ultimately enhance the user experience and trust in our systems.
Resources
Hugging Face RAG Example, Pinecone Examples Repo
JumpStart Llama 2 RAG Example, Pinecone Examples Repo
Was this article helpful?