This Learn article was written by Sohan Maheshwar, Lead Developer Advocate at AuthZed.
Securing Knowledge Retrieval using SpiceDB and ReBAC
Retrieval-Augmented Generation (RAG) pipelines are powerful tools for grounding large language models (LLMs) in private or domain-specific knowledge. By fetching relevant documents from a vector database and including them in the model’s prompt, RAG enables more accurate and context-aware answers.
However, this capability introduces a serious risk: information leakage. If different users have different levels of access to data, as they do in most real-world systems, your RAG pipeline must enforce those access boundaries. In fact, OWASP lists Sensitive Information Disclosure, Excessive Agency & Vector and Embedding Weaknesses in their list of Top 10 Risks for Large Language Model Applications.
That’s where access control comes in. Instead of trusting the RAG system to “just do the right thing,” we can integrate an authorization layer that determines which resources a given identity can access. In this post, we’ll explore how to achieve that using SpiceDB, an open-source, Zanzibar-inspired permission system.
We’ll cover how SpiceDB works, how to model permissions, and how to apply access control both before and after retrieval in a RAG pipeline built with Pinecone and OpenAI embeddings.
Authentication and Authorization Primer
Before we get to the implementation, let’s review two foundational concepts: authentication and authorization.
- Authentication: Verifying who a user is. Usually handled through credentials, OAuth, or an identity provider.
- Authorization: Deciding what that user can do once authenticated — which resources they can read, write, or modify.
Several access control paradigms exist:
- ACL (Access Control Lists): Simple user-resource mappings.
- RBAC (Role-Based Access Control): Permissions granted through roles like “admin” or “editor.”
- ABAC (Attribute-Based Access Control): Decisions based on attributes such as department, geography, or clearance.
- ReBAC (Relationship-Based Access Control): Permissions determined by relationships between users and resources.
For large, dynamic, and context-rich applications (such as RAG pipelines) ReBAC provides the flexibility and scalability we need. It models access as a graph of relationships rather than hard-coded rules.
Enter Google Zanzibar
Google Zanzibar is the internal authorization system that Google built to manage permissions across all their products and services. Think of it as the system that decides whether you can view a shared Google Doc, edit a file in Google Drive, or access a specific Google Cloud resource. Rather than each Google product implementing its own permission system, they all use Zanzibar as a shared service.
Zanzibar systems shine when the requirement is for:
- Low-latency
- High-throughput authorization checks
- Global consistency of relationship data
- Composable and hierarchical permission models
Turns out, RAG systems typically have these requirements. In addition, embeddings need to retain the permissions from where the data was originally sourced. This means that the permission system needs to be powerful and flexible enough to model all of the source systems' permission systems. These requirements make ReBAC & a Zanzibar-like system the perfect way to implement fine-grained permissions for RAG.
SpiceDB
While Zanzibar is an internal system at Google, there are open source implementations based on the whitepaper that Google released in 2019. Among those, SpiceDB is the most scalable and consistent open-source implementation of Google’s Zanzibar authorization model, used by businesses such as OpenAI, Workday, Turo, Netflix and more.
SpiceDB stores access relationships as a graph, where nodes represent entities (users, groups, documents) and edges represent relationships (like “viewer,” “editor,” or “owner”). Fundamentally, authorization logic can be reduced to asking a single question:
Is this actor allowed to perform this action on this resource?
In SpiceDB parlance, this actor and this resource are both Objects and this action is a Permission or Relation. Here’s a Google Docs style example where a user can be either a reader or a writer of a document. A reader can only read the document, whereas a writer can read and write the document.
You can represent this use case using a schema like this:
definition user {}

definition document {
    relation reader: user
    relation writer: user

    permission can_read = reader + writer
    permission can_write = writer
}
This defines:
useranddocumentobject types- Relations (
reader,writer) - Derived permissions (
can_read,can_write)
When a user requests access to a document, SpiceDB answers questions like:
“Can user:alice perform can_read on document:doc1?”
It evaluates the relationship graph in microseconds, allowing real-time authorization checks at massive scale.
In our RAG pipeline, we’ll use this to ensure that each document fetched from the vector store is checked against the access graph before it’s used in the model’s context.
Access Control for RAG Applications - Simulating a RAG Pipeline
We’ll now simulate a simple RAG setup using:
- OpenAI and Langchain for embeddings,
- Pinecone for vector similarity search, and
- SpiceDB for authorization.
This article distills the concepts of RAG and Authorization to a simple use case: we have a user ‘Kim’ that has access to two documents with IDs 123 and 456.
We query an LLM for information from one of the documents. We then remove Kim's permissions to view one of the documents and make the same query. If all goes well, the information should not be available to them.
1. Create a Pinecone Index
Let’s define a Pinecone serverless index that we’ll use to store our vectors:
pc = Pinecone(api_key=PINECONE_API_KEY)

index_name = "documents"
namespace_name = "authzed"

pc.create_index(
    name=index_name,
    dimension=1024,
    metric="cosine",
    spec=ServerlessSpec(
        cloud="aws",
        region="us-east-1"
    )
)
We are simulating a real-world RAG (retrieval-augmented generation) scenario by embedding 2 documents.
In this example, we also specify metadata like article_id to track which article the chunk comes from. The article_id is important for linking embeddings to objects that users are authorized on.
# Create a Document object that specifies our made up documents and specifies the document_id as metadata.

documents = [
    Document(
        page_content="The number of paid holidays is 50 per year",
        metadata={"article_id": "123"}
    ),
    Document(
        page_content="The revenue for Q4 2025 is one billion dollars!",
        metadata={"article_id": "456"}
    )
]


# Initialize LangChain embeddings
embeddings = PineconeEmbeddings(
    model="multilingual-e5-large",
    pinecone_api_key=PINECONE_API_KEY
)

# Create vector store and upsert both documents
docsearch = PineconeVectorStore.from_documents(
    documents=documents,
    index_name=index_name,
    embedding=embeddings,
    namespace=namespace_name
)
2. Installing SpiceDB
There are multiple ways of running an instance of SpiceDB after installing it.
To run it locally you can run the binary:
spicedb serve --grpc-preshared-key "t_your_token_here_1234567deadbeef"Or in a local Docker container:
docker run --rm -p 50051:50051 authzed/spicedb serve --grpc-preshared-key "t_your_token_here_1234567deadbeef"You could also use the AuthZed Cloud to create a SpiceDB Permissions System in the cloud for production purposes.
This article will assume a local instance of SpiceDB.
For our RAG pipeline, the schema below defines two object types, user and article. Users can relate to an article as a viewer and any user who is related to the article as a viewer has view permissions on the document.
def make_spicedb_client() -> Client:
    # For TLS environments, replace with bearer_token_credentials(...).
    return Client(
        target=SPICEDB_ENDPOINT,
        credentials=insecure_bearer_token_credentials(SPICEDB_TOKEN),
    )

client = make_spicedb_client()
print('SpiceDB client ready:', isinstance(client, Client))

SCHEMA = """definition user {}

definition article {
    relation viewer: user

    permission view = viewer
}"""

try:
    resp = await client.WriteSchema(WriteSchemaRequest(schema=SCHEMA))
except Exception as e:
    print(f"Write schema error: {type(e).__name__}: {e}")
3. Write Relationships to SpiceDB
Now, we write relationships to SpiceDB that specify that Kim is a viewer of document 123 and 456.
After these relationships are written, any permission checks to SpiceDB will reflect that Kim can view documents 123 and 456. In production, when a user creates a new document, a relationship is created between the user and that document.
try:
    resp = await (client.WriteRelationships(
        WriteRelationshipsRequest(
            updates=[
                RelationshipUpdate(
                    operation=RelationshipUpdate.Operation.OPERATION_TOUCH,
                    relationship=Relationship(
                        resource=ObjectReference(object_type="article", object_id="123"),
                        relation="viewer",
                        subject=SubjectReference(
                            object=ObjectReference(
                                object_type="user",
                                object_id="kim",
                            )
                        ),
                    ),
                ),
                RelationshipUpdate(
                    operation=RelationshipUpdate.Operation.OPERATION_TOUCH,
                    relationship=Relationship(
                        resource=ObjectReference(object_type="article", object_id="456"),
                        relation="viewer",
                        subject=SubjectReference(
                            object=ObjectReference(
                                object_type="user",
                                object_id="kim",
                            )
                        ),
                    ),
                ),
            ]
        )
    ))
except Exception as e:
    print(f"Write relationships error: {type(e).__name__}: {e}")
Authorization Techniques using ReBAC
There are two techniques of fine-grained authorization in RAG using SpiceDB:
- Pre-filter
- Post-Filter.
Let’s take a look at how both methods would work and when you would choose to use one over the other.
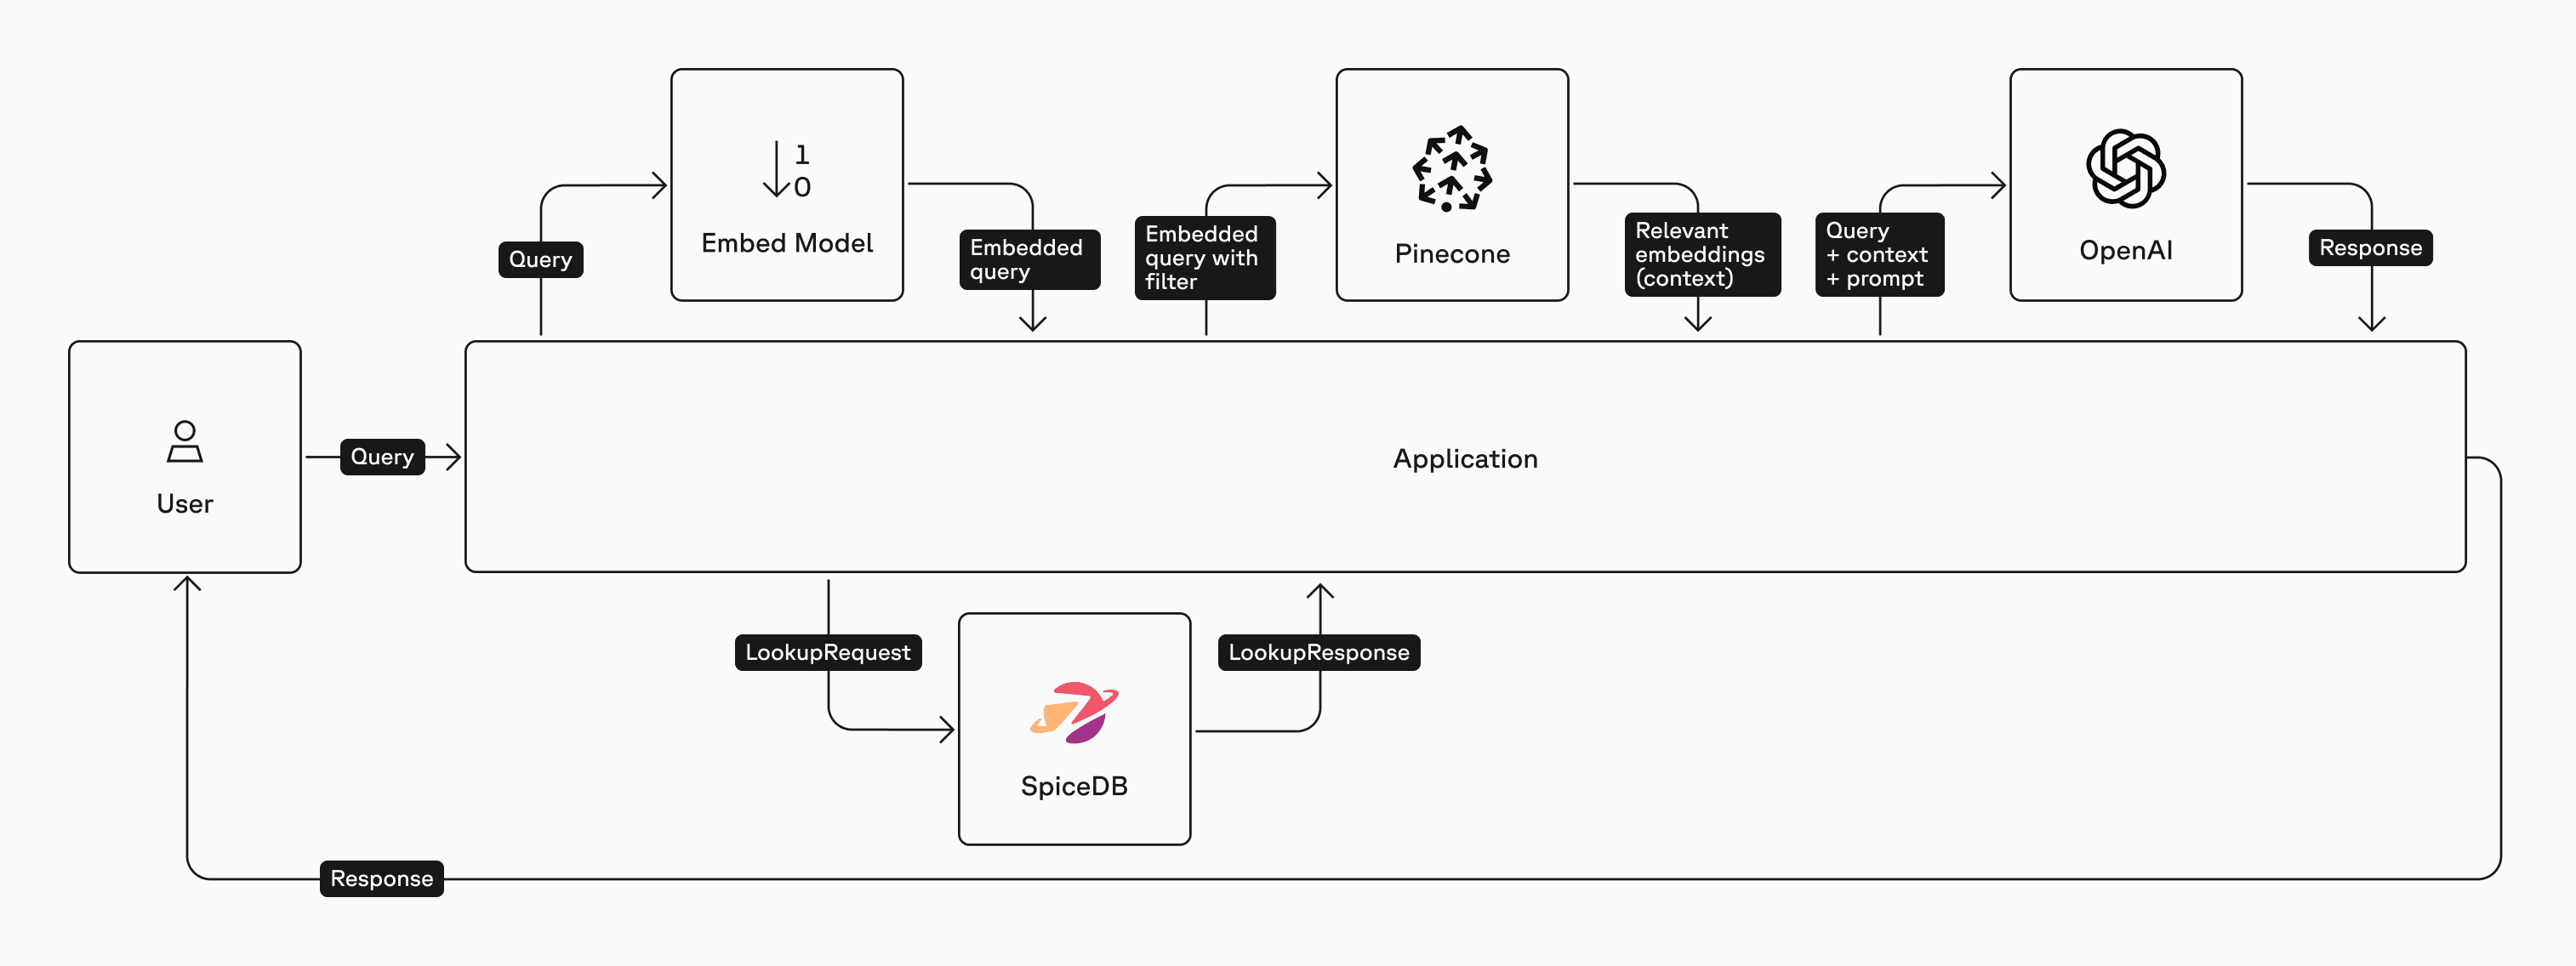
1. Pre-Filter Authorization
In this method we'll first query SpiceDB for a list of documents that Kim is allowed to view using the LookupResources API. Only the list of documents that the user can access is embedded and sent to the vector database ensuring that the user’s query to the LLM includes only documents they have permission to view.
Here is a high-level architecture diagram of the Pre-Filter method:
subject = SubjectReference(
    object=ObjectReference(
        object_type="user",
        object_id="kim",
    )
)

def lookupArticles():
    return client.LookupResources(
        LookupResourcesRequest(
            subject=subject,
            permission="view",
            resource_object_type="article",
        )
    )
try:
    resp = lookupArticles()

    authorized_articles = []

    async for response in resp:
            authorized_articles.append(response.resource_object_id)
except Exception as e:
    print(f"Lookup error: {type(e).__name__}: {e}")

print("Article IDs that Kim is authorized to view:")
print(authorized_articles)
The result of the lookupResources call looks like this:
Article IDs that Kim is authorized to view:
['123', '456']
We can now issue a prompt to GPT-5, enhanced with relevant data that the user is authorized to access. This ensures that the response is based on information the user is permitted to view.
We initialize a LangChain object to create an OpenAI chat model (this could be swapped out for any LLM). We also initialize a LangChain object for a Pinecone index with the OpenAI embeddings model. The retriever is a filter that restricts the search to authorized documents. We also add some basic prompt engineering to ensure the answer from the LLM is restricted to the context passed.
# Define the ask function
def ask():
    # Initialize a LangChain object for an OpenAI chat model.
    llm = ChatOpenAI(
        openai_api_key=OPENAI_API_KEY,
        model="gpt-5-nano-2025-08-07",
        temperature=1
    )

    # Initialize a LangChain object for a Pinecone index with an OpenAI embeddings model.
    knowledge = PineconeVectorStore.from_existing_index(
        index_name=index_name,
        namespace=namespace_name,
        embedding=OpenAIEmbeddings(
            openai_api_key=OPENAI_API_KEY,
            dimensions=1024,
            model="text-embedding-3-large"
        )
    )

    # Initialize a retriever
    retriever=knowledge.as_retriever(
            search_kwargs={
            "filter": {
                "article_id":
                    {"$in": authorized_articles},
            },
        }
    )

    # Initialize a string prompt template that let's us add context and a question.
    prompt = ChatPromptTemplate.from_template("""Answer the question below using the context:

    Context: {context}

    Question: {question}

    Answer: """)

    retrieval =  RunnableParallel(
        {"context": retriever, "question": RunnablePassthrough()}
    )

    chain = retrieval | prompt | llm | StrOutputParser()

    question = """How many paid holidays do I have this year"""

    print("Prompt: \n")
    print(question)
    print(chain.invoke(question))

#invoke the ask function
ask()
The LLM returns something like this:
Prompt:

How many paid holidays do I have this year
50 paid holidays.
You can also generate a summary of all the articles that Kim is authorized to view.
async def summarize_accessible_articles(user_id: str):

    # 1️⃣ Lookup articles
    subject = SubjectReference(
        object=ObjectReference(object_type="user", object_id=user_id)
    )
    response = client.LookupResources(
        LookupResourcesRequest(
            subject=subject,
            permission="view",
            resource_object_type="article",
        )
    )
    authorized_articles = [res.resource_object_id async for res in response]
    print(f"🔍 {user_id} can view articles: {authorized_articles}")

    if not authorized_articles:
        return "❌ No accessible articles."

    # 2️⃣ Setup LangChain retriever w/ filter
    knowledge = PineconeVectorStore.from_existing_index(
        index_name=index_name,
        namespace=namespace_name,
        embedding=OpenAIEmbeddings(
            openai_api_key=OPENAI_API_KEY,
            dimensions=1024,
            model="text-embedding-3-large"
        )
    )

    retriever = knowledge.as_retriever(
        search_kwargs={
            "filter": {"article_id": {"$in": authorized_articles}},
            "k": 100  # Ensure we get all matches
        }
    )

    docs = await retriever.ainvoke("Give me all the contents to summarize")

    if not docs:
        return "❌ No content found."

    combined_text = "\n\n".join([d.page_content for d in docs])

    # 3️⃣ Summarize using OpenAI
    summary_prompt = (
        "You are an AI assistant. Based ONLY on the following articles, "
        "generate a concise summary of their contents. Do not use any outside knowledge.\n\n"
        + combined_text
        + "\n\nSummary:"
    )

    openai_client = AsyncOpenAI(api_key=OPENAI_API_KEY)
    chat_response = await openai_client.chat.completions.create(
        messages=[{"role": "user", "content": summary_prompt}],
        model="gpt-5-nano-2025-08-07",
        temperature=1
    )

    return chat_response.choices[0].message.content

# Make the call to summarize_accessible_articles
summary = await summarize_accessible_articles("kim")
print("📄 Summary of accessible articles:")
print(summary)
And the resulting output:
🔍 Kim can view articles: ['123', '456']
📄 Summary of accessible articles:
Summary: There are 50 paid holidays per year, and Q4 2025 revenue is one billion dollars.
A Change in Permission
Let’s make a request when the user is NOT authorized to view the necessary contextual data. I.e let's see what happens when Kim is not authorized to view the document.
We can simulate this by deleting the relationship between Kim as a viewer to document 456. In production this would be an API call to the RelationshipUpdate API.
try:
    resp = await client.WriteRelationships(
        WriteRelationshipsRequest(
            updates=[
                RelationshipUpdate(
                    operation=RelationshipUpdate.Operation.OPERATION_DELETE,
                    relationship=Relationship(
                        resource=ObjectReference(object_type="article", object_id="123"),
                        relation="viewer",
                        subject=SubjectReference(
                            object=ObjectReference(
                                object_type="user",
                                object_id="kim",
                            )
                        ),
                    ),
                ),
            ]
        )
    )
except Exception as e:
    print(f"Write relationships error: {type(e).__name__}: {e}")
To confirm this update in permissions, run the LookupResources method again:
try:
        resp = lookupArticles()

        authorized_articles = []

        async for response in resp:
                authorized_articles.append(response.resource_object_id)
except Exception as e:
    print(f"Lookup error: {type(e).__name__}: {e}")

print("Documents that Kim can view:")
print(authorized_articles)
And the output:
Documents that Kim can view:
['456']
Now, we can run our earlier query again:
ask()With an output:
Prompt:

How many paid holidays do I have this year
The provided context does not specify any paid holidays; it only mentions Q4 2025 revenue (one billion dollars). If you need to know your paid holidays, please share your company’s holiday policy or HR information, or check your employee handbook/HR portal.
We no longer receive a completion that answers our question because Kim is no longer authorized to view the document that contains the context about the number of paid holidays in the year.
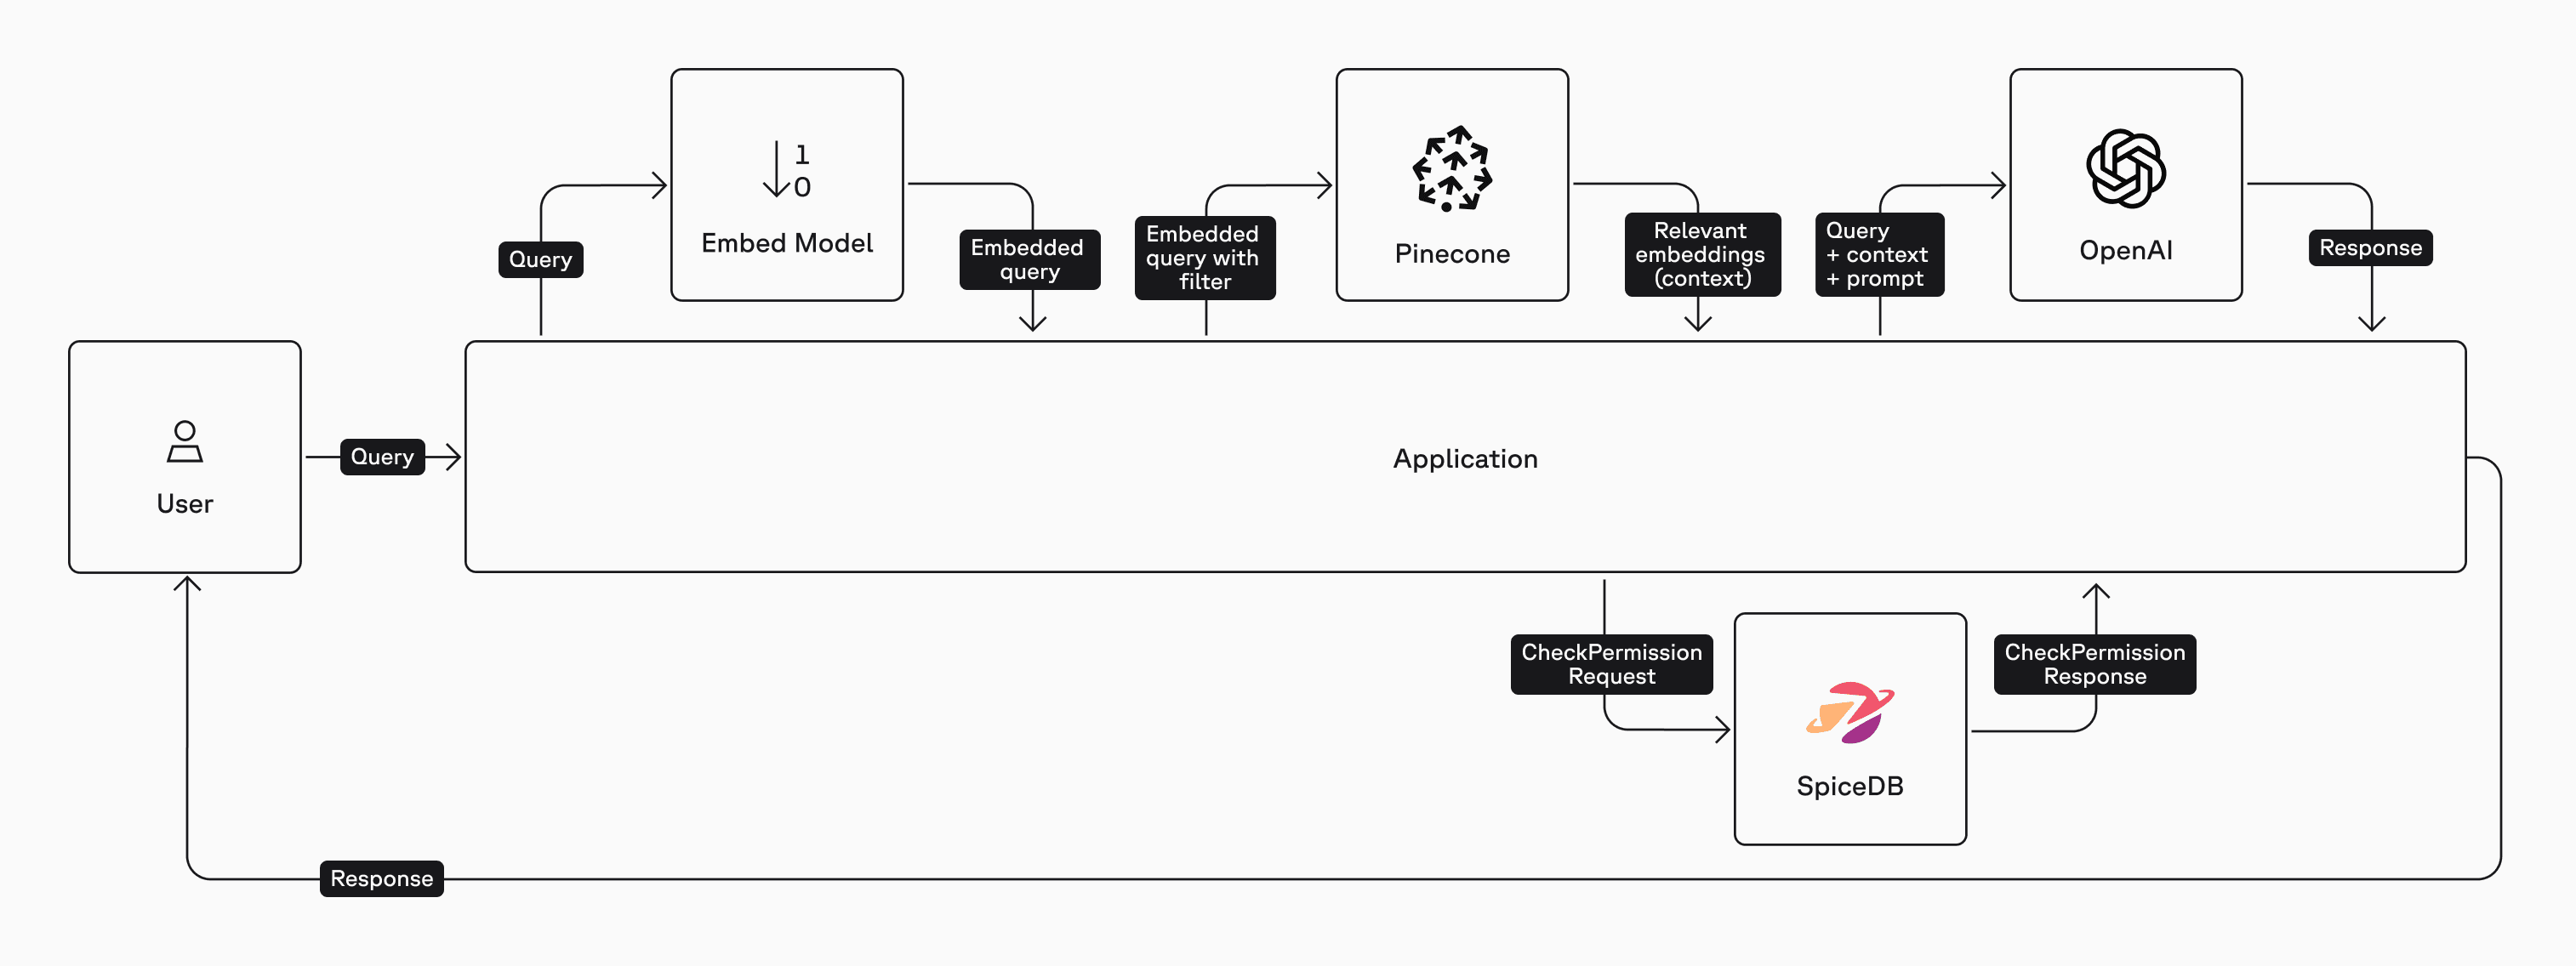
2. Post-Filter Method
We just completed the pre-filter method where we queried SpiceDB for all the documents that Kim was authorized to view. An alternate approach is to use the Post-Filter method where a CheckPermissionRequest is performed on every document ID that the vector database returns. The list of authorized documents is then passed on to the LLM for a response to the query.
Here is a high-level architecture diagram of the post-filter method:
Let's restore Kim's permissions to view document 123:
try:
    resp = await client.WriteRelationships(
        WriteRelationshipsRequest(
            updates=[
                RelationshipUpdate(
                    operation=RelationshipUpdate.Operation.OPERATION_TOUCH,
                    relationship=Relationship(
                        resource=ObjectReference(object_type="article", object_id="123"),
                        relation="viewer",
                        subject=SubjectReference(
                            object=ObjectReference(
                                object_type="user",
                                object_id="kim",
                            )
                        ),
                    ),
                ),
            ]
        )
    )
except Exception as e:
    print(f"Write relationships error: {type(e).__name__}: {e}")
Checking For Permissions
Define the method that gets the article_id for all documents and checks whether the user has permissions for each article. Compare and contrast this with the Pre-Filter method where we performed a lookup to get a list of documents that the user had access to.
async def filter_docs_with_spicedb(docs: List):
    filtered_docs = []
    for doc in docs:
        article_id = doc.metadata.get("article_id")
        resp = await client.CheckPermission(
            CheckPermissionRequest(
                subject=SubjectReference(
                    object=ObjectReference(
                        object_type="user",
                        object_id="kim",
                    ),
                ),
                resource=ObjectReference(
                    object_type="article",
                    object_id=str(article_id),
                ),
                permission="view",
            )
        )
        if resp.permissionship == CheckPermissionResponse.PERMISSIONSHIP_HAS_PERMISSION:
            filtered_docs.append(doc)

    return filtered_docs
All that's left is to build a Langchain object. This snippet sets up a retriever to fetch relevant documents, then applies a post-filter using SpiceDB to ensure only documents the user is authorized to view are included.
The RunnableLambda allows you to wrap a custom Python function (such as your authorization filter) so it can be used as a step in the LangChain pipeline. RunnablePassthrough simply passes its input through unchanged, making it useful for forwarding data (like the user's question) to the next step in the chain.
# Build the LangChain object
retriever = docsearch.as_retriever(search_kwargs={"k": 4})
llm = ChatOpenAI(api_key=OPENAI_API_KEY,
                 model="gpt-5-nano-2025-08-07",
                 temperature=1)

prompt = ChatPromptTemplate.from_messages([
    ("system", "You answer strictly from the provided context. If insufficient, say so."),
    ("human", "Question: {question}\n\nContext:\n{context}")
])

# Combine: retrieve → post-filter → prompt → LLM
graph = (
    RunnableParallel(
        {
            "context": retriever | RunnableLambda(filter_docs_with_spicedb),
            "question": RunnablePassthrough(),
        }
    )
    | prompt
    | llm
    | StrOutputParser()
)

print("✅ Retrieval + chain wired up")
Run this code to ask the LLM about some data in document 123. Since Kim does have permission to view this document, you should see the correct response.
question = "How many holidays can I take this year?"
result = await graph.ainvoke(question)
print(result)
The LLM responds with:
You can take up to 50 paid holidays this year.Let's repeat the same steps from the pre-filter technique by removing Kim's permission to view the document and then asking the same question. Since Kim doesn't have permission to view this document the LLM isn't able to provide an answer.
try:
    resp = await client.WriteRelationships(
        WriteRelationshipsRequest(
            updates=[
                RelationshipUpdate(
                    operation=RelationshipUpdate.Operation.OPERATION_DELETE,
                    relationship=Relationship(
                        resource=ObjectReference(object_type="article", object_id="123"),
                        relation="viewer",
                        subject=SubjectReference(
                            object=ObjectReference(
                                object_type="user",
                                object_id="kim",
                            )
                        ),
                    ),
                ),
            ]
        )
    )
except Exception as e:
    print(f"Write relationships error: {type(e).__name__}: {e}")


question = "How many holidays can I take this year?"
result = await graph.ainvoke(question)
print(result)
The response:
Insufficient information. The provided document only mentions Q4 2025 revenue and has no details about holidays or leave policies. If you share your company’s holiday/leave policy or HR guidelines, I can help interpret it.How do you choose between using the pre-filter or the post-filter technique? It Depends™️.
Typically, if you have a high positive hit-rate of documents from your vector database, a post-filter approach works well. Conversely, if you have a large corpus of documents in your RAG pipeline and a low positive hit-rate, the pre-filter approach is more efficient. It’s important to note that the lookupResources call is computationally more expensive than a checkPermission call. Also, you can perform multiple permission checks in a single call with CheckBulkPermissionsRequest. The general advice is to look at your SpiceDB metrics to determine which approach works best.
Takeaways
Access control is fundamental to building trustworthy AI systems. In RAG pipelines, where content retrieval directly influences model output, fine-grained authorization must be enforced at every layer.
By integrating SpiceDB into your RAG pipeline, you get:
- Centralized authorization modeled as relationships.
- Low-latency ReBAC checks optimized for high throughput.
- Clear separation of concerns between search, embedding, and access control.
Congratulations! You learned how to secure your RAG pipelines with fine-grained authorization using SpiceDB.
OpenAI uses SpiceDB and AuthZed Dedicated to secure 37 Billion documents for 5 Million users who use ChatGPT Connectors. Read more about it here: https://authzed.com/customers/openai.
Was this article helpful?